E12 M535i Project - 08-21-19 Update

Post your photos and videos here!
wkohler
Posts: 50924
Joined: Oct 05, 2006 11:04 PM
Location: Phönix, Arizona, USA
Contact:

Re: E12 M535i Project - 04-27-15 Update

Post by wkohler »

Adam W in MN wrote:Damn that's some fast progress. I'll be interested to see what you do on the front end, I never noticed any flexing with mine when the hood was raised?
I am going to assume that it might be because your car spent the first 25 years of it's life with the valance attached. This one didn't. Also, you care about your car. I'm still trying to find evidence of that from the previous owners of mine. Of course, I'm more careful than most people, so it likely won't be an issue and by the time the car came to me, it was missing the brackets that hold the top of the airdam flush to the grille support, so I think that might all go a long way towards adding some necessary rigidity. Maybe not. Either way, I got a good laugh out of it while the car was a turd. It's kinda not a turd now, so Mr. Serious is concerned. :|
Jelmer538i wrote:Same here with the E12 but I think it would be very easy to weld in some sheet metal there. Now there are huge, rough holes visible with the trunk open.
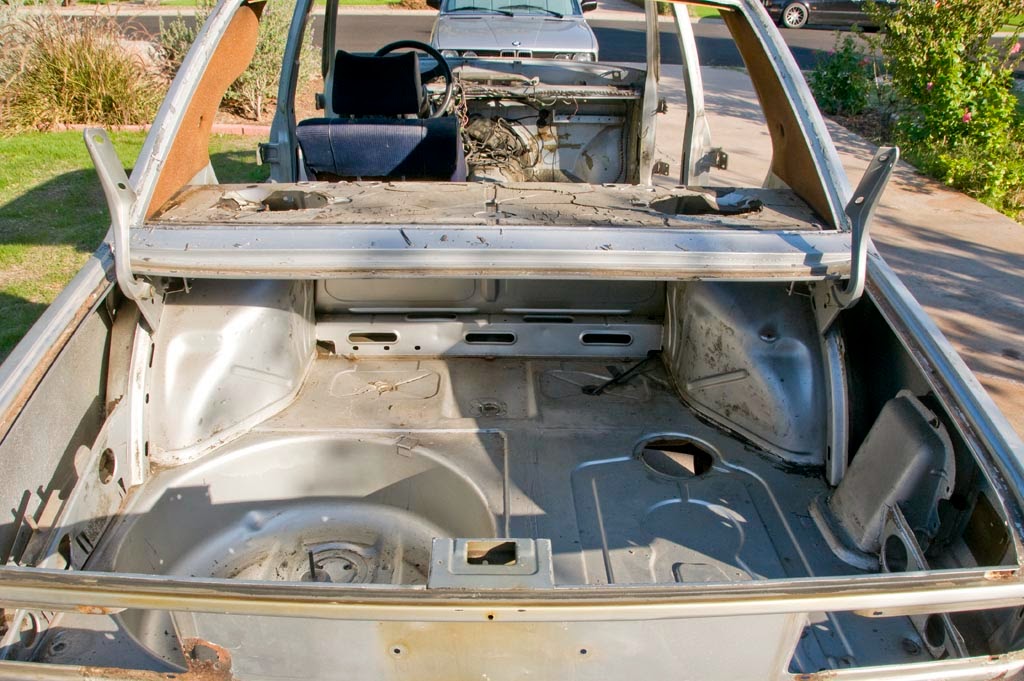
I really think only the people who ride in the trunk will pay attention to it, but it is something that does concern me. That's why I spent several hours tonight (much to the chagrin of my neighbors) cutting this out of the Super Eta:

Image

Image

About the only thing that went well was removing the rear window. I did that while I was on the phone. Mike loaned me a die grinder and a couple of cutting discs. Once I got all of the OSHA gear on, I discovered that I suck at this stuff. It was also right around that time where I had cut half of the back of the panel where I realized that there were a whole bunch of spot welds in the middle of the panel indicating that this would be a bit more involved than I was hoping. I would have drilled out all of the spot welds, but I had already done that cutting. Of course, I also discovered that I'm not sure how invasive I want to make this surgery on the E12. Then, sometime around 8 PM, I decided it would be a good idea to kill the person that cut the holes, but I decided I needed to keep working so they can live another day. So, I made more cuts with the sawzall, then drilled out all of the spot welds and apparently things that are spot-weldy in shape somehow even more weldy the two panels together so, it got a little messy on the edges. Then the two panels still didn't want to separate and eventually after being thoroughly pissed I got it out of the car around 10pm.

So, I have no idea what will happen now. I will show it to Mike. I also noticed that there is zero asphalt sound deadening in this super eta. None under the carpets or anything. Would have made a great track car. Oh well. I guess it still could. Haha.

Anyway, back to this morning, Mike called and wanted to make sure he got the oil cooler brackets welded on properly. I grabbed the oil cooler and drove out there. They were in the right place, though one was backwards, but that was easily remedied. Of course, I thought the cooler was pretty much empty as I had let it drain for a week or so after I pulled it out. Apparently, this oil cooler needs to take Dramamine since the bags and rags I put it in were soaked with oil when I got to the shop. Then, it decided to puke everywhere while it was there. Thanks. Of course, one critical thing was noticed when I tried to feed the cooler lines through the hole in the core support. There was no hole. Someone threw out the old core support after it was cut off the car. I'm not throwing out any names but it wasn't me. Some detective work was in order. I sent Paul Drake to Bakersfield. He brought me back a photo of the car I had taken when I was by the shop one day. Turns out, it's just a hole about the width of the hole for the frame rail in diameter and it was welting on it, so it didn't have a flange or anything fancy like that. Here's Mike fixing that:

Image

I used the real camera to show a photo of the hole since my iPhone says I'm out of space and won't let me take photos. I deleted fifty or so photos tonight to take the two of the parcel shelf. I have no idea how that works. Hopefully someone in a turtleneck can explain it.

This afternoon, I got these photos from Mike. He's running out of car to paint I guess. Materials budget on this is way more than many paint jobs. The paint is still wet here as it looks kinda lachssilbery.

Image

Image

Image

I have to say, I'm pretty happy. :) With the car.
Kyle in NO
Posts: 17638
Joined: Feb 12, 2006 12:00 PM
Location: Nasty Orleans------> Batten-Rooehjch------>More Souther LA

Re: E12 M535i Project - 04-28-15 Update

Post by Kyle in NO »

Very fap-worthy.
Adam W in MN
Posts: 5053
Joined: Feb 12, 2006 12:00 PM
Location: Don't waste my motherf***in' time!
Contact:

Re: E12 M535i Project - 04-28-15 Update

Post by Adam W in MN »

Extremely impressive! That cut-out of the rear parcel shelf, WOW, what a job.
ElGuappo
Posts: 8130
Joined: Feb 12, 2006 12:00 PM
Location: Sacramento, CA
Contact:

Re: E12 M535i Project - 04-28-15 Update

Post by ElGuappo »

This accelerated quickly, I heartily approve. :up:
cddallara
Posts: 3513
Joined: Apr 03, 2010 8:45 AM
Location: Lagunitas, Ca

Re: E12 M535i Project - 04-28-15 Update

Post by cddallara »

As usual, the captions are > or = the pics.
Eddie in TO
Posts: 1007
Joined: Feb 12, 2006 12:00 PM
Location: Toronto, Ontario, Canada
Contact:

Re: E12 M535i Project - 04-28-15 Update

Post by Eddie in TO »

This really took off!
The rear parcel shelf surgery from the parts car took some serious dedication and a lot of patience.
Nice to see some color on it.
wkohler
Posts: 50924
Joined: Oct 05, 2006 11:04 PM
Location: Phönix, Arizona, USA
Contact:

Re: E12 M535i Project - 05-10-15 Update

Post by wkohler »

Thanks. It definitely went pretty quickly there. Fortunately, over the last couple weeks, there has been a bit of a break. Mike has been working on a W113 which should be finished now. It started out as a job with some minor work but then turned into a complete due to some mismatched panels from prior repaints.

That said, there's still some stuff to report.

Here's a couple pictures from when I went and saw the car after Mike painted the engine compartment:

Image

Image

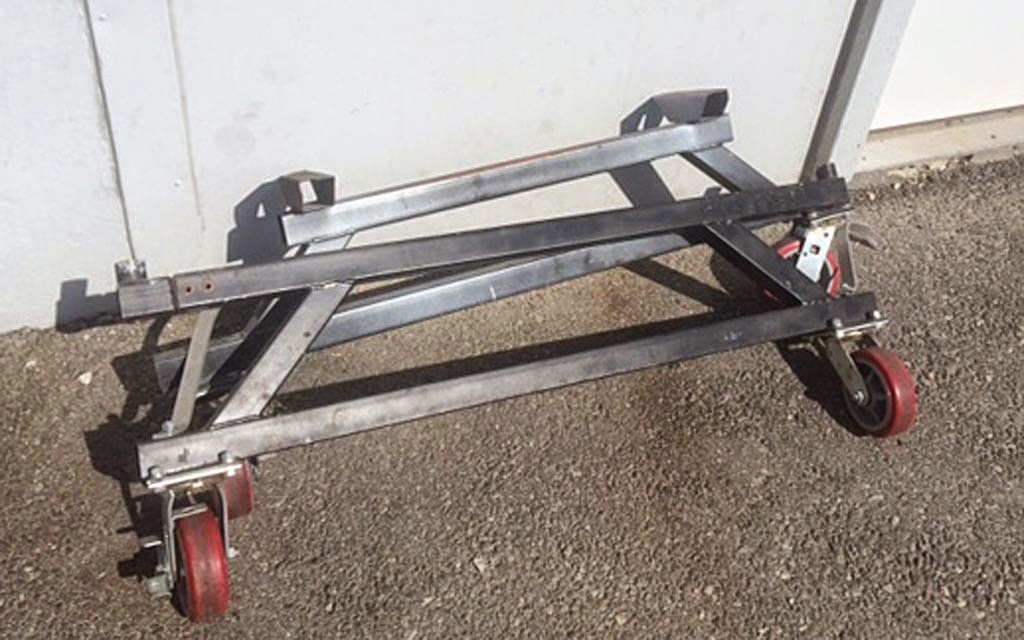
When I removed the subframes, the car was supported on these stands that Mike had made by welding Harbor Freight jack stands to some wheel dollies. He had used them on the body for the Nova and said they worked well. I can't say I was the biggest fan, but what else did we have, really?

Image

Sure, the car was supported and mobile, but only three of the stands were supporting the car and there was way too much movement for me.

So with some help of friends (occoupe for making the arrangements for the deal, ldsbeaker for transporting them to Yuma, then geordi for bringing them from Yuma to me), I was able to get ahold of the new suspension for my M535i:

Image

They're designed to attach where the subframes attach, which is great. There was a slight delay in getting them installed because I needed adapters to adapt to the E12 frame rails. I received the necessary adapters and then had to adapt the adapters (E9 subframe bolt spacing isn't as deep as E12 by nearly 1.5"). It all went pretty smoothly and the car will be attached to these for the foreseeable future. It's a welcome change from the cringing over whether or not the car will slip on the jack stands or what not. Also, it keeps me from having to rush putting the suspension together as I don't have it back from the powder-coater and I've also done nothing else. I have gotten so stressed out, my decision was to just stop and focus on work. The less stuff I have to rush with, the fewer mistakes will be made (I hope).

Image

Image

The aluminum piece goes up and attaches to one of the mounting points for the "push rods." The idea is to help minimize the load on the subframe pins, but we will see what that does. Obviously, great care will still be exercised in moving the car.

Also, laying under the front of the car, I got another shot showing the transmission tunnel and the bottom of the car. I guess this would be a different perspective.

Image

On Friday, Mike told me that he was going to be back on this in the coming week. His plan is to get the shell itself ready to paint. I still don't have fenders. It's been over a month and I'm pretty upset. It also looks like I'm going to have to try to buy another '80-'81 E12 to get some parts I need, but it's not a rush thing. There's a local yard here that has one (missing the driver door and fender) and I want to possibly work out a deal with them on it as the market for E12 parts in Phoenix is probably just me. I'm mainly shooting for stuff that requires disassembling nearly the whole car.
tig
Posts: 9327
Joined: Mar 18, 2013 6:25 PM
Location: Durango
Contact:

Re: E12 M535i Project - 05-10-15 Update

Post by tig »

wkohler wrote: Image
Awesome progress. Good call on the new dollies.

If this were mine, I think I'd want paint inside those little tunnels made by the transmission support braces. You?
wkohler
Posts: 50924
Joined: Oct 05, 2006 11:04 PM
Location: Phönix, Arizona, USA
Contact:

Re: E12 M535i Project - 05-10-15 Update

Post by wkohler »

When I first looked at the photo on the computer, I was going to talk to Mike about it, but when I was under the car again on Friday, I czeched them out and found that the dark area is in fact painted, so I cannot explain this phenomenon. My eye goes right to it still, though. That said, originally, this much of the car was not painted silver, particularly up in the tunnel. The brackets for the transmission crossmember were, since they'd have been hit when the firewall and such were painted. The car also wasn't schutzed as far forward either. Mike wanted to do it as added protection even though it will be covered by the firewall insulation. Still, Mike has to go and deal with the areas where the jack stands were setting, particularly at the rear jacking points on the rockers. The thing that does bug me is that one of the studs for the driveshaft heat shield is missing. I'm going to have to figure out a fix for that as it is a real problem that does exist. Just an M6x1 bolt and I will probably use some of that fancy metal adhesive for it. I completely forgot about it and when the car was dirty underneath, I didn't even notice it. Just like I didn't notice the bolts for the transmission crossmember were still in there. It's not like I don't have a bunch more of those, so no big deal.
Jelmer538i
Posts: 1222
Joined: Feb 12, 2006 12:00 PM
Location: Netherlands
Contact:

Re: E12 M535i Project - 05-10-15 Update

Post by Jelmer538i »

Nice update again! Good thing you put it on those dolly because I didn't like the jackstands either!
leadphut
Posts: 4499
Joined: Feb 12, 2006 12:00 PM
Location: Portland, OR

Re: E12 M535i Project - 05-10-15 Update

Post by leadphut »

you're gonna need some bubble to store the car in, because it's now too nice to drive.
Crazy_Canuck
Posts: 313
Joined: Feb 12, 2006 12:00 PM
Location: Surrey

Re: E12 M535i Project - 05-10-15 Update

Post by Crazy_Canuck »

wkohler wrote: The thing that does bug me is that one of the studs for the driveshaft heat shield is missing. I'm going to have to figure out a fix for that as it is a real problem that does exist. Just an M6x1 bolt and I will probably use some of that fancy metal adhesive for it.
I would ask Mike about the broken stud and see what repair he sugests.

Since Mike has to touch up the paint were the stands were resting it might not be much trouble right now to weld in a new stud.

Plus if you do not fix it now, it will bug you forever.
Adam W in MN
Posts: 5053
Joined: Feb 12, 2006 12:00 PM
Location: Don't waste my motherf***in' time!
Contact:

Re: E12 M535i Project - 05-10-15 Update

Post by Adam W in MN »

Those dollies are very trick!
unt0uchable
Posts: 2265
Joined: Jul 21, 2011 8:05 PM
Location: Rochester Hills, Michigan
Contact:

Re: E12 M535i Project - 05-10-15 Update

Post by unt0uchable »

Damn, just re-read this entire thread. I even commented before I think! Holy progression bat man! Loving the updates and the photos, potatoes included.

Good call on the dolly exchange. Those old wheel dollies were scary looking. Hell I don't like stationary jack stands, let alone ones with wheels!! :shock: :shock:

Keep it coming Christoph. You.Are.The.Man. :up:
ElGuappo
Posts: 8130
Joined: Feb 12, 2006 12:00 PM
Location: Sacramento, CA
Contact:

Re: E12 M535i Project - 05-10-15 Update

Post by ElGuappo »

Crawling towards the finish line, slowly but surely.
This is going to be quite the car.
Adam W in MN
Posts: 5053
Joined: Feb 12, 2006 12:00 PM
Location: Don't waste my motherf***in' time!
Contact:

Re: E12 M535i Project - 05-10-15 Update

Post by Adam W in MN »

wkohler wrote:
Image
Image

Stay rust-free my friend.
wkohler
Posts: 50924
Joined: Oct 05, 2006 11:04 PM
Location: Phönix, Arizona, USA
Contact:

Re: E12 M535i Project - 05-18-15 Update

Post by wkohler »

Remember my "giant holes in the hatshelf?"

Image

Well, hopefully those riding in the trunk won't be able to see them.

Image

I received a message from Mike Sunday morning while I was cleaning the B7 Turbo alone on the grass in a park in San Diego and I received this photo:

Image

He obviously figured out what to do with the panel. I'm fine with it.

Image

Image

Image

The bracket for the third brake light is going to come off. I didn't mention it before since I didn't realize he was going to use that much of the panel per our discussions.

He also bought some sound deadening material and replaced the stuff that was removed. He removed more and found no other areas of concern. He has some more to replace, seal the seams in it and then it will get a "dusting" of silver.

Image

It's not the BMW stuff but it works fine and will be under the carpet, so I'm not really concerned too much with that.

He's done the initial block sanding on the roof and quarters. He is going to paint the inside of the trunk again as well since he said it looks like he was "hunting a fucking elusive deer for a week." I'm not sure what that means, but it obviously means something similar to repainting the trunk.

We also talked about the missing heat shield stud. He asked about the hole in the floor and I said it was a perfect segue into my next issue. He said he'd take care of it.
Jelmer538i
Posts: 1222
Joined: Feb 12, 2006 12:00 PM
Location: Netherlands
Contact:

Re: E12 M535i Project - 05-18-15 Update

Post by Jelmer538i »

Now I can sleep better!!
Your headlight wiper setup is almost ready too. You want me to take it to Ivo?
Karl Grau
Posts: 9717
Joined: Mar 10, 2006 7:34 PM
Location: Sandy Eggo

Re: E12 M535i Project - 05-18-15 Update

Post by Karl Grau »

wkohler wrote:I received a message from Mike Sunday morning while I was cleaning the B7 Turbo alone on the grass in a park in San Diego
You weren't alone. I stopped by at least a dozen times to offer a smart remark or two. :roll:
wkohler
Posts: 50924
Joined: Oct 05, 2006 11:04 PM
Location: Phönix, Arizona, USA
Contact:

Re: E12 M535i Project - 05-18-15 Update

Post by wkohler »

I was alone when I got the text message. Gary showed up shortly after.
Adam W in MN
Posts: 5053
Joined: Feb 12, 2006 12:00 PM
Location: Don't waste my motherf***in' time!
Contact:

Re: E12 M535i Project - 05-18-15 Update

Post by Adam W in MN »

Nobody liked my worlds most interesting man joke?

I guess if it were me, I'd keep the rear shelf as-is because I sure as hell would want a center brake light (with LED strobe effect) in the back when this is done. I don't know if that's going to do much to wake someone up while texting and driving... but it would make me feel slightly better.
wkohler
Posts: 50924
Joined: Oct 05, 2006 11:04 PM
Location: Phönix, Arizona, USA
Contact:

Re: E12 M535i Project - 05-24-15 Update

Post by wkohler »

I stopped by Thursday the 21st. Mike had repainted the trunk and did the silver over the sound deadening.

Image

Image

Image

Image

Sure, it's not a seamless transplant, but I think with the options we had and the various levels of invasiveness, we did fine. It fixes the problem and maintains the integrity of the car.

There's one more round of block sanding on the roof and quarters and the shell should be ready to paint. Mike wanted another thousand dollars to buy some more primer and the base coat for the exterior. He's already used the base he bought initially on the rest of the car (I'm shocked). He told me that he wanted the rest of the parts so they can get them jambed. That became the plan for Friday.

Since he already had the driver door and the trunklid, I loaded up the remaining three doors and spent an hour or so finding the bolts to mount the doors. I was happy to discover that somehow they were put into the general bolt population but I was even happier to find that I did in fact have sixteen of them. I only found fifteen washers. I went through the bins with the items from each door and found the sixteenth washer. I had all of the shims from this car, but also have a stack of extras from the B7 Turbo project. The new doors are in nice shape with no rust (they're NOS, but have been in various types of storage for many years) and fortunately already have the sound-deadening panel and the check strap installed. Yee-haw. I spent 90 minutes looking for the front window guide/mirror mounting for the passenger door and gave up figuring maybe he had it. He didn't. Unfortunately, my plan for a matching driver door never materialized, so we have to use the original. I did ask Mike to remove the Federalization-added side impact bar, though. I wanted the holes for the bolts welded up and really, it was the only way to do it right. Just remove it if you can. If not, we can figure something out, I guess.

I tried to get ahold of a van from work to take the hood over but with the long weekend came a vacation to Sedona, so that didn't happen. Mike said I could use a truck belonging to one of the guy's renting the rest of his shop. Unfortunately, it's a stepside Chevy, so really it wasn't going to work. I went home and decided to see what it would take to put it on top of the touring, which was not exactly something I was excited to do. Alone. I did find the window guide though. It was laying on my work bench. Totally covered by crap, but it was there.

Well, we got it up there. It had to go sideways. I got it strapped down and decided that would work. Then I thought "why not just see if I can take it over there now instead of taking it all apart to do it another time." I called Mike and left a message. He called me back and said he'd be there another 30 min or so. Well, it just so happens to take 29 minutes or so to get there, so I headed out. I'd have no chance of making it on surface streets, so I took the freeway for most of the way - at least until I got into Mesa. I got a lot of weird looks but it stayed put. Fortunately, when I got there, I had help moving it. We looked it over and while it looked good overall, there are some areas that will need attention. The worst of which is in rear right corner next to the fresh-air grille. It looks like the skin got sucked in when they attached it to the structure. I explained to Mike how important the hood is on an E12 since it's so large and is really the focal point on the car when it's open, so if there' any spot on the car to spend time getting it perfect, it's here. The three new doors I dropped off were already scuffed in the jambs and were pretty much ready to go.

Mike called this morning and it looks like my driver door is good to go. He said it was a good move to remove the bar which he did bitch about, but access is tight and I knew it would be a pain in the ass. Sue me. Either way, there was a bit of surfacey rust forming in a spot where that bar contacted the door skin, so now it's out of there, we're in a good position. Mike blasted all of the rust and noted that there really wasn't any scabbing or threatening to perforate with just a fine amount of pitting in one or two spots. He said it really looked worse than it was and the door is actually in really nice shape. Also said that they stripped off all of the previous paintwork and we're in good shape on it. Just a couple spots of bodywork and we should be good to go. He was going to work all day Saturday and Sunday on my car and take at least some of Monday off, so we will see where we are at Tuesday, I guess.

Still no fucking fenders. I'm not sure what I'm going to do other than just hope they might show up. I fought with myself to not call BMW NA and figure out WTF is going on since I think it would cause problems for other people I deal with. I have a backup plan for those, but I'd rather start with the new ones. Either way, I'm going to take my used set to get stripped on Tuesday just in case. It probably should be done regardless of whether or not they get used and who knows, it might just be the step necessary to speed things up. It seemed to work for radius rod bushings.

Oh, that reminds me. My powder-coater called and my suspension is ready to pick up. I showed up at 16:04 on Friday and was ecstatic to find that they closed at 16:00. It will at least give me an opportunity to figure out where all of this crap is going to go. A couple weeks ago, George and Ramona helped me put the third car in my storage unit. This would help me have some room to figure out what I have and what I need for the M535i and also have a place to put it when it comes home. Of course, all it actually has done was turn my two-car garage into a one-car garage with a mess leftover from when I was getting the B7 Turbo ready for San Diego. Oh well, it's on the agenda for this weekend.

Image
bkbimmer
Posts: 5875
Joined: Mar 02, 2007 2:33 AM
Location: Portland, Or.

Re: E12 M535i Project - 05-24-15 Update

Post by bkbimmer »

Nice progress!
tig
Posts: 9327
Joined: Mar 18, 2013 6:25 PM
Location: Durango
Contact:

Re: E12 M535i Project - 05-24-15 Update

Post by tig »

What does mike use to blast, Chris? (media).
wkohler
Posts: 50924
Joined: Oct 05, 2006 11:04 PM
Location: Phönix, Arizona, USA
Contact:

Re: E12 M535i Project - 05-24-15 Update

Post by wkohler »

He's using an 80-grit Garnet sand I picked up at an abrasives supply place. He's on his second 50 pound bag. He had called a couple of companies that do this work and they wanted much too much money for the isolated areas that needed it. Mike has a little blasting gun and it's worked out pretty well. It's not seeing widespread use, which is good due to the heat created when using sand. He's also used it in more locations than he was originally thinking so it has worked out that he didn't call someone else in for those initial areas. If he sees something, he can just take care of it.
bkbimmer
Posts: 5875
Joined: Mar 02, 2007 2:33 AM
Location: Portland, Or.

Re: E12 M535i Project - 05-24-15 Update

Post by bkbimmer »

I have a spot blaster that works really well but makes a ridiculous mess.
Karl Grau
Posts: 9717
Joined: Mar 10, 2006 7:34 PM
Location: Sandy Eggo

Re: E12 M535i Project - 05-24-15 Update

Post by Karl Grau »

wkohler wrote:He was going to work all day Saturday and Sunday on my car and take at least some of Monday off
What a slacker!
wkohler
Posts: 50924
Joined: Oct 05, 2006 11:04 PM
Location: Phönix, Arizona, USA
Contact:

Re: E12 M535i Project - 05-24-15 Update #2!

Post by wkohler »

Totally slacking away.

Here are the photos he tried to send me yesterday of the door. He didn't take any photos of where the rust was but these are nice nonetheless.

Image

Image

He had to remove the window guide from the driver door to get access to the bar. That's fine with me. The rivets will match now.

He called me this morning to ask a question about the underside of the hood and said he was getting ready to jamb the parts.

I got these photos around 12:30pm:

Image

Image

Image

I didn't get any videos of the process, unfortunately.
bkbimmer
Posts: 5875
Joined: Mar 02, 2007 2:33 AM
Location: Portland, Or.

Re: E12 M535i Project - 05-24-15 Update #2!

Post by bkbimmer »

Hopefully the hood won't have any low spots in it from sitting on the stand like that... looking good though.

I wish I had a real paint booth sometimes.
wkohler
Posts: 50924
Joined: Oct 05, 2006 11:04 PM
Location: Phönix, Arizona, USA
Contact:

Re: E12 M535i Project - 05-24-15 Update #2!

Post by wkohler »

We'll see. He put a couple of blankets over the top of the stand. He's going to go over everything again before the top side is painted, of course.
Post Reply