E12 M535i Project - 08-21-19 Update
Re: E12 M535i Project - 01-16-16 Update
Christ, the car is looking really good.
-
Adam W in MN
- Posts: 5053
- Joined: Feb 12, 2006 12:00 PM
- Location: Don't waste my motherf***in' time!
- Contact:
Re: E12 M535i Project - 01-16-16 Update
Great progress, now pop on over to MN and perform the same steps on my car!
-
white chocolate
- Posts: 428
- Joined: Sep 21, 2011 9:44 PM
- Location: Canton, Ohio
Re: E12 M535i Project - 01-16-16 Update
Awesome progress!
If I made that much effort on fuel lines only to see their condition a few months later, I would have lost my mind.
If I made that much effort on fuel lines only to see their condition a few months later, I would have lost my mind.
Re: E12 M535i Project - 01-16-16 Update
Sweet Chewbacca, that's looking nice! Great job Mr. Kohler.
What'd you use to finish the fuel lines?
Hey, that's disgusting. At least give us a NSFW warning when you create imagery like that.stance my dolly
What'd you use to finish the fuel lines?
-
Tammer in Philly
- Posts: 10719
- Joined: Feb 12, 2006 12:00 PM
- Location: CHI, IL
Re: E12 M535i Project - 01-15-16 Update
Link to the tool you chose?wkohler wrote:
I ordered some of the correct terminal connectors and a proper German crimping tool ($$$).
Excellent progress.
Re: E12 M535i Project - 01-16-16 Update
Wow, great progress and looking awesome. I can't wait to see it at St Paddy's.
Re: E12 M535i Project - 01-16-16 Update
Bravo sir. Bravo
Re: E12 M535i Project - 01-16-16 Update
I thoroughly enjoyed that. I need a cigarette now. Thank you, sir.
Re: E12 M535i Project - 01-16-16 Update
Looking awesome Mr Kohler!
I've been following your progress for awhile now.
I look forward to your updates as I'm sure many do. It's like waiting for the latest Autoweek or Classic Motorsports!
Those of us without the time, patience, resources, or intestinal fortitude to tackle this project do appreciate it!
Rock on Obi-Wan!
-
austin8753
- Posts: 1492
- Joined: May 16, 2010 1:37 AM
- Location: Portland, Oregon, USA
Re: E12 M535i Project - 01-16-16 Update
A man after my own heart. Fantastic.
-
Sapotorito
- Posts: 323
- Joined: Apr 18, 2014 10:31 AM
- Location: Chandler, Arizona
Re: E12 M535i Project - 01-19-16 Update
Great update Chris, thanks for sharing!
Re: E12 M535i Project - 01-19-16 Update
Thanks for the comments. It's nice to be back at it, but as with anything I seem to do, I keep running into issues.
I decided to get a couple more things in the process. First was the wood for the dash and door panels. I've read many posts over the years of people refinishing their own wood and while I'm sure it's something I could handle, I've got enough stuff going on right now and I'm not sure it is something I would have the patience to do. I looked up some wood refinisher/furniture restoration places and started seeing what they'd do for me. I had a hard time reaching anyone by phone, so I went to the nearest one to my house. Walking in the door, it seemed more like they were the people you'd call if you wanted a kitchen remodel, but they did a lot of antique restoration and whatnot as well. They got to looking at the six pieces I brought and weren't sure what they could do. They took one as a test and their stripper couldn't permeate the polyurethane finish. They suggested a place a few miles north of me to strip them and said that if I could get them stripped, they'd refinish them for about $300. I thanked them for their time. I see this as the stripping of the old finish being the hardest part here, so let's see what I can do. I called Ray as I remembered him telling me about a place he used years ago for an E12 he had. He described the place to me but figured it was long gone. I went to the place that the first shop recommended and wouldn't you know it? It's the same place Ray described. I walked back to the metal building and started showing the pieces to a guy working there and he told me to wait for the owner. Once the owner came back, he looked at them, didn't figure it would be a problem and told me $75 to do everything and I'd have it in a couple weeks. That included refinishing. Crazy. Turns out I forgot one of the pieces, so I'll head up there with that soon.
Next up, we have my dash:
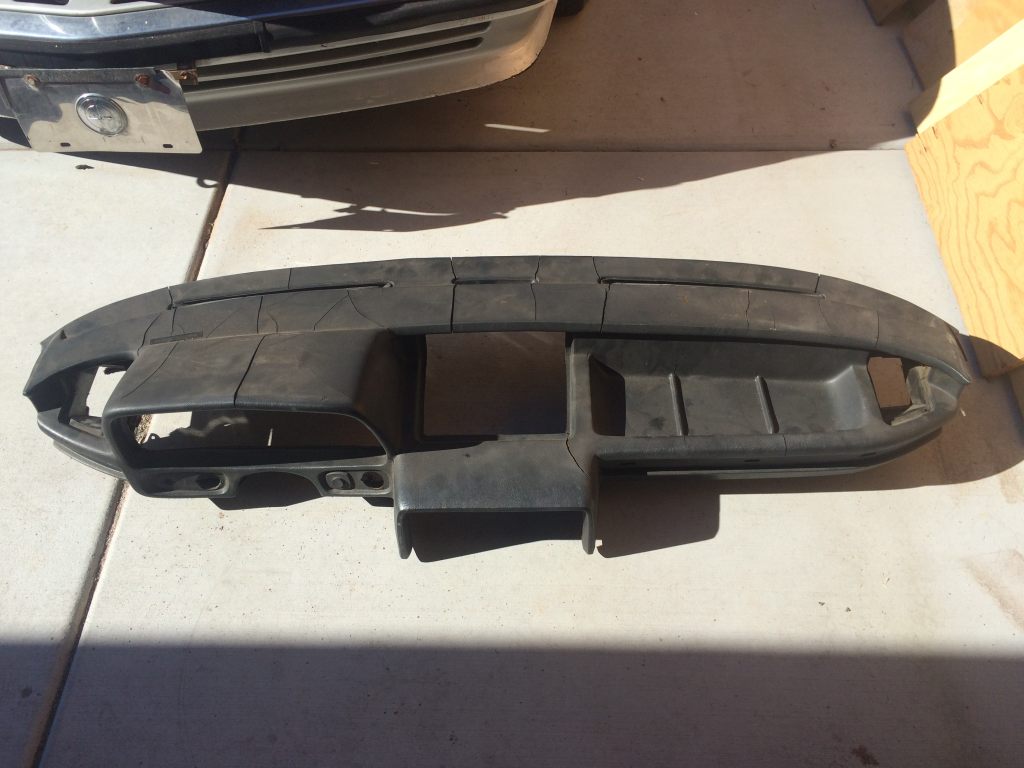
Yum. As you can see, this is a dash that would look just fantastic in any car. A few years ago, I inquired with Just Dashes in California about restoring my dash. They gave me a quote and I put it aside and proceeded to buy eight "crack-free" E12 dashes, all of which arrived with cracks. I did keep two of them since they were the best of the bunch and actually set me back the least (I paid over $800 for one only to have it be the worst. Fortunately after many months, I received a refund minus return shipping). I inquired with them again and they quoted me $2,000 plush shipping each way and a handling charge with a 12-14 week turnaround time. I'm not sure what to do, but the clock is, as they say, ticking. It's a lot of money, but they're the only game in town I guess unless I want to install a dash with a crack in it. Still, I'm not sure which way to go.
I finished running the wiring harness across the nose of the car and also decided to install the mount for the tow hook. It bolts into the right frame rail, but what I happened to notice was that the original core support had been modified for it by BMW Motorsport, just as they had for the oil cooler lines. The new one looks like this:
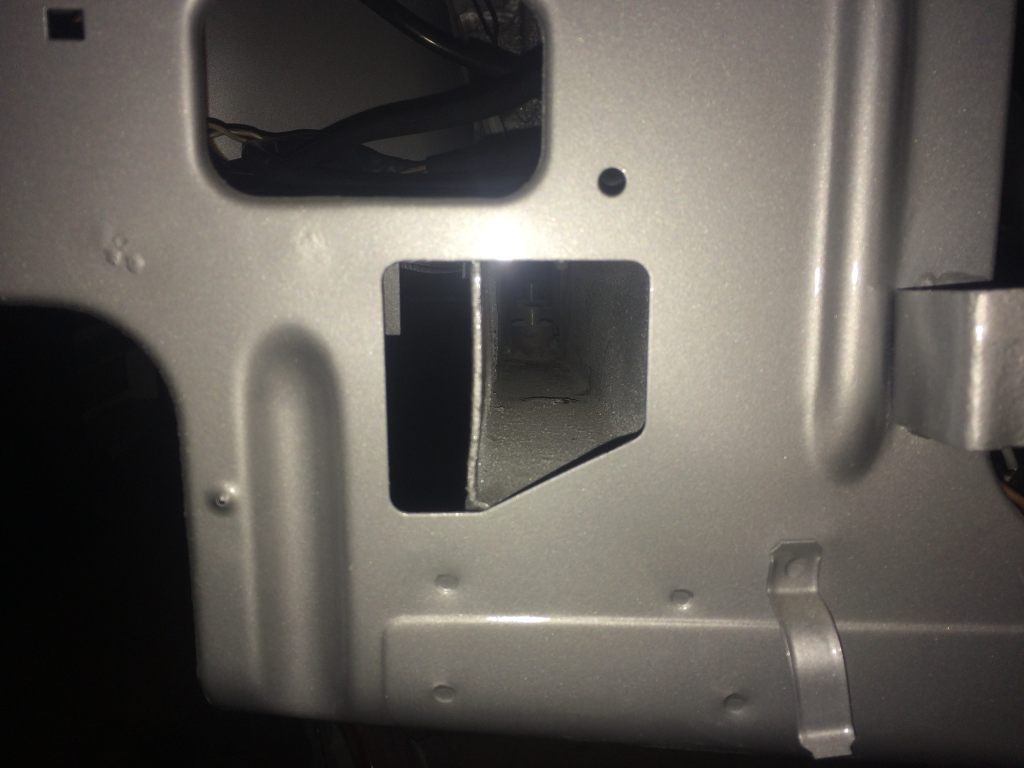
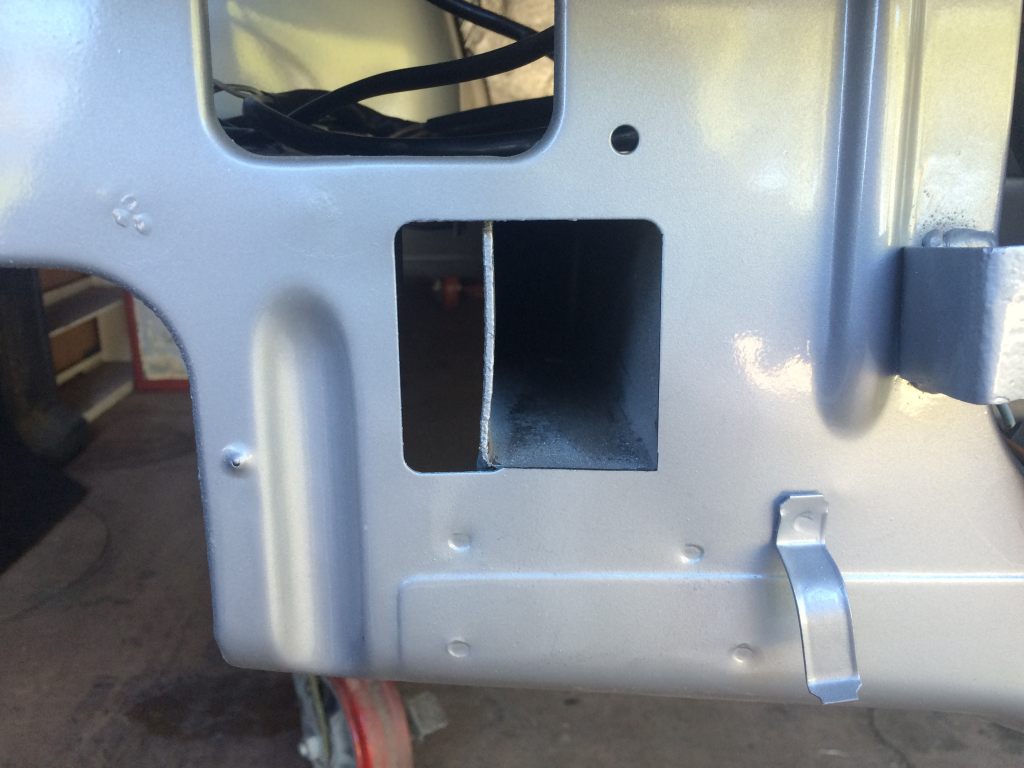
The mount sits on the bottom of the frame rail and protrudes past the core support about 15mm. Trying to install it like this would have the hook impinging on the spoiler and it would look dumb. It's supposed to be centered in the hole. I had to make a cut, and I did, then covered the open edge with paint. Fortunately, I accidentally took a bunch of photos of the front of the car and made the cut just as it was originally.
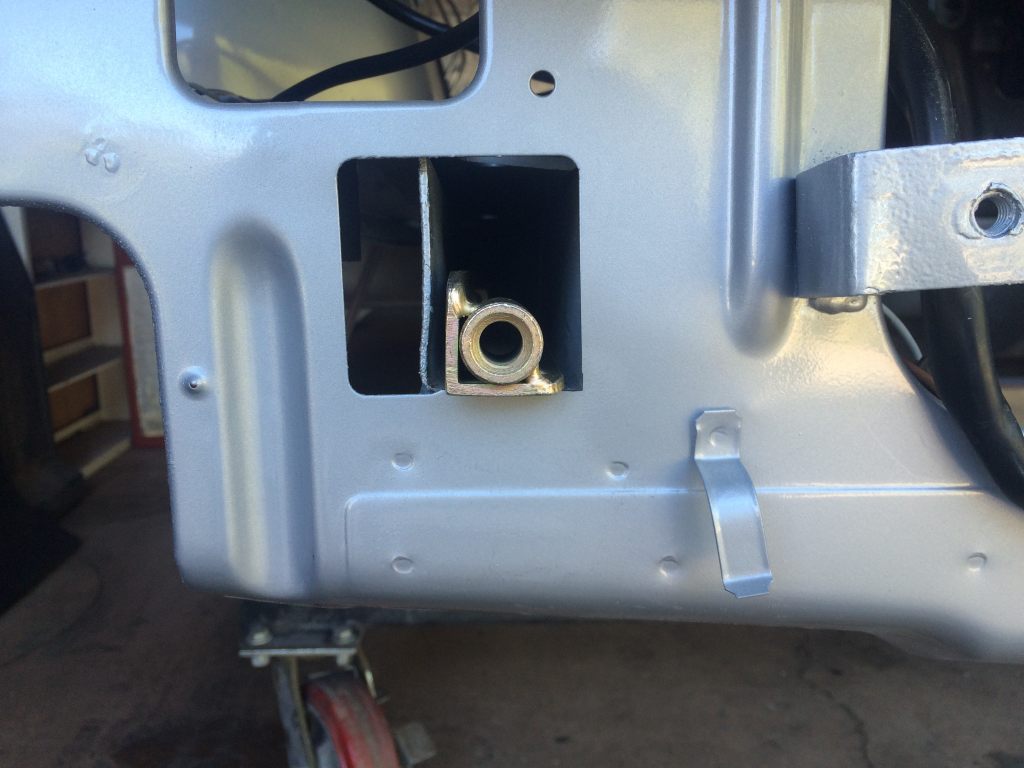
And here's the mount in place:
I also had to hit up the yards as believe it or not, all of these clips are NLA:
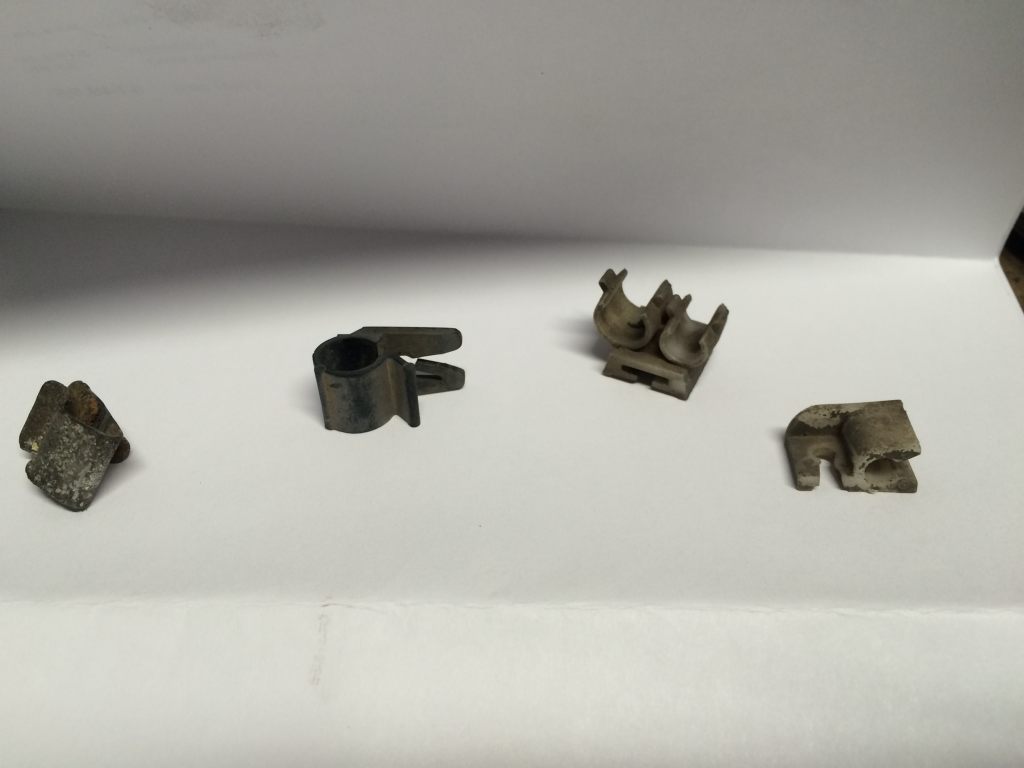
The metal clips weren't used long as earlier E12s had tabs welded to the body for cable management, but I was still able to grab several off of the car. The rear trailing arms also had a similar setup, so they were, in effect, useless to me. These clips were used on E23s, E24s and E28s, though, but those cars are few and far between now, too. Either way, I came back with enough where I can manage. The metal ones will go in with the next batch of plating.
Thinking ahead, I starting looking around for my antenna. Years ago, I had bought a new one for one of my parents' E21s and we ended up selling the car, so it was never installed. I thought I had put it with the E12 stuff, but while I was looking, I found this guy:
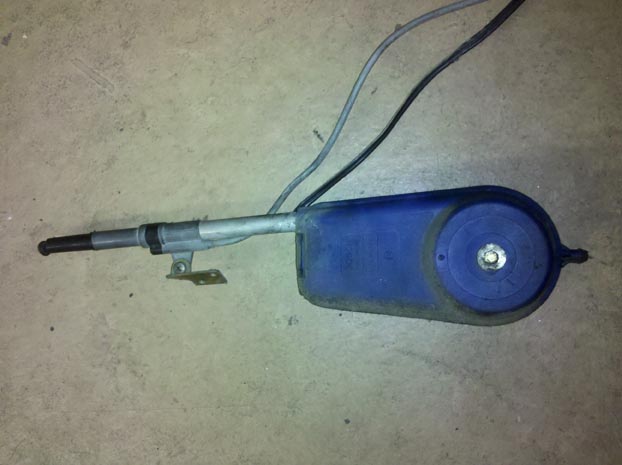
It's a Bosch power antenna I found in the left front fender when I was taking the car apart. From the outside, it looks just like a manual one, but it isn't.
I was just going to put a manual one in, but after posting a thread here, I ended up searching for some and actually found someone that had bought the remnants of a Canadian electronics store and had three of them. Well, now I have three of them.
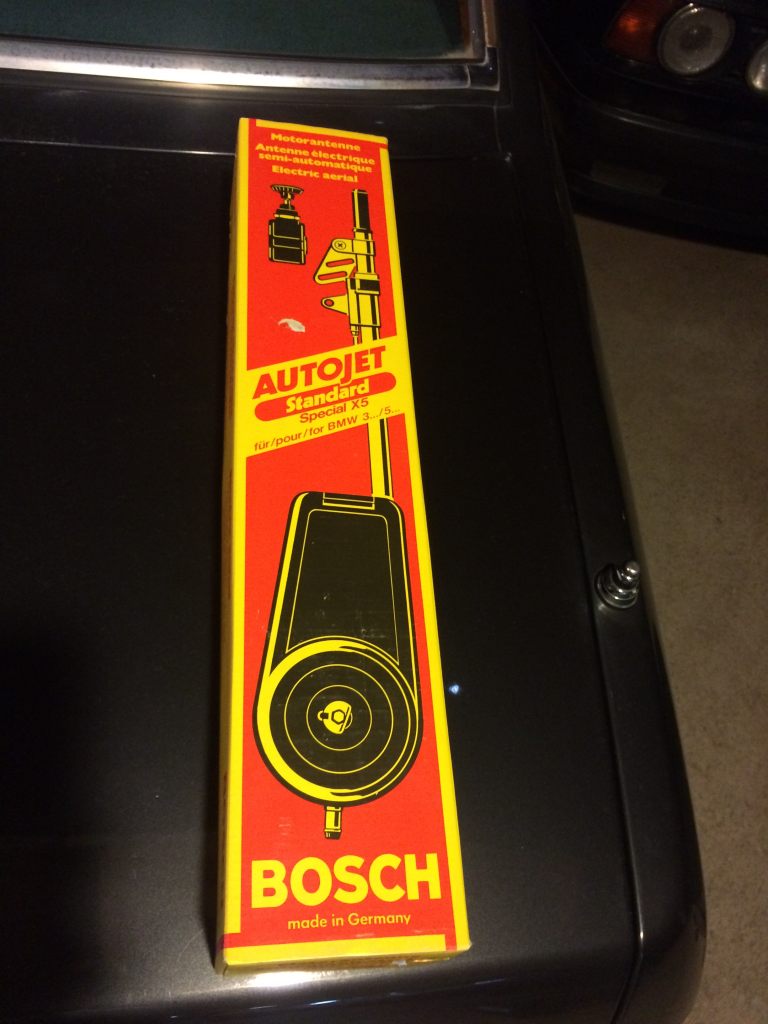
I had never opened the box they came in and actually forgot about until I found the old one. I decided to open one up and just see what we had for hardware and instructions. Should be pretty neat. I like this setup because the left rear edge of the hood by the A-pillar is notched for an antenna. The factory power antenna cars had it in the trunk, like E28s do and I think that's kinda odd considering the car has a dedicated spot for it. It is also activated with a switch, so if I don't want it up, it doesn't need to be up. I will try to work out a clever way to integrate the switch. For now though, there are more pressing matters.
Lastly, I figured with the wiring run to the front of the car, I better have a good look at perhaps mocking up the oil cooler again and then get it cleaned out so I can refinish it and also get my lines copied.
I figured the lines would be a basic thing and mine weren't leaking, so no reason to cut them up and replace the rubber. Also, since the plating on the fittings was less-than-perfect, really, that's the most important thing. All of this stuff is NLA. I decided not to bother with the tube and hose shop that made the rest of the lines, so I went to a Parker store and talked to them. After getting the "Huh? Metric?" face, I wasn't particularly excited. He took them in the back where they appeared to be having a pizza party and then much laughter ensued. He came back out a while later suggesting that there's no way they could get anything that would match these and mate up to my cooler, the pipe or the filter head. Thanks. I tried a couple of other shops, but they weren't really the places that would deal with a guy like me. My last name isn't Komatsu. I took the oil cooler by the radiator shop and talked to them for a little bit about the predicament. For $35, they hot tanked everything and pressure tested it and found no leaks. They also painted the oil cooler.
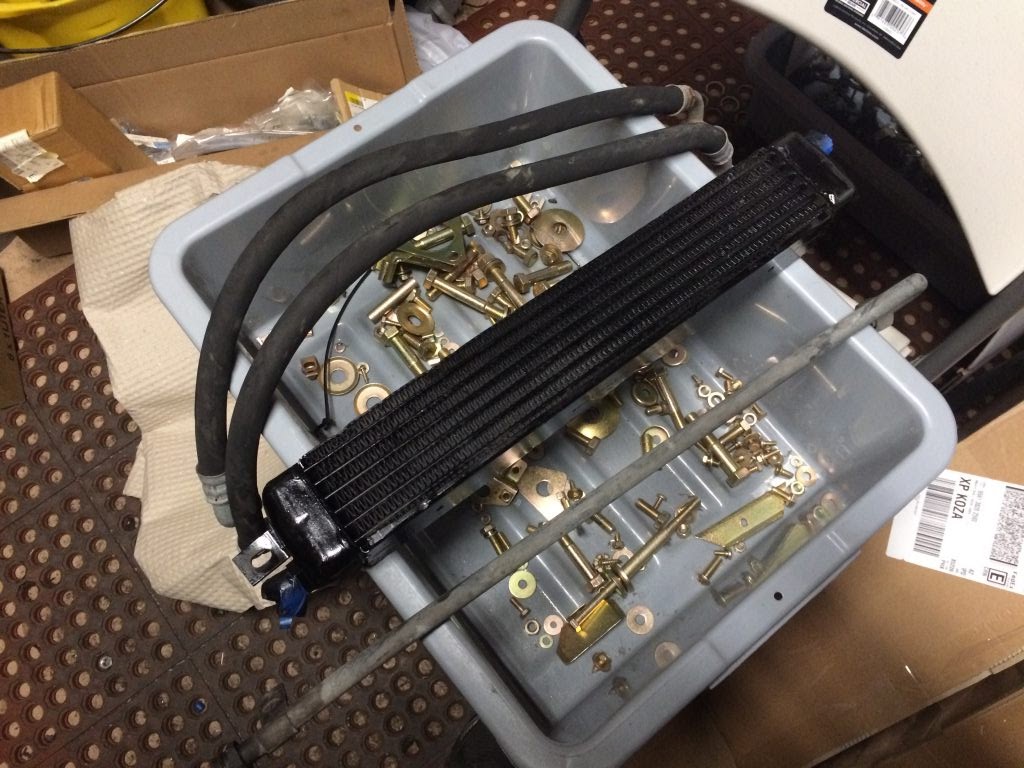
I'm going to try another place tomorrow which I think either has or can get the fittings according to some catalog link I found on their site. We shall see.
I decided to get a couple more things in the process. First was the wood for the dash and door panels. I've read many posts over the years of people refinishing their own wood and while I'm sure it's something I could handle, I've got enough stuff going on right now and I'm not sure it is something I would have the patience to do. I looked up some wood refinisher/furniture restoration places and started seeing what they'd do for me. I had a hard time reaching anyone by phone, so I went to the nearest one to my house. Walking in the door, it seemed more like they were the people you'd call if you wanted a kitchen remodel, but they did a lot of antique restoration and whatnot as well. They got to looking at the six pieces I brought and weren't sure what they could do. They took one as a test and their stripper couldn't permeate the polyurethane finish. They suggested a place a few miles north of me to strip them and said that if I could get them stripped, they'd refinish them for about $300. I thanked them for their time. I see this as the stripping of the old finish being the hardest part here, so let's see what I can do. I called Ray as I remembered him telling me about a place he used years ago for an E12 he had. He described the place to me but figured it was long gone. I went to the place that the first shop recommended and wouldn't you know it? It's the same place Ray described. I walked back to the metal building and started showing the pieces to a guy working there and he told me to wait for the owner. Once the owner came back, he looked at them, didn't figure it would be a problem and told me $75 to do everything and I'd have it in a couple weeks. That included refinishing. Crazy. Turns out I forgot one of the pieces, so I'll head up there with that soon.
Next up, we have my dash:
Yum. As you can see, this is a dash that would look just fantastic in any car. A few years ago, I inquired with Just Dashes in California about restoring my dash. They gave me a quote and I put it aside and proceeded to buy eight "crack-free" E12 dashes, all of which arrived with cracks. I did keep two of them since they were the best of the bunch and actually set me back the least (I paid over $800 for one only to have it be the worst. Fortunately after many months, I received a refund minus return shipping). I inquired with them again and they quoted me $2,000 plush shipping each way and a handling charge with a 12-14 week turnaround time. I'm not sure what to do, but the clock is, as they say, ticking. It's a lot of money, but they're the only game in town I guess unless I want to install a dash with a crack in it. Still, I'm not sure which way to go.
I finished running the wiring harness across the nose of the car and also decided to install the mount for the tow hook. It bolts into the right frame rail, but what I happened to notice was that the original core support had been modified for it by BMW Motorsport, just as they had for the oil cooler lines. The new one looks like this:
The mount sits on the bottom of the frame rail and protrudes past the core support about 15mm. Trying to install it like this would have the hook impinging on the spoiler and it would look dumb. It's supposed to be centered in the hole. I had to make a cut, and I did, then covered the open edge with paint. Fortunately, I accidentally took a bunch of photos of the front of the car and made the cut just as it was originally.
And here's the mount in place:
I also had to hit up the yards as believe it or not, all of these clips are NLA:
The metal clips weren't used long as earlier E12s had tabs welded to the body for cable management, but I was still able to grab several off of the car. The rear trailing arms also had a similar setup, so they were, in effect, useless to me. These clips were used on E23s, E24s and E28s, though, but those cars are few and far between now, too. Either way, I came back with enough where I can manage. The metal ones will go in with the next batch of plating.
Thinking ahead, I starting looking around for my antenna. Years ago, I had bought a new one for one of my parents' E21s and we ended up selling the car, so it was never installed. I thought I had put it with the E12 stuff, but while I was looking, I found this guy:

It's a Bosch power antenna I found in the left front fender when I was taking the car apart. From the outside, it looks just like a manual one, but it isn't.
I was just going to put a manual one in, but after posting a thread here, I ended up searching for some and actually found someone that had bought the remnants of a Canadian electronics store and had three of them. Well, now I have three of them.
I had never opened the box they came in and actually forgot about until I found the old one. I decided to open one up and just see what we had for hardware and instructions. Should be pretty neat. I like this setup because the left rear edge of the hood by the A-pillar is notched for an antenna. The factory power antenna cars had it in the trunk, like E28s do and I think that's kinda odd considering the car has a dedicated spot for it. It is also activated with a switch, so if I don't want it up, it doesn't need to be up. I will try to work out a clever way to integrate the switch. For now though, there are more pressing matters.
Lastly, I figured with the wiring run to the front of the car, I better have a good look at perhaps mocking up the oil cooler again and then get it cleaned out so I can refinish it and also get my lines copied.
I figured the lines would be a basic thing and mine weren't leaking, so no reason to cut them up and replace the rubber. Also, since the plating on the fittings was less-than-perfect, really, that's the most important thing. All of this stuff is NLA. I decided not to bother with the tube and hose shop that made the rest of the lines, so I went to a Parker store and talked to them. After getting the "Huh? Metric?" face, I wasn't particularly excited. He took them in the back where they appeared to be having a pizza party and then much laughter ensued. He came back out a while later suggesting that there's no way they could get anything that would match these and mate up to my cooler, the pipe or the filter head. Thanks. I tried a couple of other shops, but they weren't really the places that would deal with a guy like me. My last name isn't Komatsu. I took the oil cooler by the radiator shop and talked to them for a little bit about the predicament. For $35, they hot tanked everything and pressure tested it and found no leaks. They also painted the oil cooler.
I'm going to try another place tomorrow which I think either has or can get the fittings according to some catalog link I found on their site. We shall see.
Last edited by wkohler on Jan 20, 2016 1:58 AM, edited 1 time in total.
-
Kyle in NO
- Posts: 17638
- Joined: Feb 12, 2006 12:00 PM
- Location: Nasty Orleans------> Batten-Rooehjch------>More Souther LA
Re: E12 M535i Project - 01-19-16 Update
Lol @ stanced dolly.
-
Das_Prachtstrasse
- Posts: 5616
- Joined: Sep 10, 2006 7:06 AM
- Location: Melbourne, Doooown Under
Re: E12 M535i Project - 01-19-16 Update
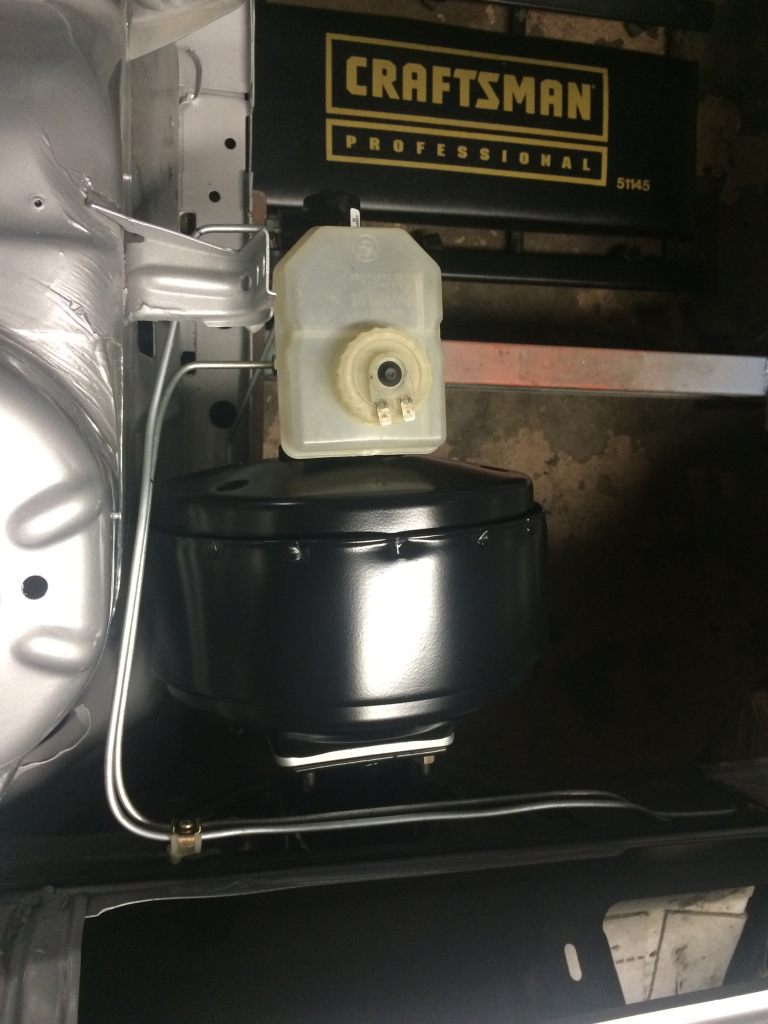
Pardon my ignorance, but was the brake fluid res originally yellow or was it simply a case of not being able to find a NOS unit? Great progress, I really hope to see this in person some time, it looks to be a much higher quality build than even your B7 and that is a thing of beauty. I get the opportunity often to go to this extent and further with Porsche builds for other people, yet there's something so incredibility enticing about nut and bolting your own restoration that I'm finding it very difficult to resist the temptation to tear my own pos back to pieces and start again.. 
Re: E12 M535i Project - 01-19-16 Update
Ola, I think I have a crack free dash or at least one with only a very small crack I'd be willing to part with. Should I have a look and take some pictures for you? I'm guessing overseas shipping should not be a deal breaker here.It's a lot of money, but they're the only game in town I guess unless I want to install a dash with a crack in it. Still, I'm not sure which way to go.
Let me know if you are interested?
-
Kyle in NO
- Posts: 17638
- Joined: Feb 12, 2006 12:00 PM
- Location: Nasty Orleans------> Batten-Rooehjch------>More Souther LA
Re: E12 M535i Project - 01-19-16 Update
He already has several with cracks.DMS wrote:Ola, I think I have a crack free dash or at least one with only a very small crack I'd be willing to part with. Should I have a look and take some pictures for you? I'm guessing overseas shipping should not be a deal breaker here.It's a lot of money, but they're the only game in town I guess unless I want to install a dash with a crack in it. Still, I'm not sure which way to go.
Let me know if you are interested?
Re: E12 M535i Project - 01-19-16 Update
Can you read? I'm offering to try to help him.
Re: E12 M535i Project - 01-19-16 Update
no one is going to turn down your efforts to help, but the only thing worthy of going into this gem is a crack-free dash.DMS wrote:Can you read? I'm offering to try to help him.
just saying...
Re: E12 M535i Project - 01-19-16 Update
It doesn't exist, even my perfect dash has cracks.leadphut wrote:no one is going to turn down your efforts to help, but the only thing worthy of going into this gem is a crack-free dash.DMS wrote:Can you read? I'm offering to try to help him.
just saying...
Re: E12 M535i Project - 01-19-16 Update
Chris is doing a great job as expected. The devil is in the details and in the preparation. Chris is certainly adhering to his original plan and not taking any shortcuts. I hope to see it at LOTA this year, hopefully wearing a first place trophy. Keep it going and don't let the minutia ruin your momentum.
Re: E12 M535i Project - 01-19-16 Update
Thanks. Right now, I'm so overwhelmed with stupidity and things that should be simple tasks being a huge pain in the ass, I don't even know what to do. I'm just burnt out.
DMS, interested in what you have, unless there are cracks. Needs to be for a late car. Thanks for the offer.
DMS, interested in what you have, unless there are cracks. Needs to be for a late car. Thanks for the offer.
-
Kyle in NO
- Posts: 17638
- Joined: Feb 12, 2006 12:00 PM
- Location: Nasty Orleans------> Batten-Rooehjch------>More Souther LA
Re: E12 M535i Project - 01-19-16 Update
Yes, I can read quite well. You stated yours has a small crack.DMS wrote:Can you read? I'm offering to try to help him.
Re: E12 M535i Project - 01-19-16 Update
Sadly, your forum-guardians are right. It has a small crack. It's been years since I've taken a look at this dash and I remembered it being crack-free. Might be because you can not see it from the drivers seat or perhaps it's been developing while it was is storage. But who cares, it's not up to your spec.wkohler wrote:DMS, interested in what you have, unless there are cracks. Needs to be for a late car. Thanks for the offer.
I stated that I sincerely thought it was crack free but kept small reservations for the possibility my memory was clouded by the years. You focussed on the possible negative and instantly waved me off. Let's hope it's based on experience not your usual attitude in life. Anyway, you were right it does have a little crack (developed while in storage or it might have been my memory). At least I put time and efforts in trying to help someone that I never met and never will with a car I will never see. I'm hoping he will find one to finish this beautiful car!Kyle in NO wrote:Yes, I can read quite well. You stated yours has a small crack.DMS wrote:Can you read? I'm offering to try to help him.
Re: E12 M535i Project - 01-19-16 Update
Hey, don't worry about it. I can't tell you how many dashes I bought under the same circumstance. Oh wait. Eight of them. Anyway, it's a crack you don't really see and it doesn't even show up in some photos. They all start there first. Always on the left side of the center defrost vent. I really appreciate you offering your dash, though! I guess I might just need to bite the bullet on this one.
Re: E12 M535i Project - 01-19-16 Update
I guess so but anything less would just not be up to the quality of the rest of the car. It's a lot of money tho! Make sure you keep posting your progress!
I'm also really curious how they restore these old things. Is it only the cover that cracks or also the foam underneath? I'm wondering how well they compare with an original dash concerning, colour and brake lines in upholstery (or are these a single piece of covering?)
I'm also really curious how they restore these old things. Is it only the cover that cracks or also the foam underneath? I'm wondering how well they compare with an original dash concerning, colour and brake lines in upholstery (or are these a single piece of covering?)
Re: E12 M535i Project - 01-19-16 Update
My early Crack free dash has the same Crack in it. I'm just glad it's perfect.
-
Mark 88/M5 Houston
- Posts: 8548
- Joined: Feb 12, 2006 12:00 PM
- Location: Far North Houston
Re: E12 M535i Project - 01-19-16 Update
Great to see you back on this one Chris. You are doing a masterful job and I hope to see it in person one day.
Re: E12 M535i Project - 01-19-16 Update
Re: E12 M535i Project - 01-23-16 Update
Thanks for the comments as always!
First, I'll answer Bob's question about the brake fluid reservoir. I've looked and looked but cannot find the correct E12 reservoir new. That is the original one to the car which cleaned up pretty well, though it is discolored. The only bottle that is actually available new is the one that mounts on the inner fender, then uses hoses that run to the ports on the master cylinder. I have a very nice E28 bottle, which is essentially the same in construction save for a different location for the clutch master feed nipple as well as the cap, but it's not correct. I had been going back and forth on it.
I went to Hose Power and inquired about having my oil cooler lines duplicated. They actually had M22x1.5 fittings. I needed 3 90s and a 45 and they actually had them in stock. Unfortunately, they're for very high pressure hydraulic line, so between those and the lines, they would look quite out-of-place. They're also a couple hundred dollars. I don't seem to see any other options though. I told them I'd think about it.
I also went by the wood refinisher to drop off the console piece and my shifter knob (remembered that as I was pulling into the parking lot, so I turned around and went home to get it). They had made substantial progress on my wood and it already looks fantastic, but isn't finished. I'd have taken a photo, but I am only allowed to take two photos a day on my phone before it says I don't have any space. Not sure how that works.
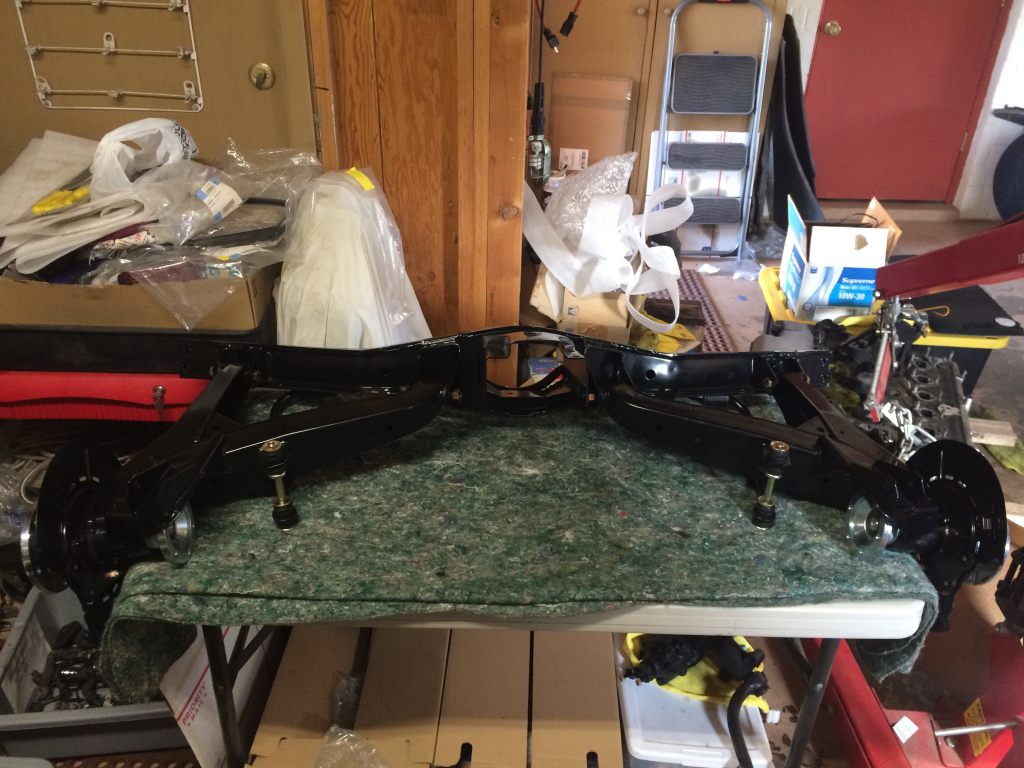
I decided with that great momentum and with me not really wanting to work on wiring for now, I'd start assembling my rear subframe. I really wanted to make sure everything would fit together. It did.
With that sitting there, I turned my attention to the differential. We might remember, it looked like this when I removed it from the car:
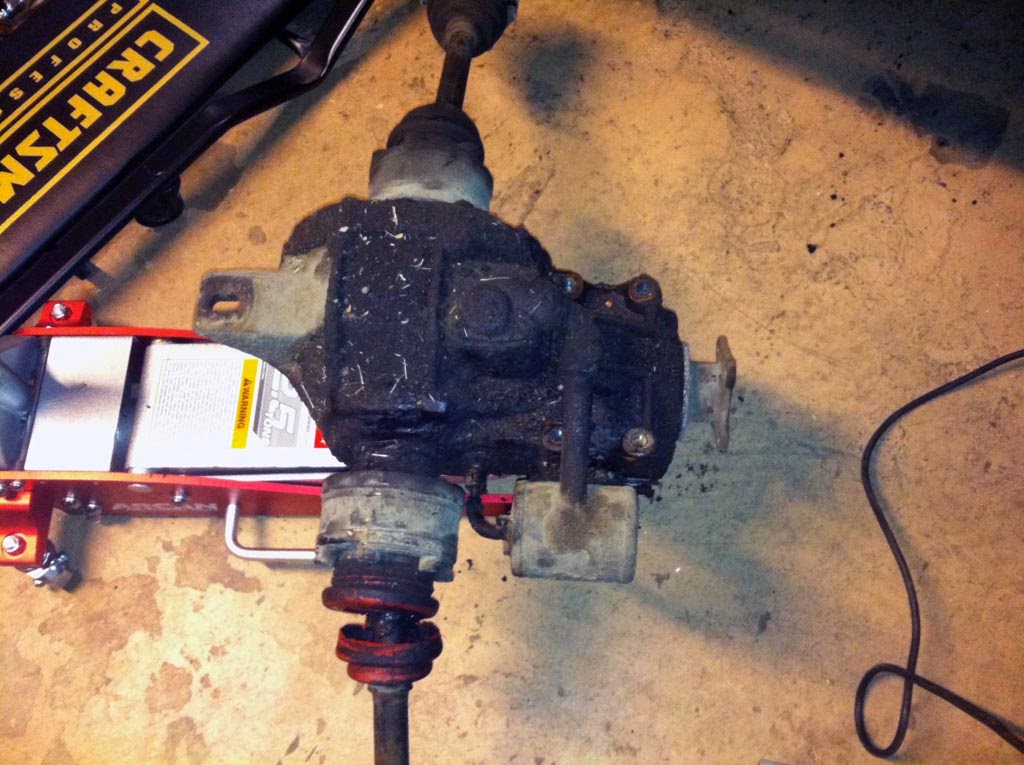
I had spent a good six hours cleaning it up and got it about 80% of the way there. I had the pinion seal replaced. Also did the output seals and the large o-ring for the side cover is en route, but it can be installed anytime before I fill it with oil. The diff locks up perfectly fine and is very clean inside, so I saw no reason to mess with that. I finished cleaning it the rest of the way, primed and painted it last night. Unfortunately, the "S" was in really nice shape and clearly visible, but it didn't survive removal of some nasty gunk. I took measurements and I will re-create it when I have time.
Today, I offered it up to the rear subframe.
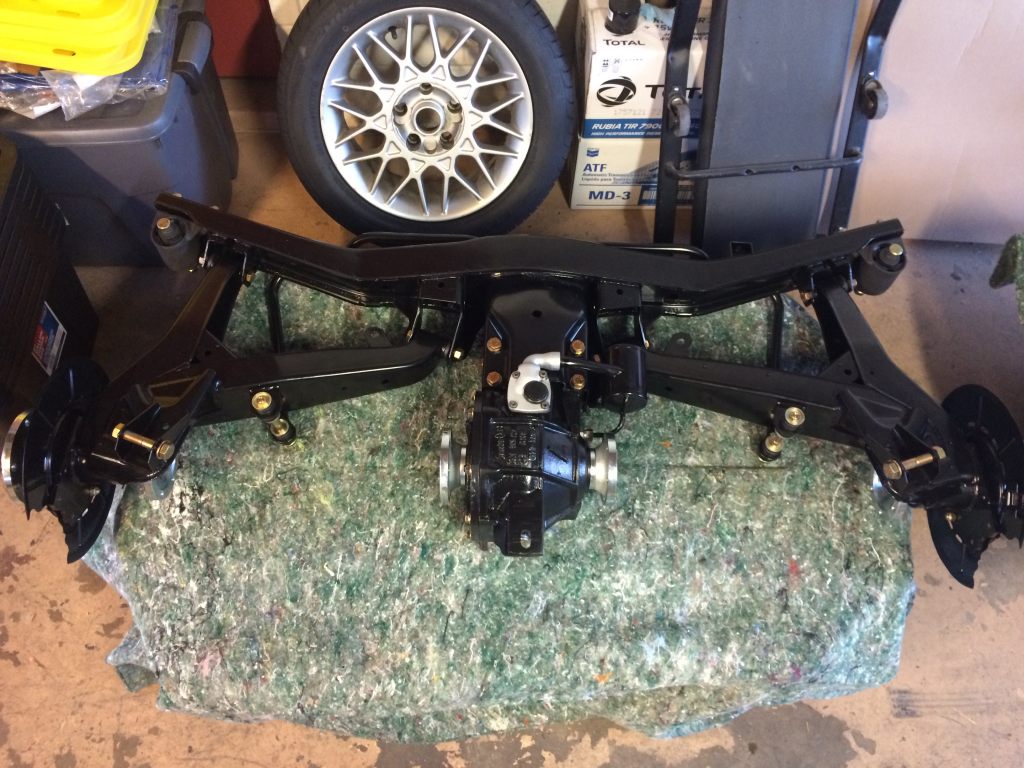
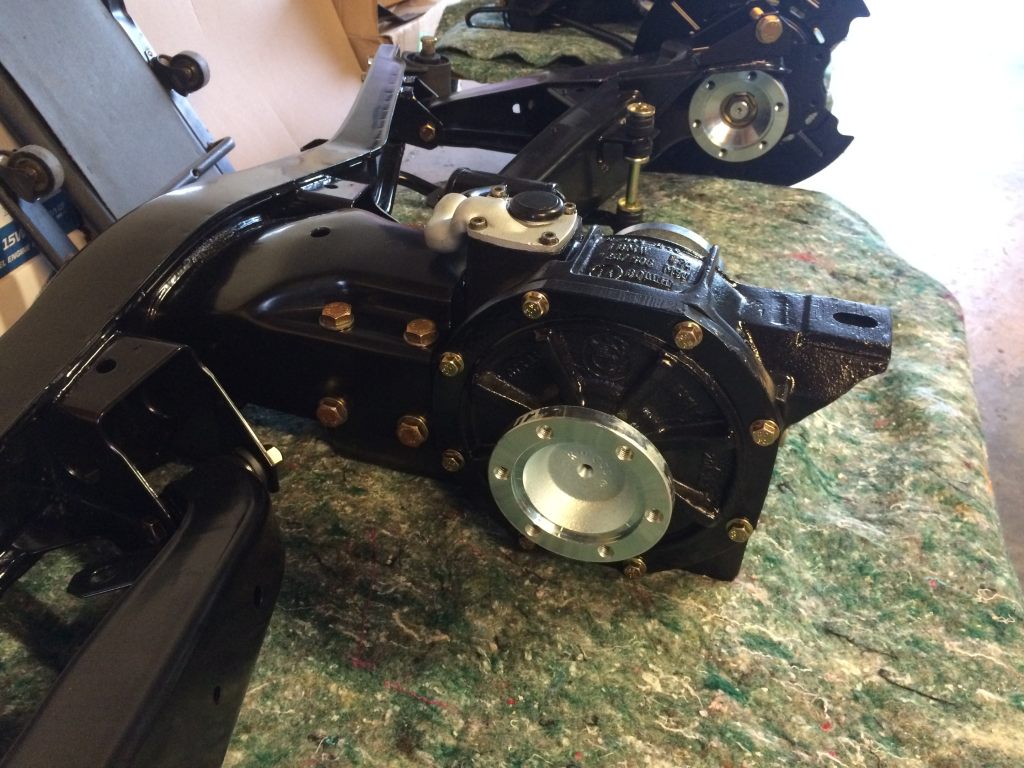
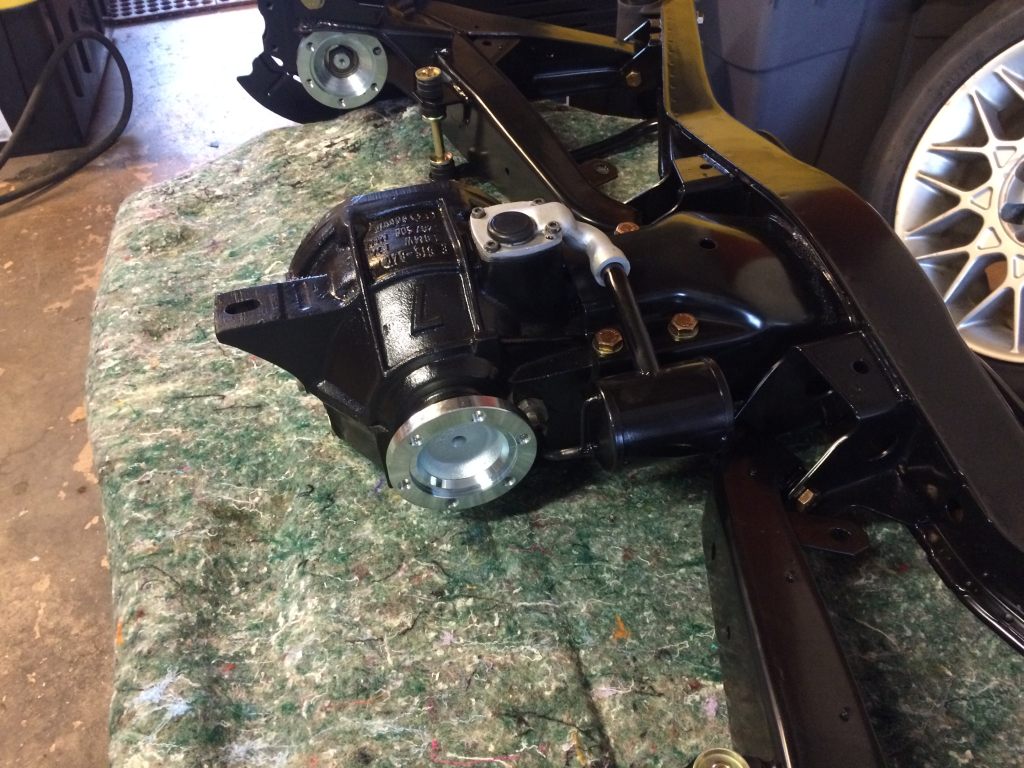
At this point, it's ready to install in the car. The new diff mount is installed and torqued.
The rebuilt axles are ready to install with new bolts as well, but due to the updated design of the inner caps, the original reinforcement pieces do not fit, so the updated design (as used on E28s onward) has to be substituted. Those are on order, but they're not difficult to install. Plus, since the diff o-ring has to be changed, I can't install the axles anyway. Also, after installation, the handbrake cables will be installed, then the shoes and adjusters. Once those are in, I can install the rotors, calipers and the last hard brake lines. I cleaned up all of those clips I got, soaked them in Vinylex and I think they should work, being that I do have some of the correct clips.
After I was satisfied with the rear subframe, I turned my attention to the front. I installed the steering box, the control arms, radius rods, sway bar and steering linkage. The ETK diagram for the steering linkage shows the idler arm bushing upside down relative to the idler arm, so I pressed it in the wrong way to start, which was definitely a setback. It worked fine, but the drag link was crooked, so it had to be corrected.
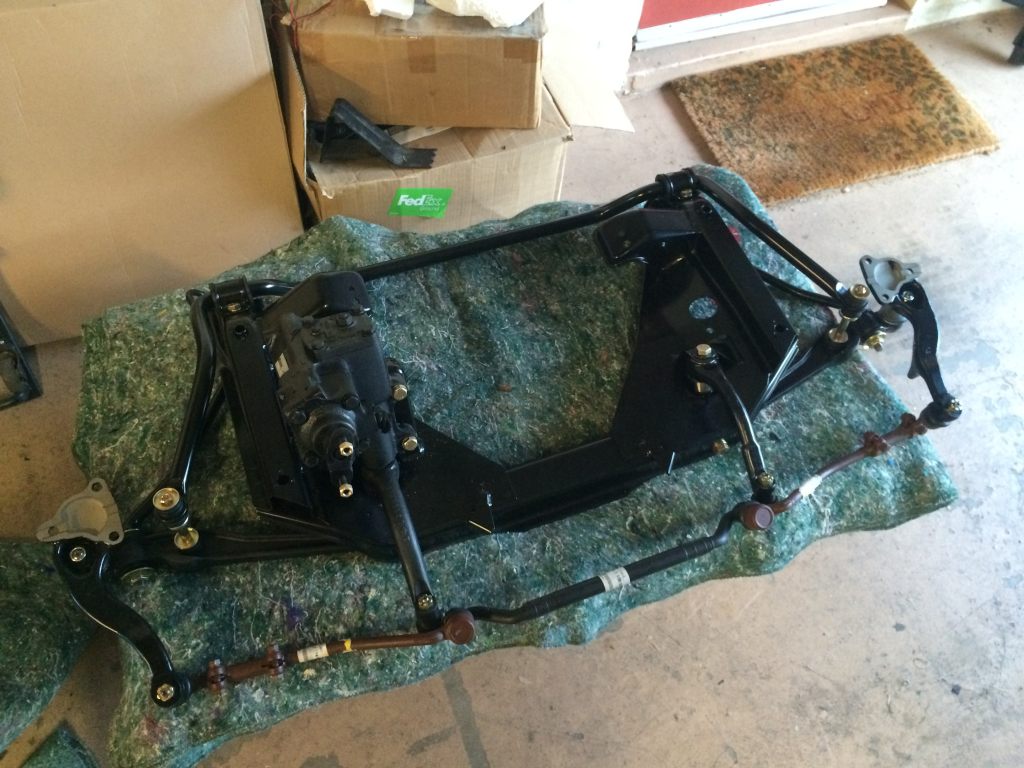
It's also ready to install. I'm hoping to get the subframes installed tomorrow which will be a big step.
I keep thinking the end is near but as I think that, I find the list growing in my head. It's likely the front subframe will come out again to install the engine and transmission, but at this point, it is critical to make sure all of the ancillary functions such as steering and the brakes and whatnot function properly. That way, when the time comes I can just focus on one thing. Filling that giant hole under the hood with something I hope will compliment it.
I am also totally stoked to not have to tip-toe around all this stuff in the house!
First, I'll answer Bob's question about the brake fluid reservoir. I've looked and looked but cannot find the correct E12 reservoir new. That is the original one to the car which cleaned up pretty well, though it is discolored. The only bottle that is actually available new is the one that mounts on the inner fender, then uses hoses that run to the ports on the master cylinder. I have a very nice E28 bottle, which is essentially the same in construction save for a different location for the clutch master feed nipple as well as the cap, but it's not correct. I had been going back and forth on it.
I went to Hose Power and inquired about having my oil cooler lines duplicated. They actually had M22x1.5 fittings. I needed 3 90s and a 45 and they actually had them in stock. Unfortunately, they're for very high pressure hydraulic line, so between those and the lines, they would look quite out-of-place. They're also a couple hundred dollars. I don't seem to see any other options though. I told them I'd think about it.
I also went by the wood refinisher to drop off the console piece and my shifter knob (remembered that as I was pulling into the parking lot, so I turned around and went home to get it). They had made substantial progress on my wood and it already looks fantastic, but isn't finished. I'd have taken a photo, but I am only allowed to take two photos a day on my phone before it says I don't have any space. Not sure how that works.
I decided with that great momentum and with me not really wanting to work on wiring for now, I'd start assembling my rear subframe. I really wanted to make sure everything would fit together. It did.
With that sitting there, I turned my attention to the differential. We might remember, it looked like this when I removed it from the car:

I had spent a good six hours cleaning it up and got it about 80% of the way there. I had the pinion seal replaced. Also did the output seals and the large o-ring for the side cover is en route, but it can be installed anytime before I fill it with oil. The diff locks up perfectly fine and is very clean inside, so I saw no reason to mess with that. I finished cleaning it the rest of the way, primed and painted it last night. Unfortunately, the "S" was in really nice shape and clearly visible, but it didn't survive removal of some nasty gunk. I took measurements and I will re-create it when I have time.
Today, I offered it up to the rear subframe.
At this point, it's ready to install in the car. The new diff mount is installed and torqued.
The rebuilt axles are ready to install with new bolts as well, but due to the updated design of the inner caps, the original reinforcement pieces do not fit, so the updated design (as used on E28s onward) has to be substituted. Those are on order, but they're not difficult to install. Plus, since the diff o-ring has to be changed, I can't install the axles anyway. Also, after installation, the handbrake cables will be installed, then the shoes and adjusters. Once those are in, I can install the rotors, calipers and the last hard brake lines. I cleaned up all of those clips I got, soaked them in Vinylex and I think they should work, being that I do have some of the correct clips.
After I was satisfied with the rear subframe, I turned my attention to the front. I installed the steering box, the control arms, radius rods, sway bar and steering linkage. The ETK diagram for the steering linkage shows the idler arm bushing upside down relative to the idler arm, so I pressed it in the wrong way to start, which was definitely a setback. It worked fine, but the drag link was crooked, so it had to be corrected.
It's also ready to install. I'm hoping to get the subframes installed tomorrow which will be a big step.
I keep thinking the end is near but as I think that, I find the list growing in my head. It's likely the front subframe will come out again to install the engine and transmission, but at this point, it is critical to make sure all of the ancillary functions such as steering and the brakes and whatnot function properly. That way, when the time comes I can just focus on one thing. Filling that giant hole under the hood with something I hope will compliment it.
I am also totally stoked to not have to tip-toe around all this stuff in the house!
Re: E12 M535i Project - 01-23-16 Update
I love it all. Inspiring.

