E12 M535i Project - 08-21-19 Update
Re: E12 M535i Project - 01-23-16 Update
Don't scratch anything.
Re: E12 M535i Project - 01-24-16 Update
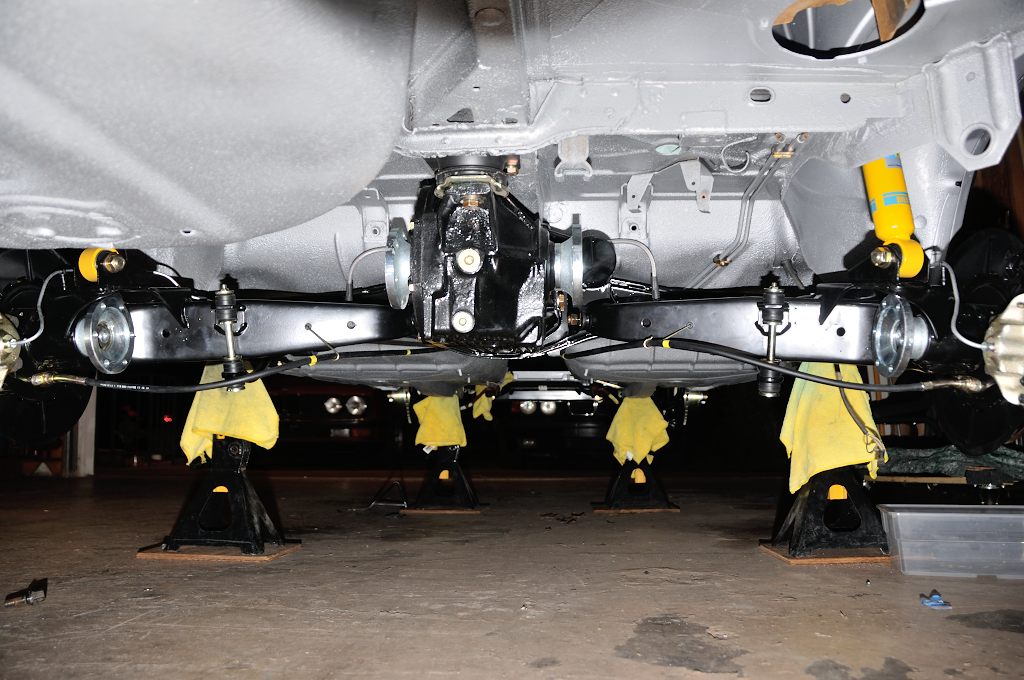
This morning, I got started removing the dolly under the rear of the car. I used it to jack up the car, put stands at the rear jacking points and removal went pretty smoothly. Not having a lift or one of those nifty lift-carts, I got to thinking about how to put the rear subframe in the car. While I waited for Scott (scarey013) to swing by, I swapped out the subframe pins. The originals were in beautiful shape, but the part you could see was discolored, so they had to be replaced. No drama there. Everything went smoothly. I then looked at the subframe sitting there. It is on two 27-gallon plastic containers with plywood over the top, then a disaster blanket on top. I thought, "Instead of trying to raise the subframe to the car, why not lower the car to the subframe. I didn't know if the containers could support the rear of the car, but it was worth a shot. Scott showed up. I shared the idea with him and I could tell he was intrigued. With no fuel tank in the car, it was pretty easy to use this substantial chunk of wood to raise the car just aft of the diff mount, slide the assembly under the car, incrementally lower the jack stands just in case and amazingly, it all went together swimmingly. Once it was in, we tightened the bushings and made sure the pins pulled all the way down, snugged up the diff and we were in great shape.
For the front, There really isn't any place to easily raise the whole front of the car and make adjustments, so we had to do it differently. Transferred the subframe to my stanced furniture dolly that formerly held my M90. Plywood and a disaster blanket of course. Rolled it over, then used the jack to offer it up to the frame rails. No muss, no fuss. It was a little tricky getting two of the bolts started, but it just needed a couple of adjustments. Snugged it up and I was excited. While I had Scott, he helped me put the front struts in and I figured I had a handle on everything else. I was glad he could work me in. This went very well with two people!
After Scott left, I went through and torqued all of the bolts for the trailing arms, diff mount, and the subframe mounts.
Next thing was assembling the rear shocks and springs. I didn't do it when I did the rest of the suspension because I forgot to order the bump stops. I got them a couple months ago but just assembled everything today. New spring pads and rear shock mounts, of course. I got them installed. Moved on to the emergency brake assemblies:
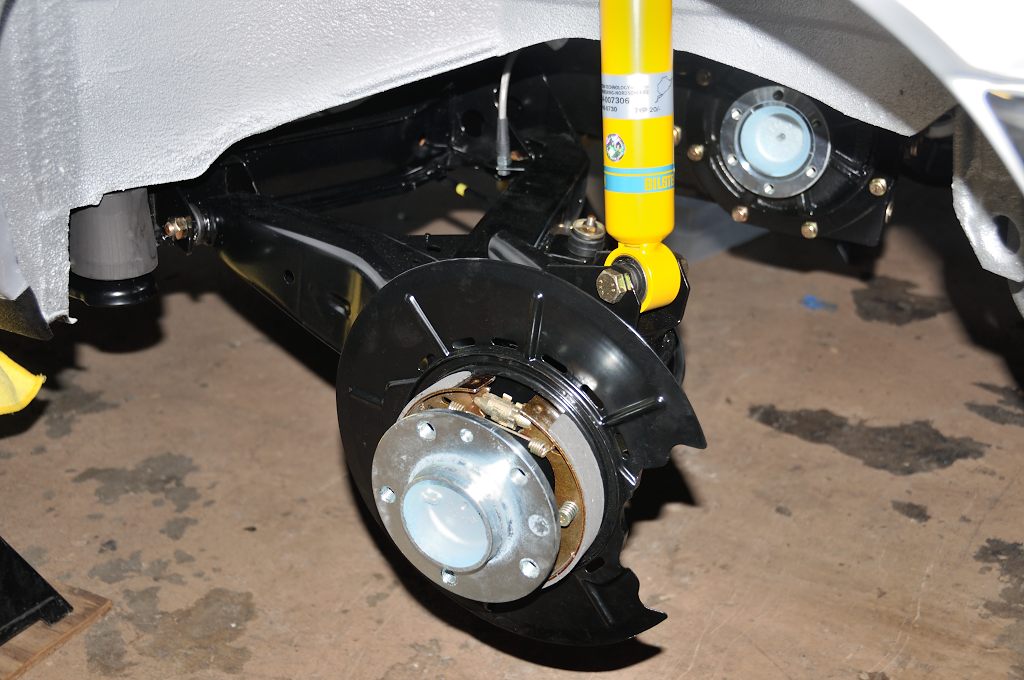
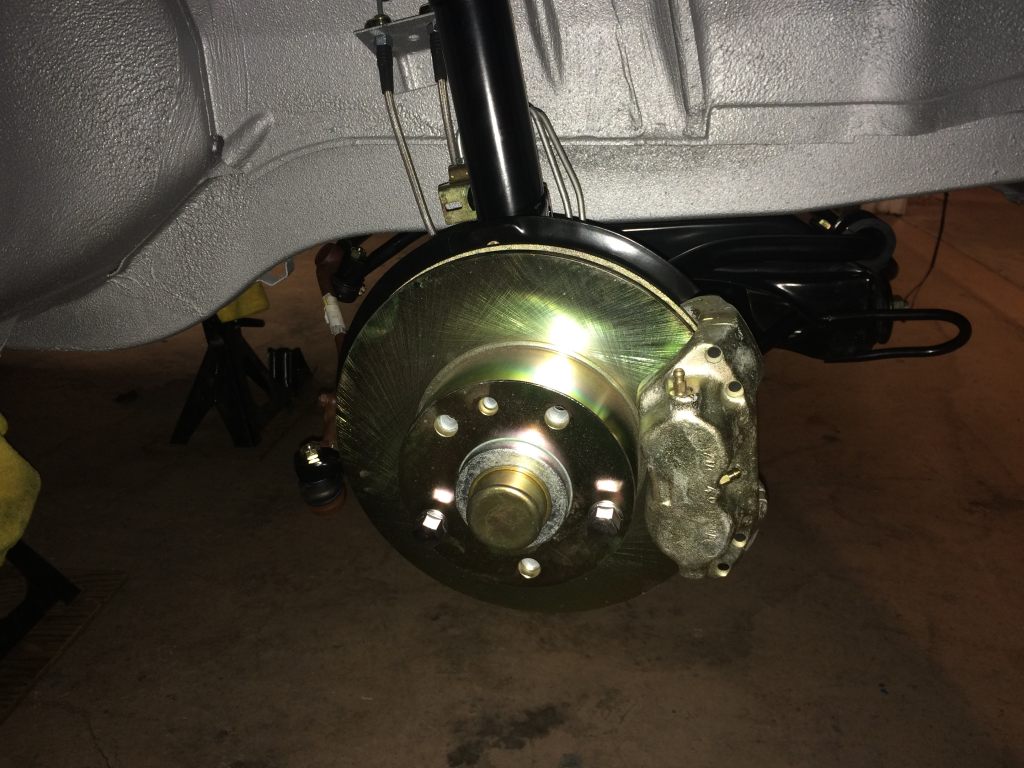
With that done on each side, I installed the rotor and the brake caliper. I forgot to order the rotor set screws, but a couple of lug bolts work for now. I also haven't ordered brake pads yet, but they're easy to slip into place with these calipers.
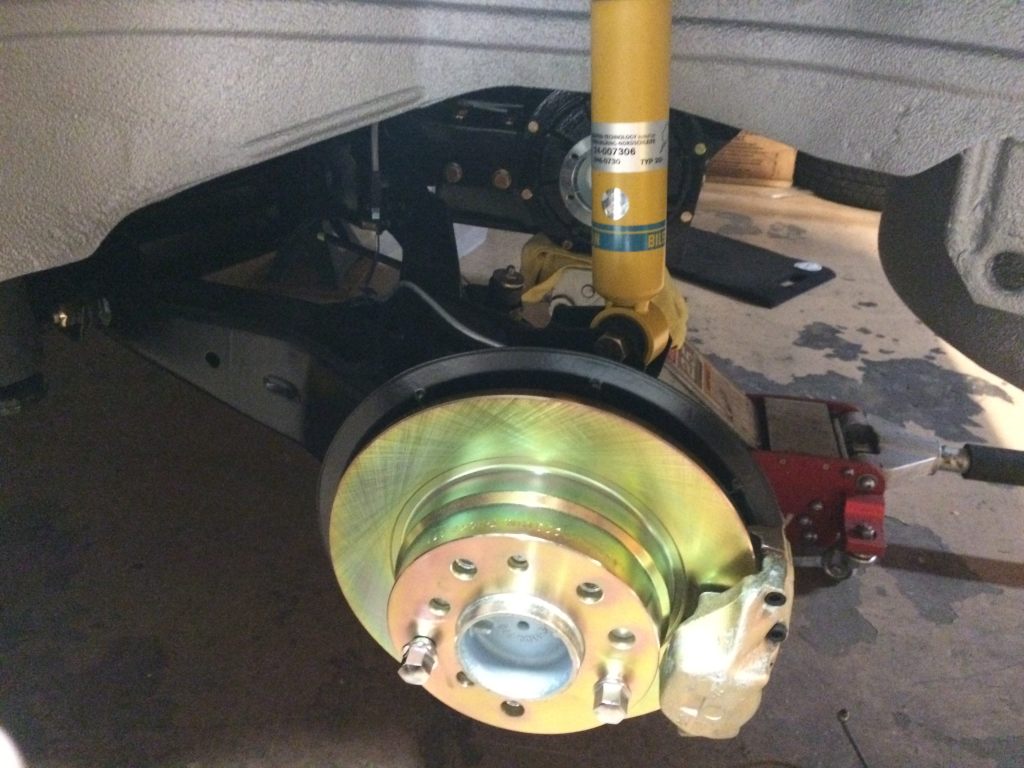
With that done, the rear looks like this. The axles are ready to go in, but I'm waiting on the new reinforcements for the bolts, and of course the O-ring for the cover on the diff.
With the rear done, I installed the bearing races into the front hubs, packed the wheel bearings and assembled them. Followed the torquing procedure and installed the cotter pin. New dust caps too! Put the front rotors on, calipers and then assembled the rest of the brake lines.
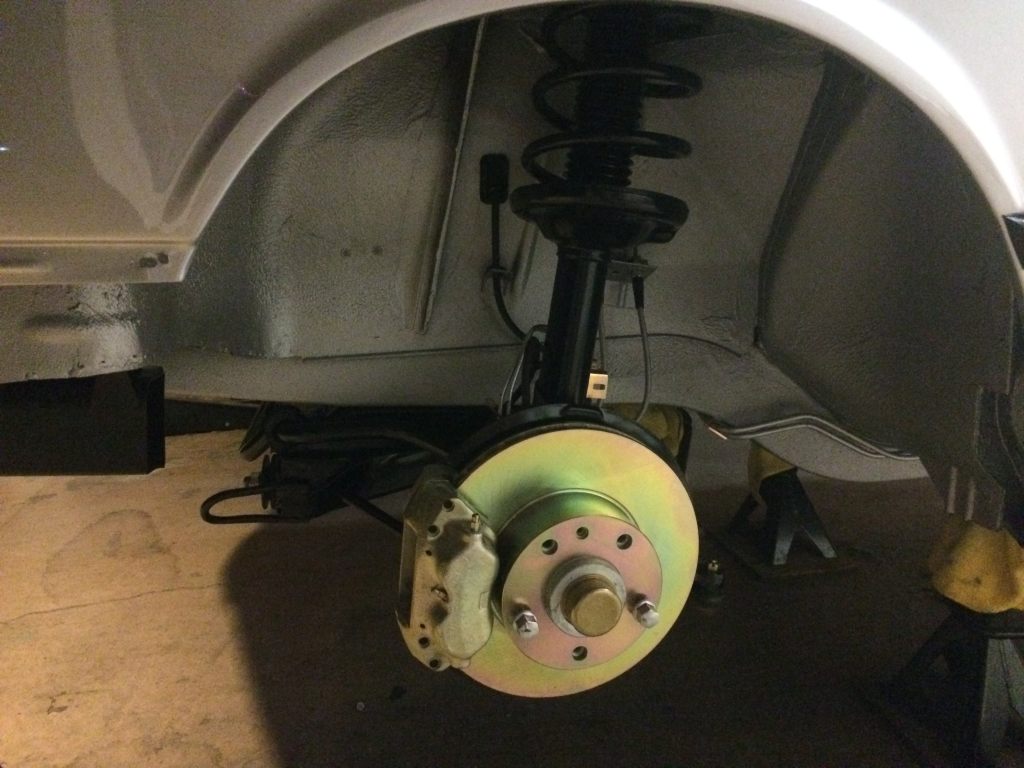
Here's the front subframe assembled and installed in the car!
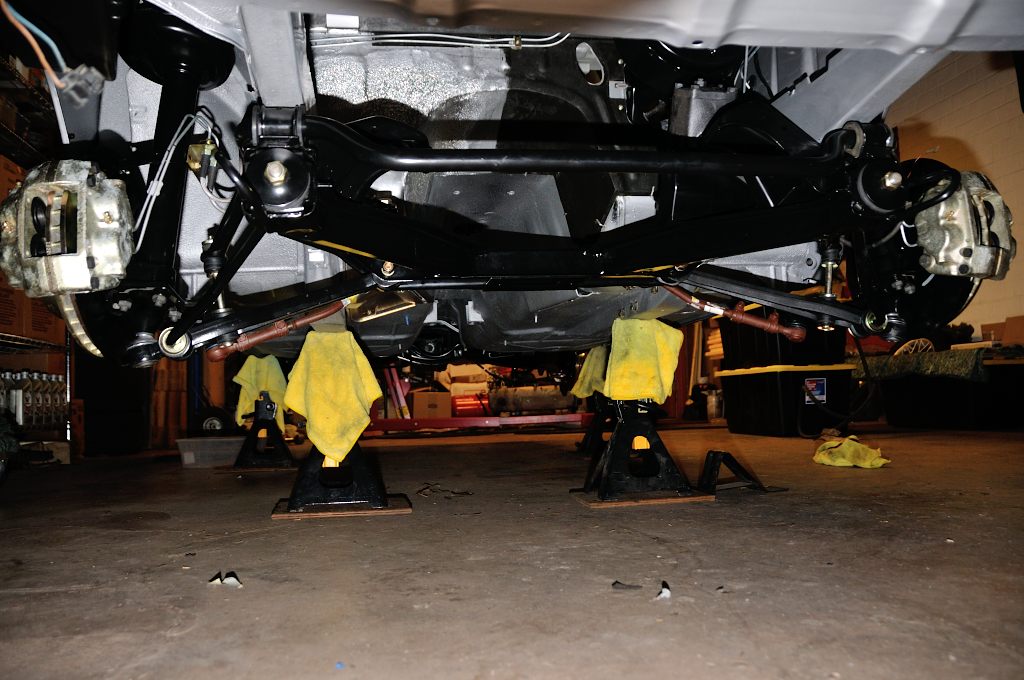
Here's how I left things this evening.
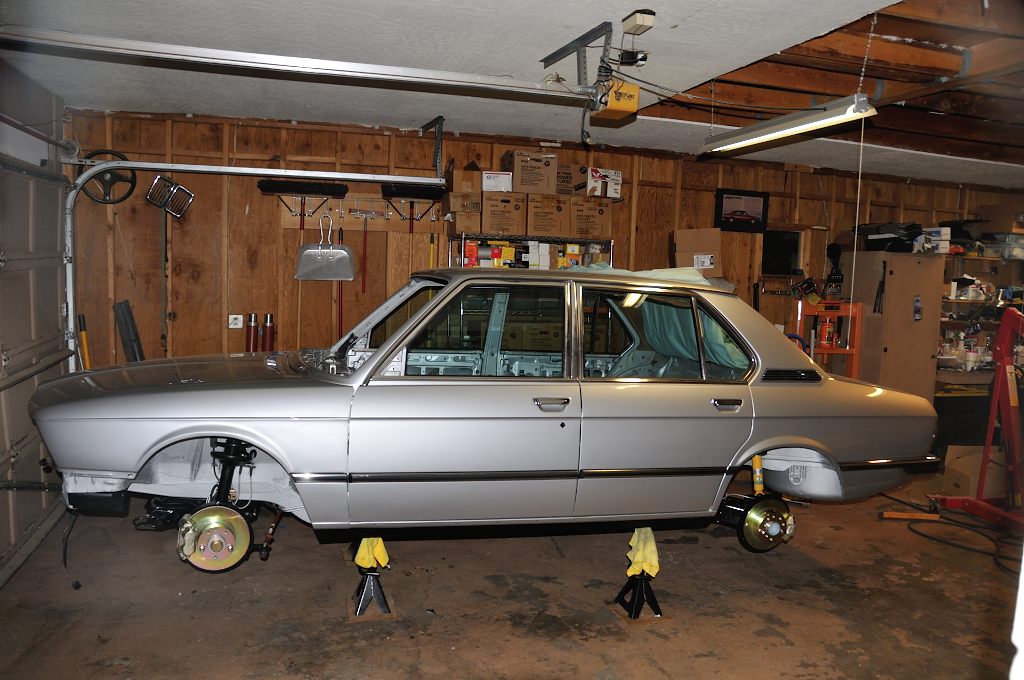
To me, this is huge progress. As much as I had gotten done since the beginning of the month, the car being on dollies was really getting to me and having so much ready to assemble, I'm glad to see it all in the car. Also, I have to say, everything went very smoothly with all of this and my overlooking the rotor screws was truly the worst thing that went wrong. It's not often things go according to plan. I think I'd probably still be working on the rear subframe if I was doing it myself.
Still plenty to do though!
For the front, There really isn't any place to easily raise the whole front of the car and make adjustments, so we had to do it differently. Transferred the subframe to my stanced furniture dolly that formerly held my M90. Plywood and a disaster blanket of course. Rolled it over, then used the jack to offer it up to the frame rails. No muss, no fuss. It was a little tricky getting two of the bolts started, but it just needed a couple of adjustments. Snugged it up and I was excited. While I had Scott, he helped me put the front struts in and I figured I had a handle on everything else. I was glad he could work me in. This went very well with two people!
After Scott left, I went through and torqued all of the bolts for the trailing arms, diff mount, and the subframe mounts.
Next thing was assembling the rear shocks and springs. I didn't do it when I did the rest of the suspension because I forgot to order the bump stops. I got them a couple months ago but just assembled everything today. New spring pads and rear shock mounts, of course. I got them installed. Moved on to the emergency brake assemblies:
With that done on each side, I installed the rotor and the brake caliper. I forgot to order the rotor set screws, but a couple of lug bolts work for now. I also haven't ordered brake pads yet, but they're easy to slip into place with these calipers.
With that done, the rear looks like this. The axles are ready to go in, but I'm waiting on the new reinforcements for the bolts, and of course the O-ring for the cover on the diff.
With the rear done, I installed the bearing races into the front hubs, packed the wheel bearings and assembled them. Followed the torquing procedure and installed the cotter pin. New dust caps too! Put the front rotors on, calipers and then assembled the rest of the brake lines.
Here's the front subframe assembled and installed in the car!
Here's how I left things this evening.
To me, this is huge progress. As much as I had gotten done since the beginning of the month, the car being on dollies was really getting to me and having so much ready to assemble, I'm glad to see it all in the car. Also, I have to say, everything went very smoothly with all of this and my overlooking the rotor screws was truly the worst thing that went wrong. It's not often things go according to plan. I think I'd probably still be working on the rear subframe if I was doing it myself.
Still plenty to do though!
Re: E12 M535i Project - 01-24-16 Update
WOW, would you look at that!
Re: E12 M535i Project - 01-24-16 Update
Sweet Chewbacca!
Re: E12 M535i Project - 01-24-16 Update
Today was a day of great progress! Very rewarding!!! Great job Chris! Now go find some screws!
-
Kyle in NO
- Posts: 17638
- Joined: Feb 12, 2006 12:00 PM
- Location: Nasty Orleans------> Batten-Rooehjch------>More Souther LA
Re: E12 M535i Project - 01-24-16 Update
fuuuuuuuggggggg.

-
Tammer in Philly
- Posts: 10719
- Joined: Feb 12, 2006 12:00 PM
- Location: CHI, IL
Re: E12 M535i Project - 01-24-16 Update
What they said. Holy crap. I am pretty sure this will be the nicest E12 in the country at least. I do hope you'll drive the thing, but photograph the snot out of it before you do.
-
Adam W in MN
- Posts: 5053
- Joined: Feb 12, 2006 12:00 PM
- Location: Don't waste my motherf***in' time!
- Contact:
Re: E12 M535i Project - 01-24-16 Update
Wow Chris, I think I blinked and you got all this done!
Re: E12 M535i Project - 01-24-16 Update
Inspirational build. Especially as you don't have a ramp
Re: E12 M535i Project - 01-24-16 Update
"Huge progress" indeed. 

-
Mark 88/M5 Houston
- Posts: 8548
- Joined: Feb 12, 2006 12:00 PM
- Location: Far North Houston
Re: E12 M535i Project - 01-24-16 Update
Congrats on the progress Chris! Looks great! 
Re: E12 M535i Project - 01-24-16 Update
Dude...
DUDE!
Very well done, it's good to see the actual results of your OCD.
Can't wait to see it...someday.
DUDE!
Very well done, it's good to see the actual results of your OCD.
Can't wait to see it...someday.
Re: E12 M535i Project - 01-24-16 Update
Way better than when it was delivered new! 
Re: E12 M535i Project - 02-03-16 Update
Thanks. I appreciate the comments.
I picked up a set of the rotor retaining screws and put them in. Also did brake pads front and rear as well. At this point, all the brakes should need to work is fluid. Fingers crossed on that.
The reinforcements came in for the axles, so I got them installed. I can torque the bolts when I put the drivetrain in or something.
I needed a set of wheels for it. I didn't want to buy tires for the car yet in case it ends up sitting for a few more years, so I tried to think of what I had in storage. The wheel fort has been greatly depleated since most of the battlements have been sent to the front lines and the budget (and desire for that matter) for procurement has been all but eliminated. I did have the stock wheels from the '75 530i and while I really just don't like them, they'll work. I brought them home, cleaned them up and put them on the car.
I decided that I better turn my attention to the fuel tank while the car was still on jack stands. I had a fuel tank powder-coated. I disassembled and cleaned the original sending unit, used a new o-ring and measured out new fuel line for the return and feed lines and got that installed. It was a little trickier than anticipated, but it worked well nonetheless. The tank also has a new heat shield for the rear muffler and I also had a rear muffler hanger powder-coated, too, so that's all installed with the new bolts I purchased from BMW. Unfortunately, I wasn't able to get good photos of this stuff, so I will try another day.
I moved to the front, put the pins in all of the steering linkage castle nuts. I wasn't going to do that but I decided I no longer cared and didn't want to forget.
I temporarily installed the steering column and next thing you know, the car was on the ground.
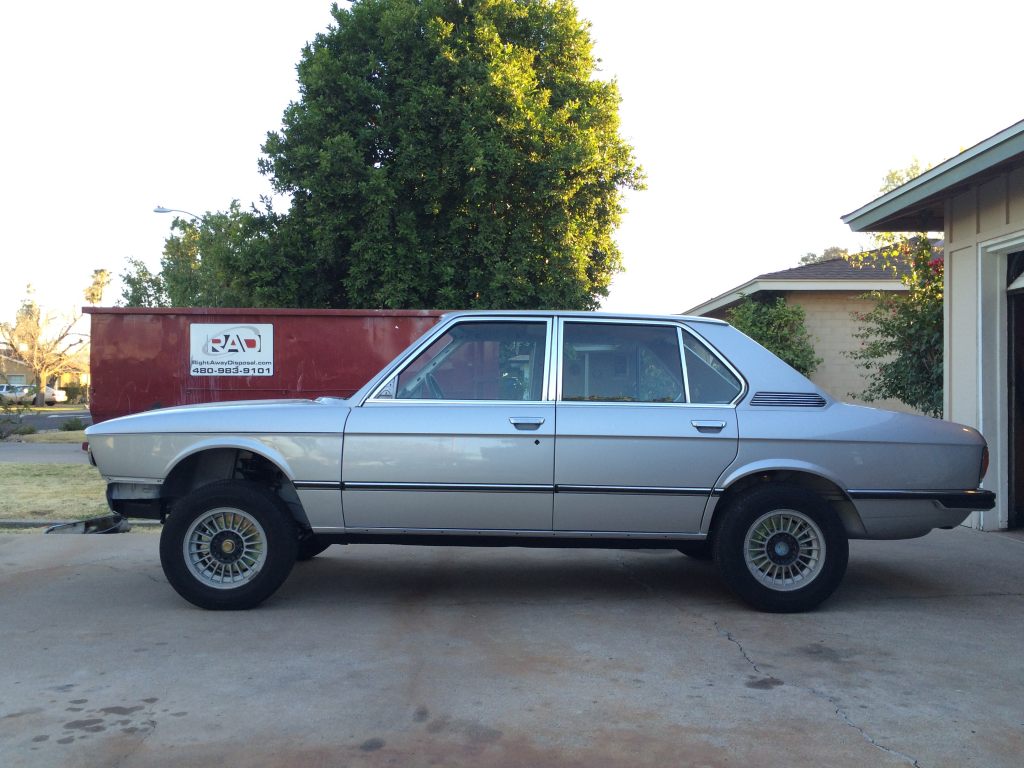
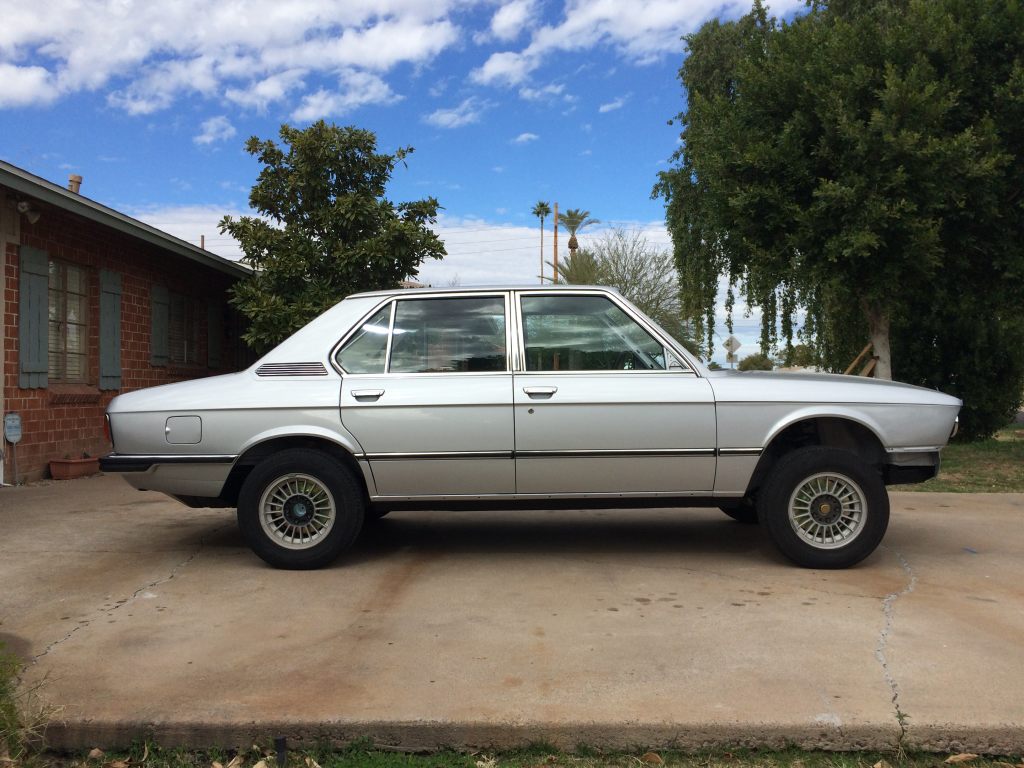
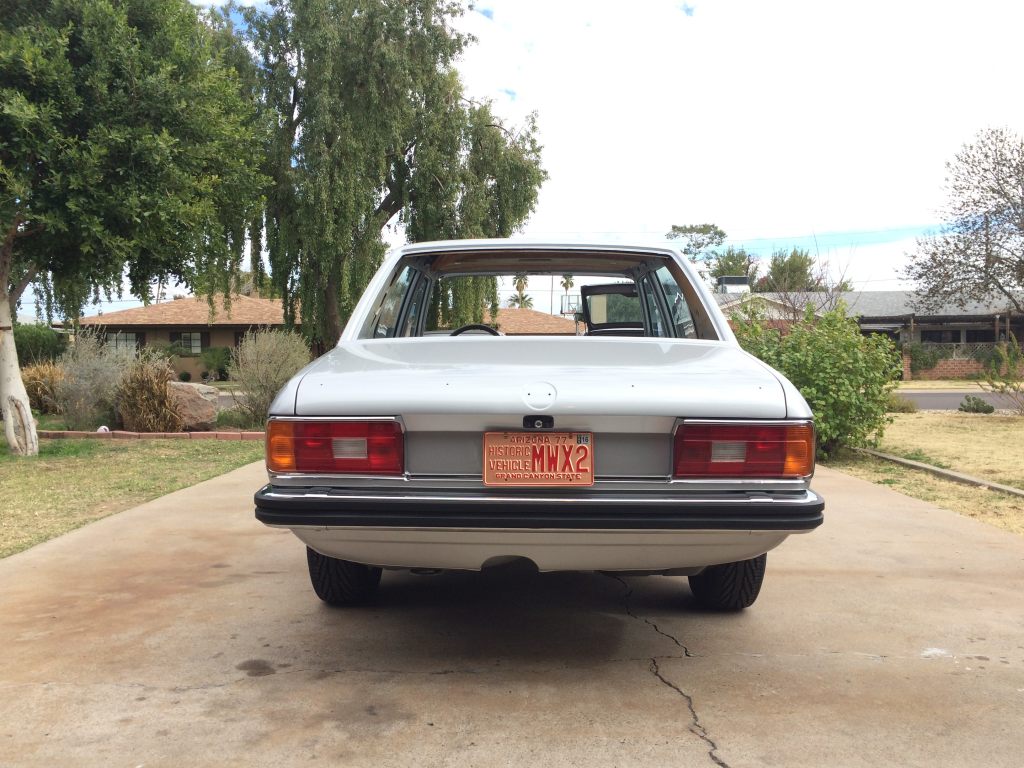
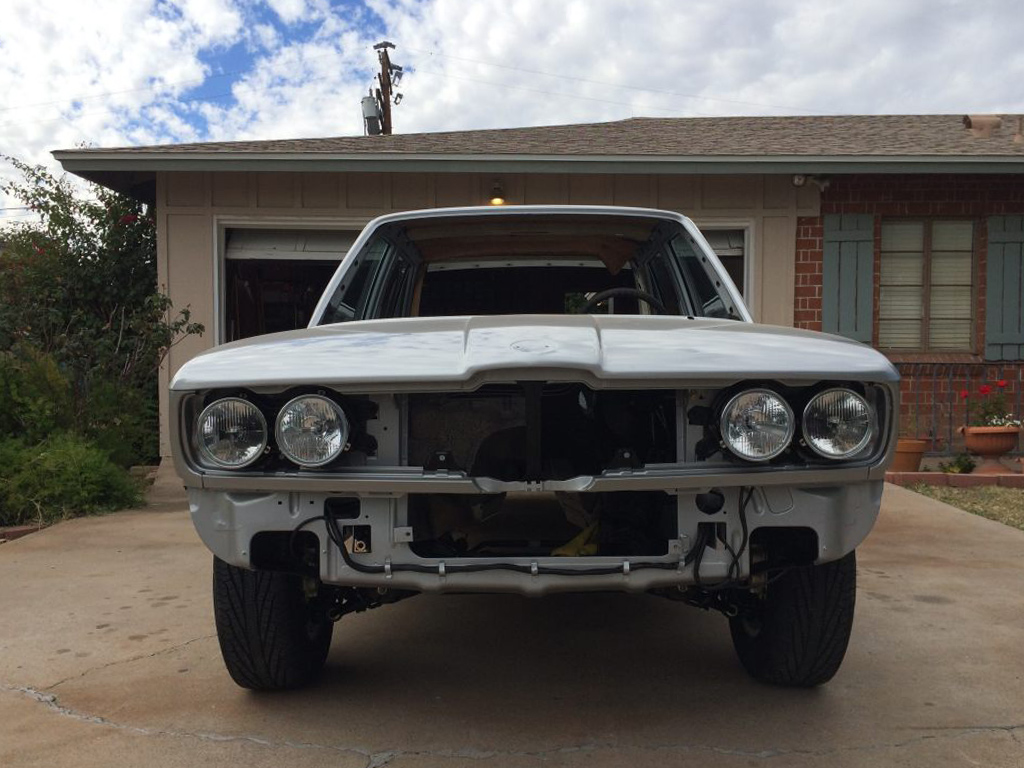
The panel gaps changed slightly - in a good way. Still a couple of adjustments, but none will be made until this thing has the drivetrain in it.
I worked a bit on trying to get the wiring situated at the left side of the firewall inside, but it's a long and tedious process of trying to remember where half of this crap goes. Definitely a lesson there. I took lots of photos when I initially took the car apart, but I didn't take the right photos. Some of the harnesses have essentially fallen into place, but some areas aren't quite like that.
I looked at what needed to be done now that the car is on the ground. I have lots of interior stuff to do yet, but I still don't have insulation for the firewall. I also cannot reach the guy who put the headliner in the B7. I have left a few messages and even went by the shop he works out of and no luck, so I guess I have to look for someone that can make and install the headliner in addition to redoing my seats again. I did pick up a second floor carpet to cut up to hopefully make all of the rest of the pieces I need, but we will see on that as well. Not really looking forward to that process since I'm back to trying to find someone and you never know how that will work out. I'm at the point now where even if I did get a hold of the guy, it doesn't sound like he wants to take on my project and if he did, would I ever hear from him again?
There was something I could do though. I had everything I needed to rebuild my heater. This is very important since I have never actually used a heater in any BMW I've ever owned.
I moved on to the heater. When I removed it from the car, I simply left the heater control panel attached to it and it's been moved around for years. I had acquired a very nice heater panel a few years back and it's been in a closet waiting for something to happen. I figured the bigger pieces I could leave things in, the better time I'd have trying to put them back together. I had a new heater blower and recently purchased a new heater core, new heater valve and anything else I thought I would need for this, the heater that I will never use.
I split the halves (which was pretty interesting):
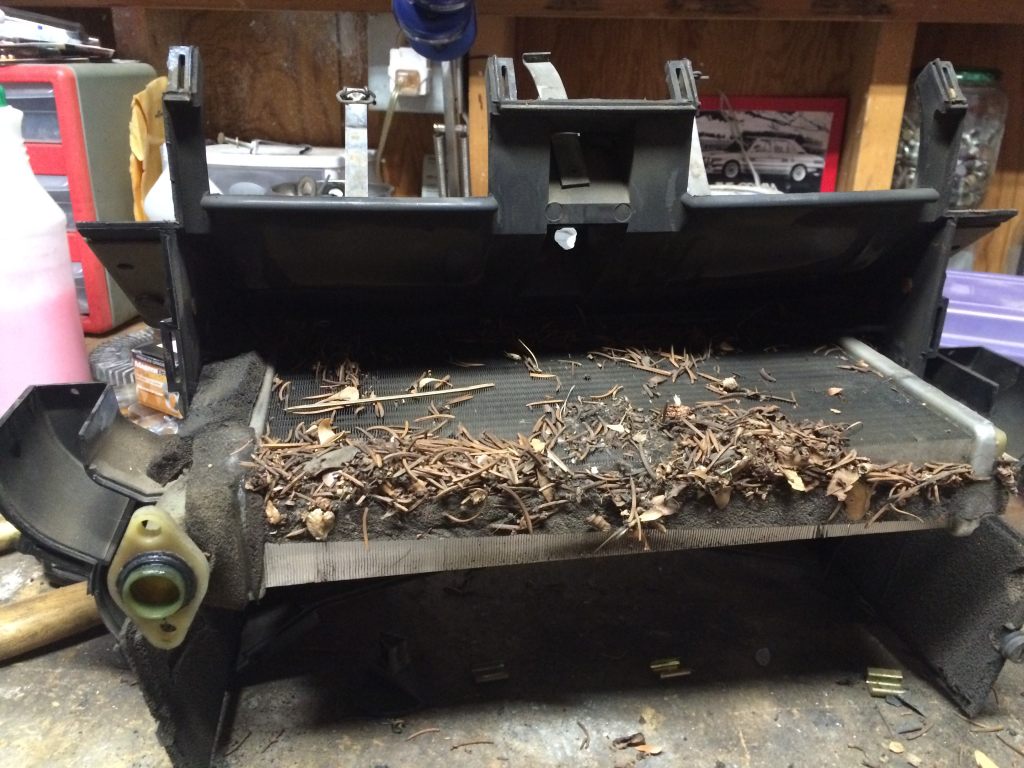
Not as bad as I thought. Once I got the old core out and removed all of the compost, I started thoroughly cleaning the halves. What I had seen was just how poor the foam was on the flaps. I could remove it all, but it's supposed to be there, so what could I replace it with? I found a suitable replacement and removed the old foam. I thoroughly cleaned all of the parts and was left with this:
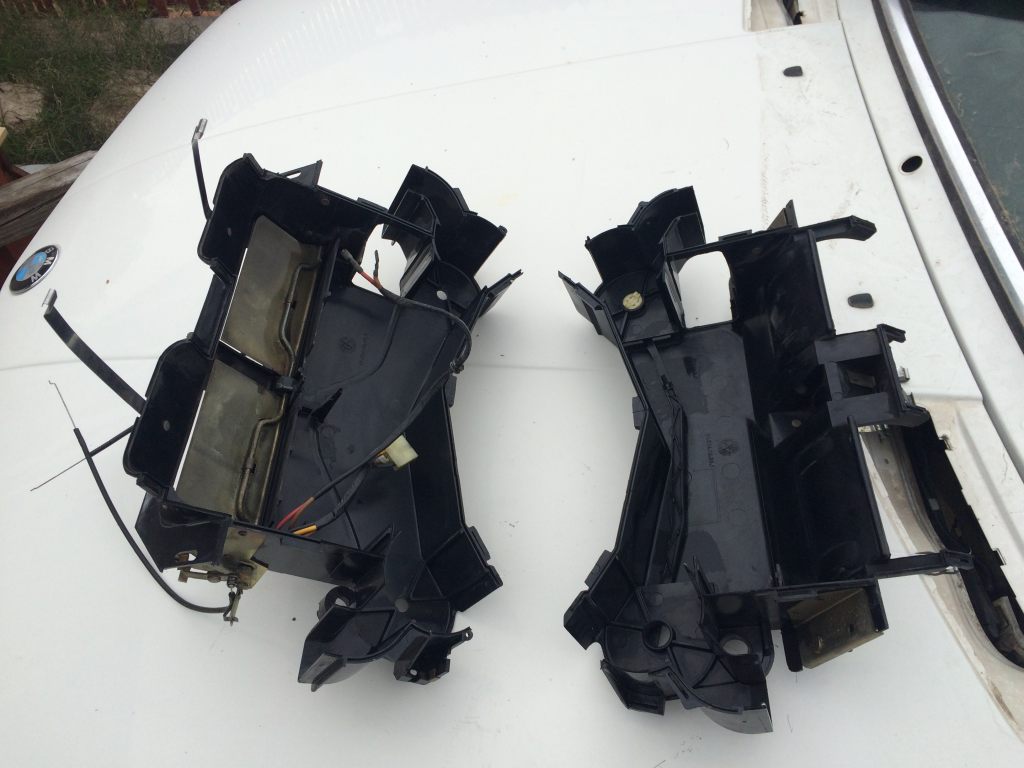
One of the floor flaps:
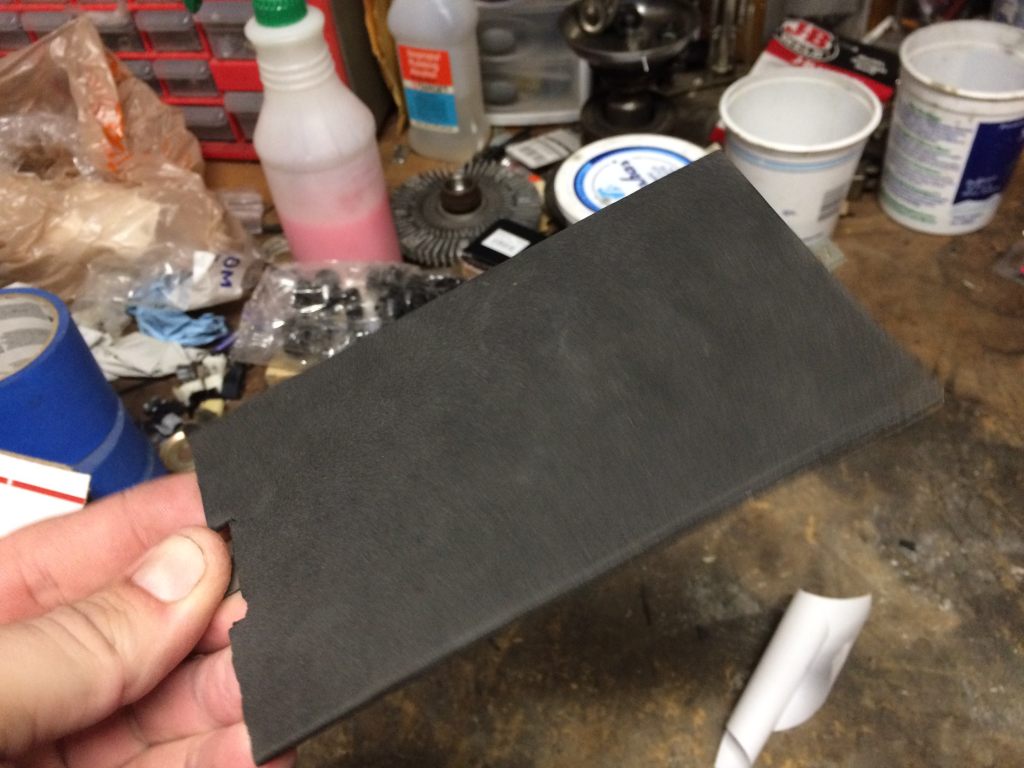
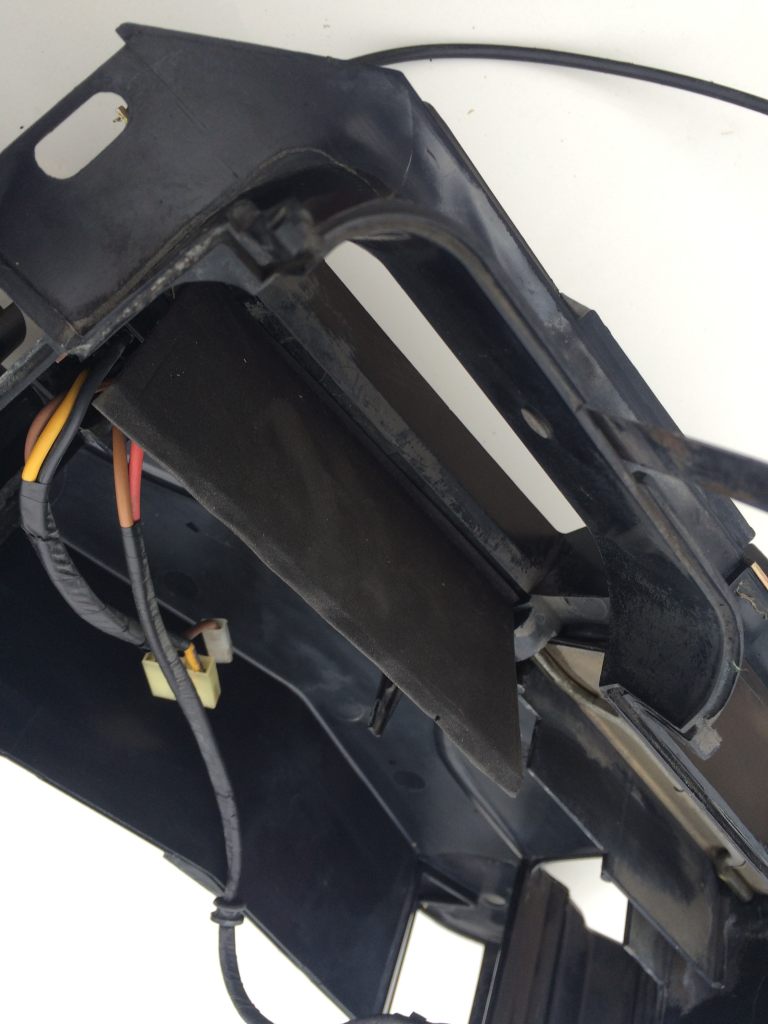
I couldn't remove the fresh air flaps, so I replaced their foam in situ, but used the floor flaps for a template. I had to slightly trim it to size, but it worked well.
New core installed - Made in 2002:
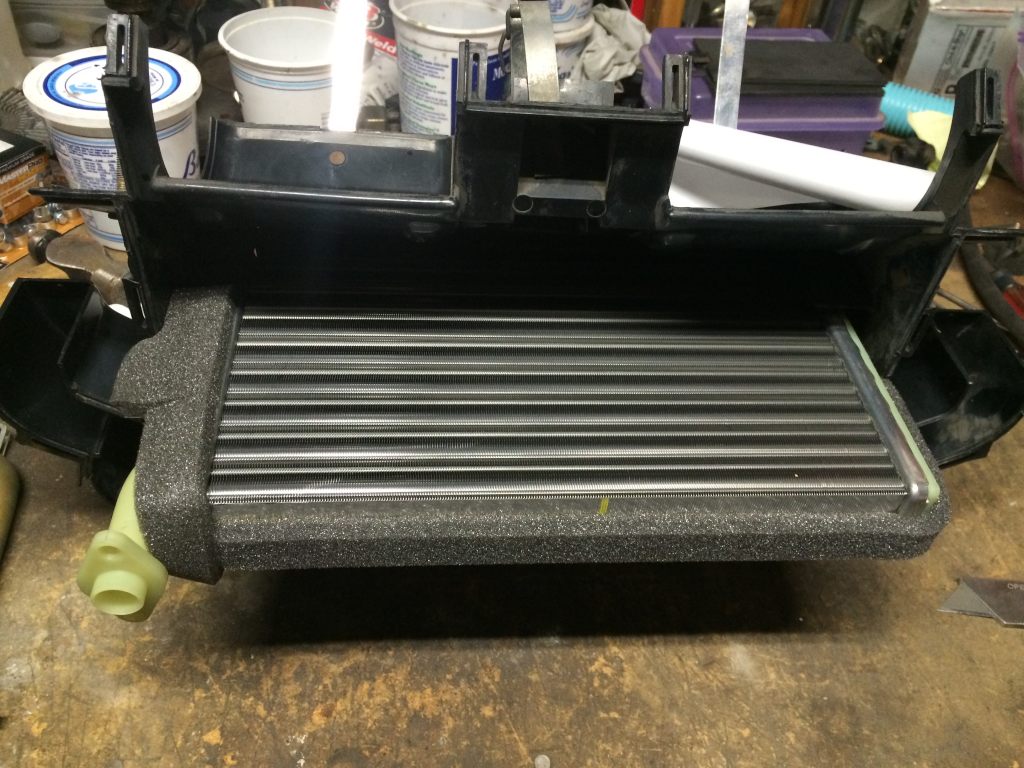
O-rings replaced, halves mated, the 1997-build heater valve (specific to non-AC cars) installed and new heater blower in position:
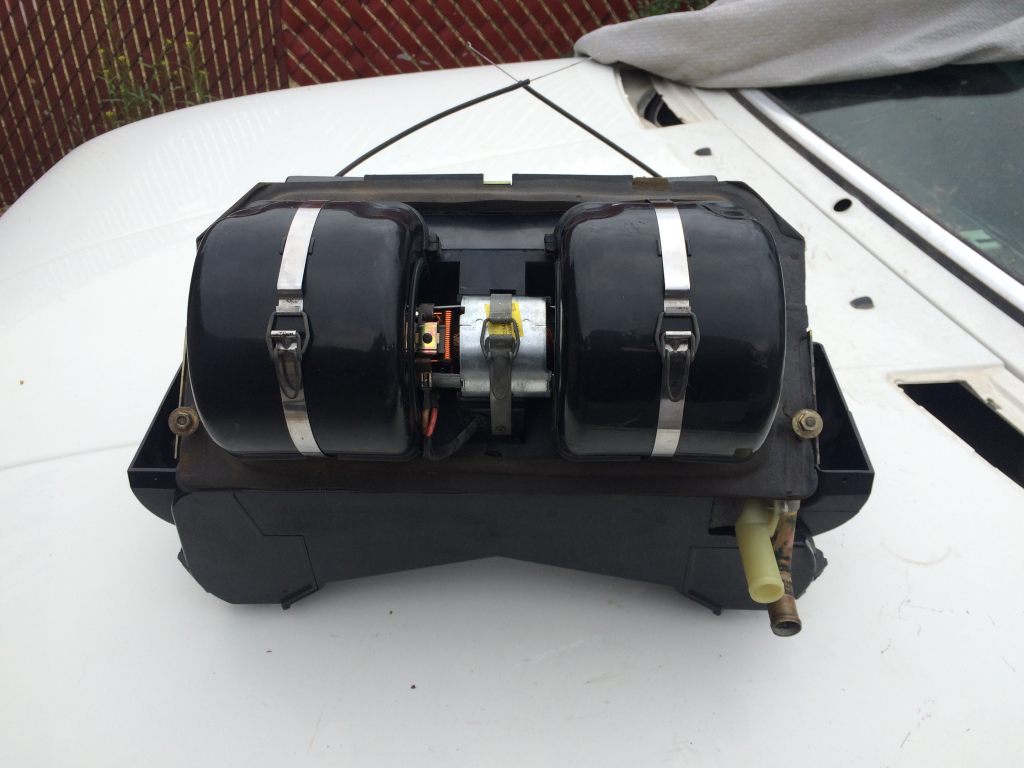
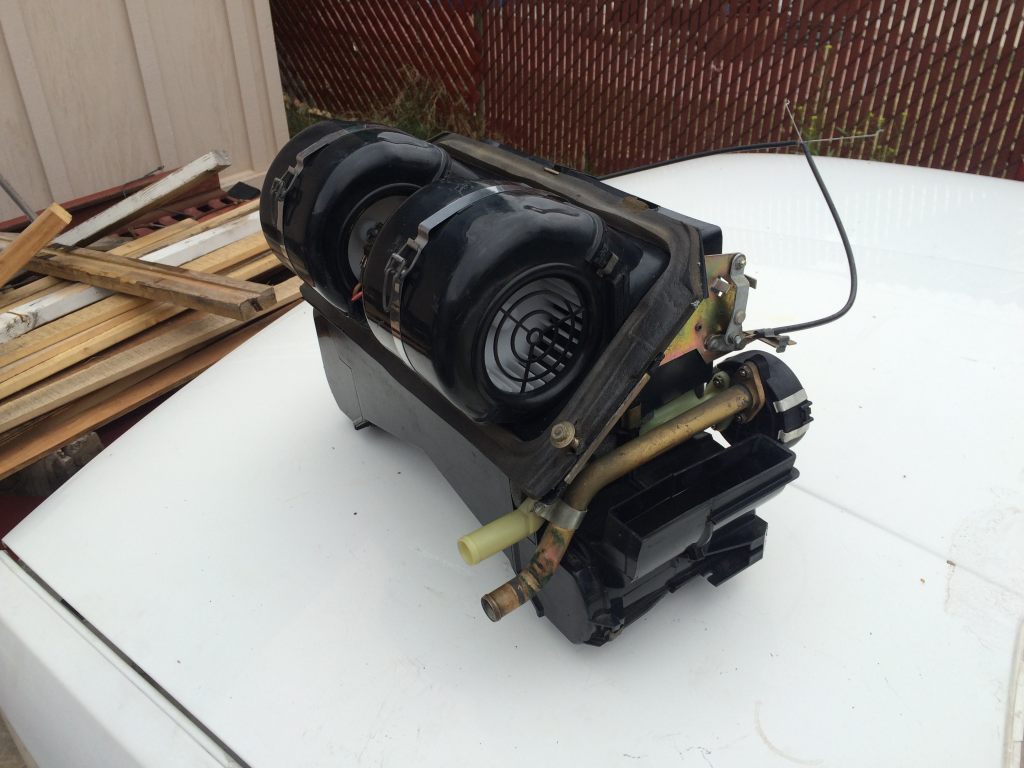
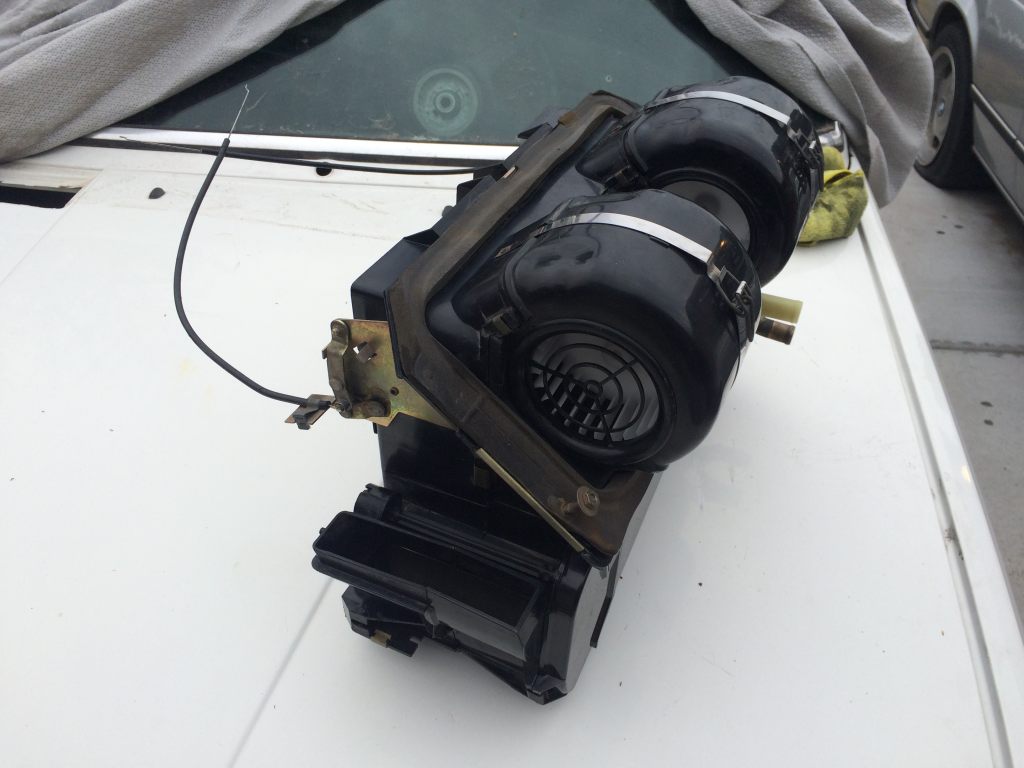
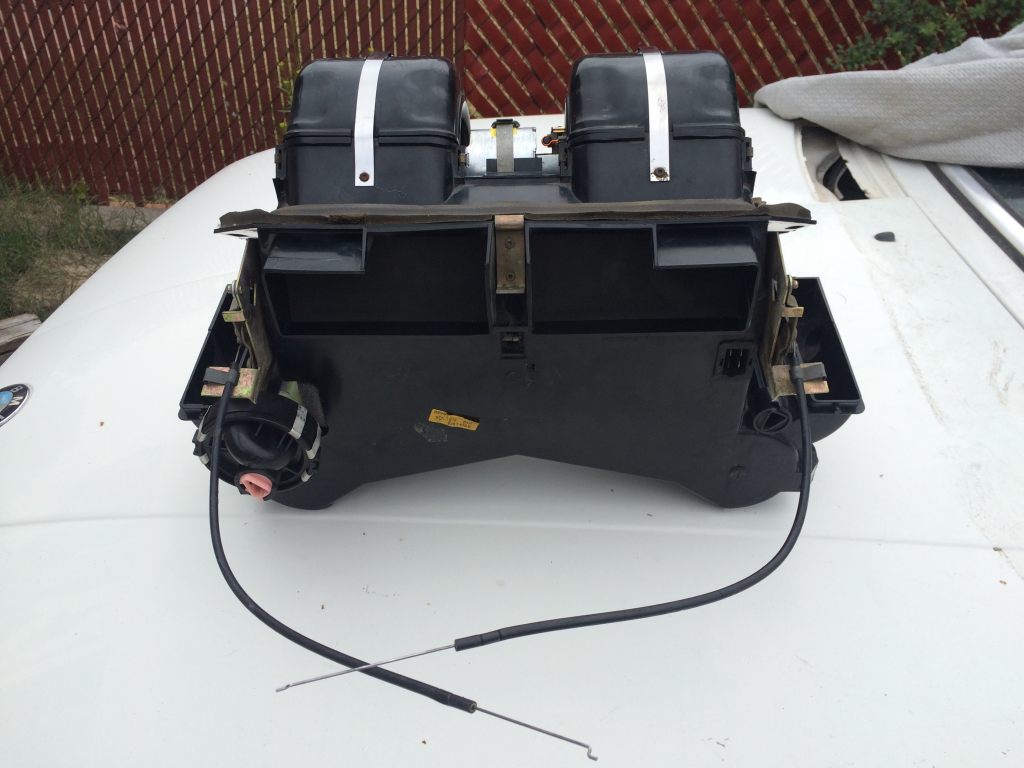
I've made arrangements to disassemble the engine on Friday. Work is really picking up starting this weekend, so I'm hoping that we can get that knocked out Friday. I should hopefully have a good idea of what I'm in for on the motor then. At this point, I'm kinda stuck with everything else, I guess.
I picked up a set of the rotor retaining screws and put them in. Also did brake pads front and rear as well. At this point, all the brakes should need to work is fluid. Fingers crossed on that.
The reinforcements came in for the axles, so I got them installed. I can torque the bolts when I put the drivetrain in or something.
I needed a set of wheels for it. I didn't want to buy tires for the car yet in case it ends up sitting for a few more years, so I tried to think of what I had in storage. The wheel fort has been greatly depleated since most of the battlements have been sent to the front lines and the budget (and desire for that matter) for procurement has been all but eliminated. I did have the stock wheels from the '75 530i and while I really just don't like them, they'll work. I brought them home, cleaned them up and put them on the car.
I decided that I better turn my attention to the fuel tank while the car was still on jack stands. I had a fuel tank powder-coated. I disassembled and cleaned the original sending unit, used a new o-ring and measured out new fuel line for the return and feed lines and got that installed. It was a little trickier than anticipated, but it worked well nonetheless. The tank also has a new heat shield for the rear muffler and I also had a rear muffler hanger powder-coated, too, so that's all installed with the new bolts I purchased from BMW. Unfortunately, I wasn't able to get good photos of this stuff, so I will try another day.
I moved to the front, put the pins in all of the steering linkage castle nuts. I wasn't going to do that but I decided I no longer cared and didn't want to forget.
I temporarily installed the steering column and next thing you know, the car was on the ground.
The panel gaps changed slightly - in a good way. Still a couple of adjustments, but none will be made until this thing has the drivetrain in it.
I worked a bit on trying to get the wiring situated at the left side of the firewall inside, but it's a long and tedious process of trying to remember where half of this crap goes. Definitely a lesson there. I took lots of photos when I initially took the car apart, but I didn't take the right photos. Some of the harnesses have essentially fallen into place, but some areas aren't quite like that.
I looked at what needed to be done now that the car is on the ground. I have lots of interior stuff to do yet, but I still don't have insulation for the firewall. I also cannot reach the guy who put the headliner in the B7. I have left a few messages and even went by the shop he works out of and no luck, so I guess I have to look for someone that can make and install the headliner in addition to redoing my seats again. I did pick up a second floor carpet to cut up to hopefully make all of the rest of the pieces I need, but we will see on that as well. Not really looking forward to that process since I'm back to trying to find someone and you never know how that will work out. I'm at the point now where even if I did get a hold of the guy, it doesn't sound like he wants to take on my project and if he did, would I ever hear from him again?
There was something I could do though. I had everything I needed to rebuild my heater. This is very important since I have never actually used a heater in any BMW I've ever owned.
I moved on to the heater. When I removed it from the car, I simply left the heater control panel attached to it and it's been moved around for years. I had acquired a very nice heater panel a few years back and it's been in a closet waiting for something to happen. I figured the bigger pieces I could leave things in, the better time I'd have trying to put them back together. I had a new heater blower and recently purchased a new heater core, new heater valve and anything else I thought I would need for this, the heater that I will never use.
I split the halves (which was pretty interesting):
Not as bad as I thought. Once I got the old core out and removed all of the compost, I started thoroughly cleaning the halves. What I had seen was just how poor the foam was on the flaps. I could remove it all, but it's supposed to be there, so what could I replace it with? I found a suitable replacement and removed the old foam. I thoroughly cleaned all of the parts and was left with this:
One of the floor flaps:
I couldn't remove the fresh air flaps, so I replaced their foam in situ, but used the floor flaps for a template. I had to slightly trim it to size, but it worked well.
New core installed - Made in 2002:
O-rings replaced, halves mated, the 1997-build heater valve (specific to non-AC cars) installed and new heater blower in position:
I've made arrangements to disassemble the engine on Friday. Work is really picking up starting this weekend, so I'm hoping that we can get that knocked out Friday. I should hopefully have a good idea of what I'm in for on the motor then. At this point, I'm kinda stuck with everything else, I guess.
Re: E12 M535i Project - 02-03-16 Update
The new wheels look particularly handsome.
Re: E12 M535i Project - 02-03-16 Update
I find it particularly satisfying to rebuild heater boxes.
Re: E12 M535i Project - 02-03-16 Update
I think it looks great. I have a question, what did you use for the heater foam? I'm doing this very shortly.
Re: E12 M535i Project - 02-03-16 Update
For the love of God, man, get that car OUT OF YOUR DRIVEWAY!

Looks good, Chris.
Looks good, Chris.
Re: E12 M535i Project - 02-03-16 Update
That's funny Vince. Of course the car is in the garage. It was just outside for photos. First time it was outside since it came back from the body shop. I am getting tired of looking at it though. Too much to do yet.
-
Adam W in MN
- Posts: 5053
- Joined: Feb 12, 2006 12:00 PM
- Location: Don't waste my motherf***in' time!
- Contact:
Re: E12 M535i Project - 02-03-16 Update
I'll be hitting you up for advice on that heater core work. Isn't there some o-ring that leaks that the firstfives guys have complained about? I'd like to make sure I take care of that before putting mine back in.
x2 on the foam question, what did you use?
x2 on the foam question, what did you use?
Re: E12 M535i Project - 02-03-16 Update
There are two o-rings where the heater valve attaches. One for the brass pipe and the other for the core. One of the recent complaints I had seen is that replacement valves are leaking. My old valve was leak free as was the core but I decided to take no chances. This is also a valve for a non-AC car which is different than what they have here.
Anyway, the o-rings are odd sizes so they have to come from the dealer.
Anyway, the o-rings are odd sizes so they have to come from the dealer.
-
Adam W in MN
- Posts: 5053
- Joined: Feb 12, 2006 12:00 PM
- Location: Don't waste my motherf***in' time!
- Contact:
Re: E12 M535i Project - 02-03-16 Update
Dayuuum -- lookin' good!
Re: E12 M535i Project - 02-12-16 Update
Thanks. I've been really busy over the last couple of weeks, but before it all got out of control, I scheduled time with my mechanic to disassemble the engine. I have learned just about everything I know from watching him over the years and he had no issue with me assisting him on the motor. I've never done much other than valve adjustments or pulling the junk head off of the 745i parts car, so time to learn more.
Just a refresher:
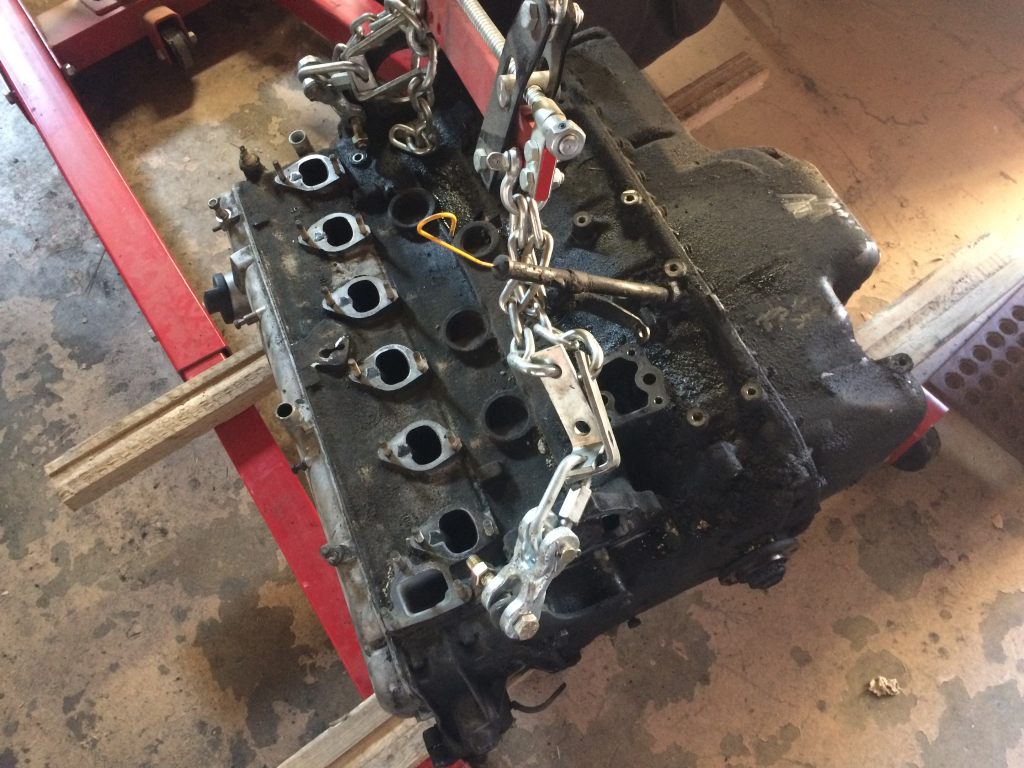
He picked it up from me and took it over to the shop a couple weeks ago. I made sure that before I pulled the balancer and other parts, I set the motor at TDC.
Everything went pretty smoothly removing the head:
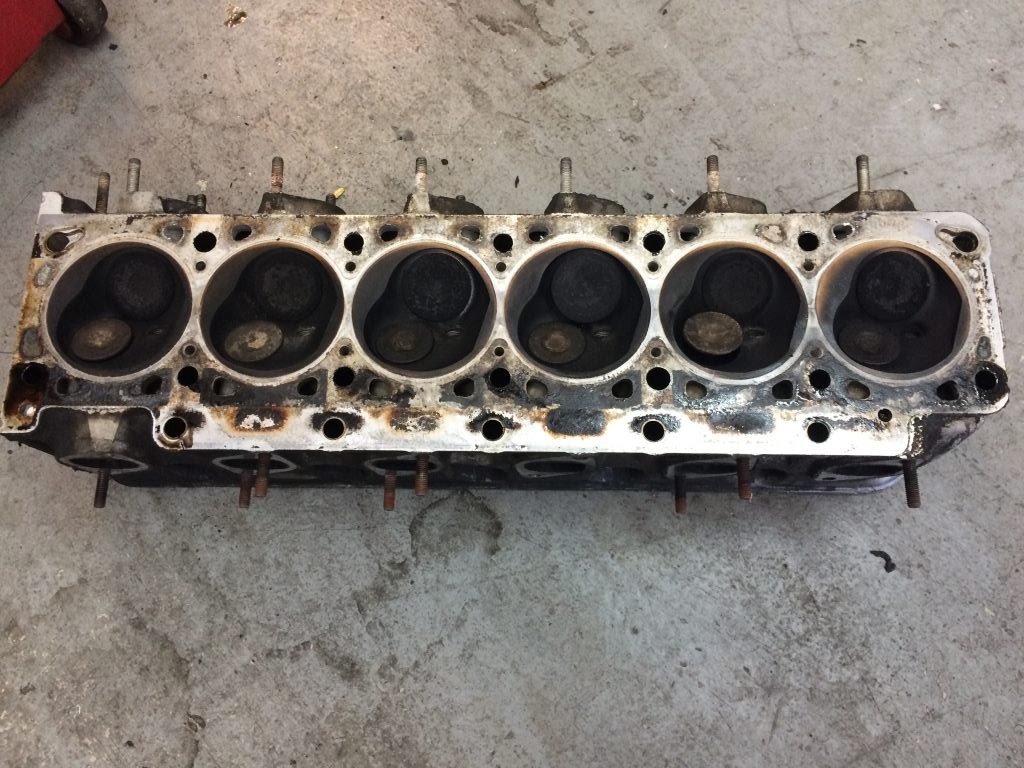
A keen eye will see this on #5:
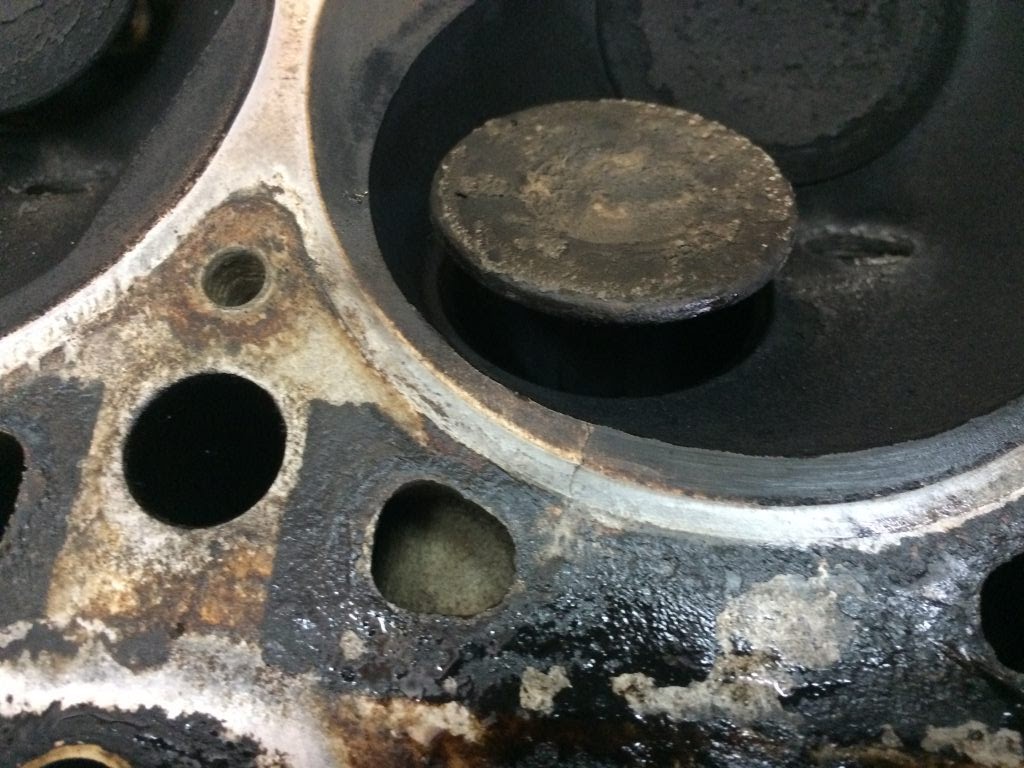
I put maybe 300 miles on this car before it was hit. I don't know how long the head has been like that.
It is a pretty common crack and can easily be repaired, I understand. It's the original head to the car so I'd like to keep it. We will see what the machinist says. He's fixed much worse with great success.
Everything looked pretty okay with the bottom end:
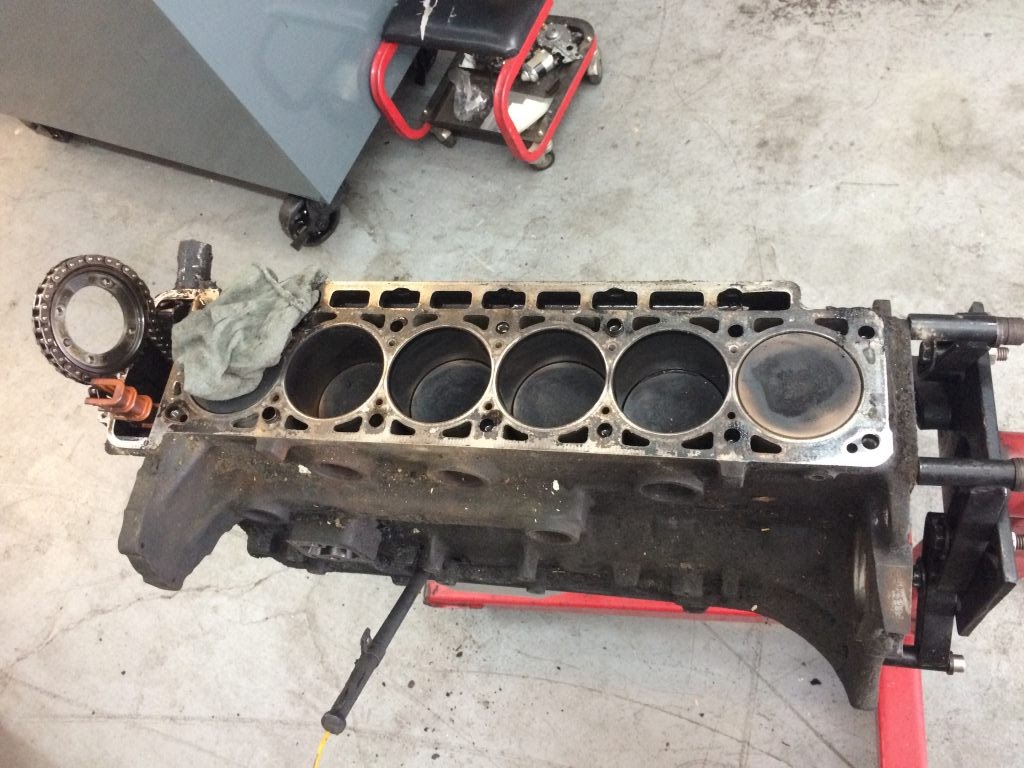
Until I looked at #5:
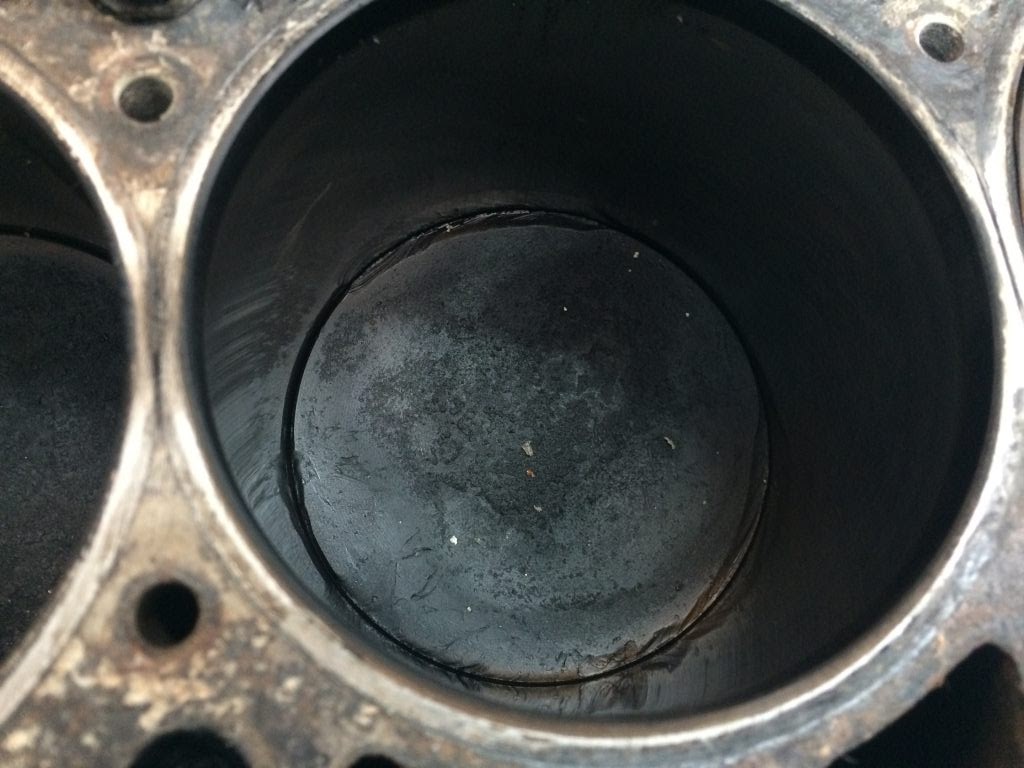
I have a feeling that whatever happened to that piston is probably related to the crack. Supposedly the PO did a head gasket on the car shortly after he got it according to sleuthing I have done on the M535i Yahoo! group but given how thorough he was with everything else replacing it one at a time, I'm not sure what exactly that entailed. It does not look like the head was resurfaced judging by the dimples.
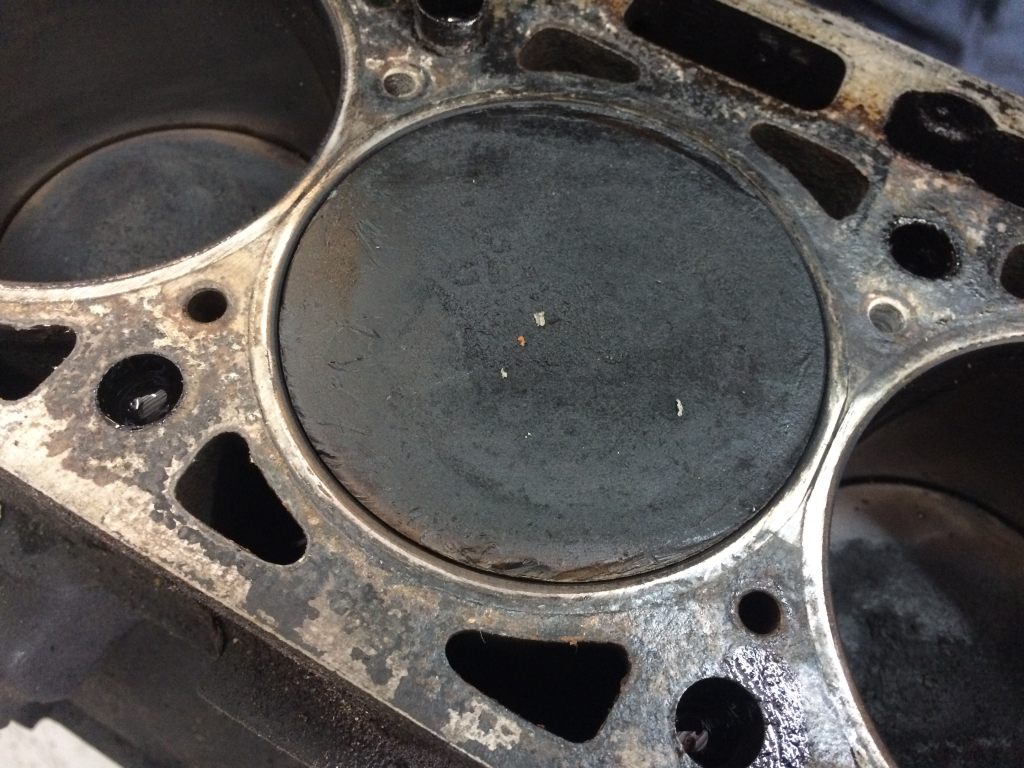
The good news is that I thought ahead a few years ago and picked up a full set of M90 pistons. The other good news is that they are all in good shape and they also take the same rings as these (1.5mm, 2.5mm, 4mm instead of the 1.5mm, 2.5mm, 3.5mm).
Here are the rod bearings:
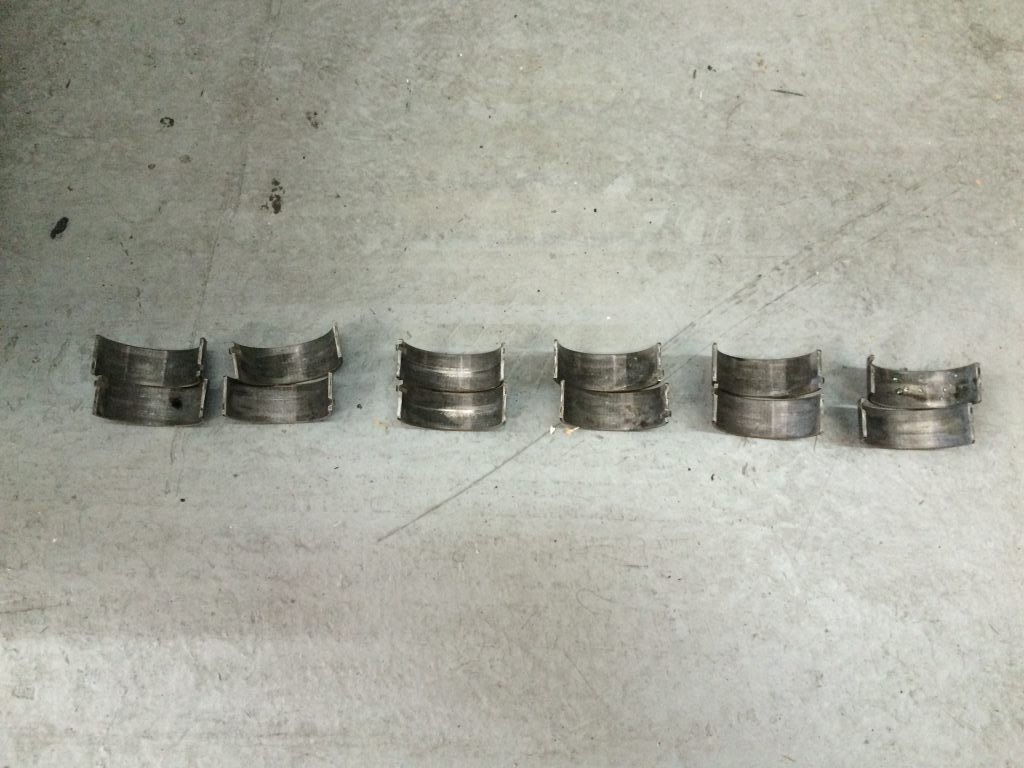
#3 has a shiny spot but you cannot feel it. What it looks like is that the oil holes on the crank weren't chamfered well, so that will be done by the machinist.
The main bearings were all in great shape. I didn't get a photo of those because my hands were full of oil, but here's a shot of the crank:
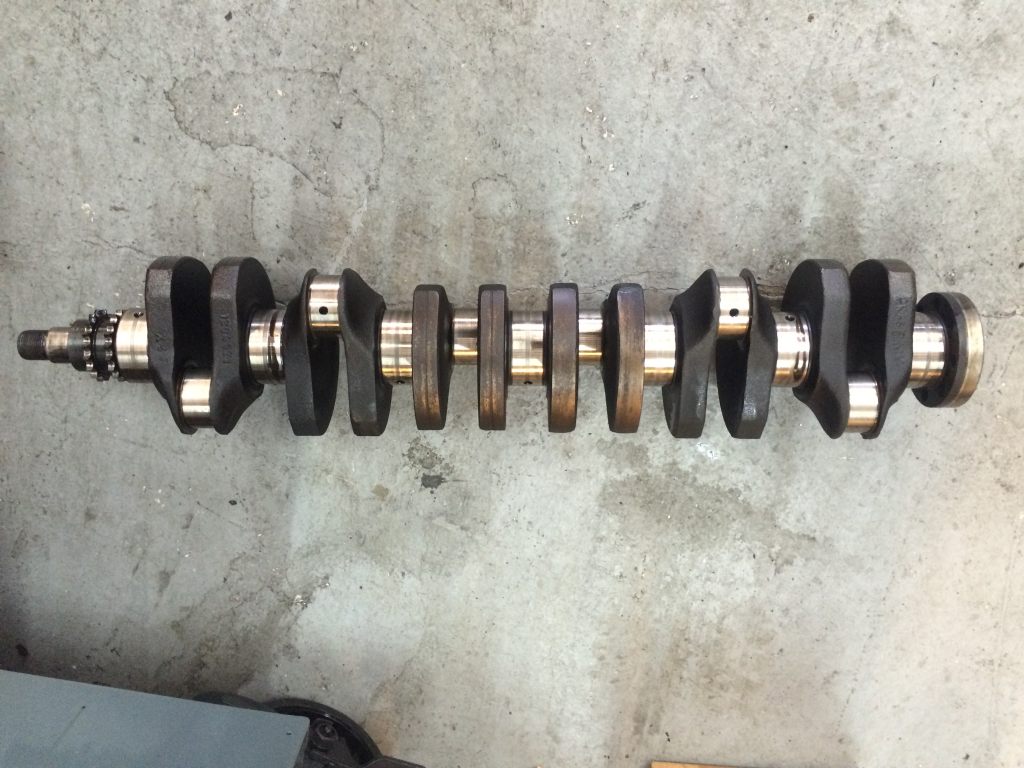
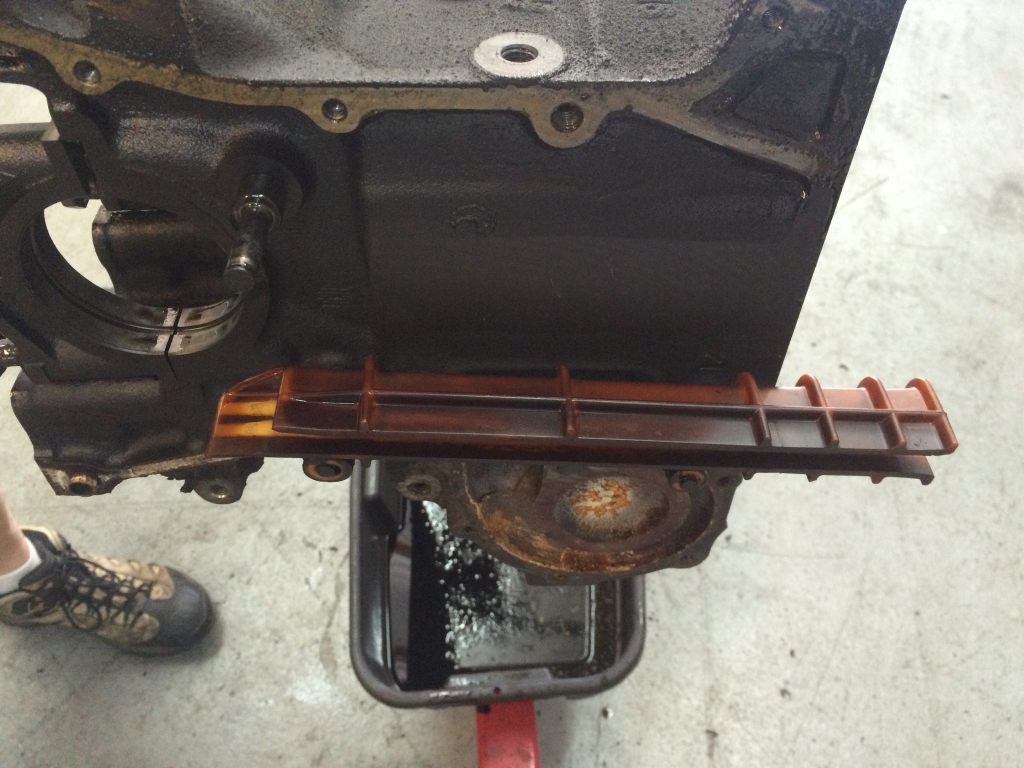
The timing chain, oil pump chain and sprockets are all in nice shape, but will, of course be replaced. The plastic guide rail looks pretty good too for the age and mileage:
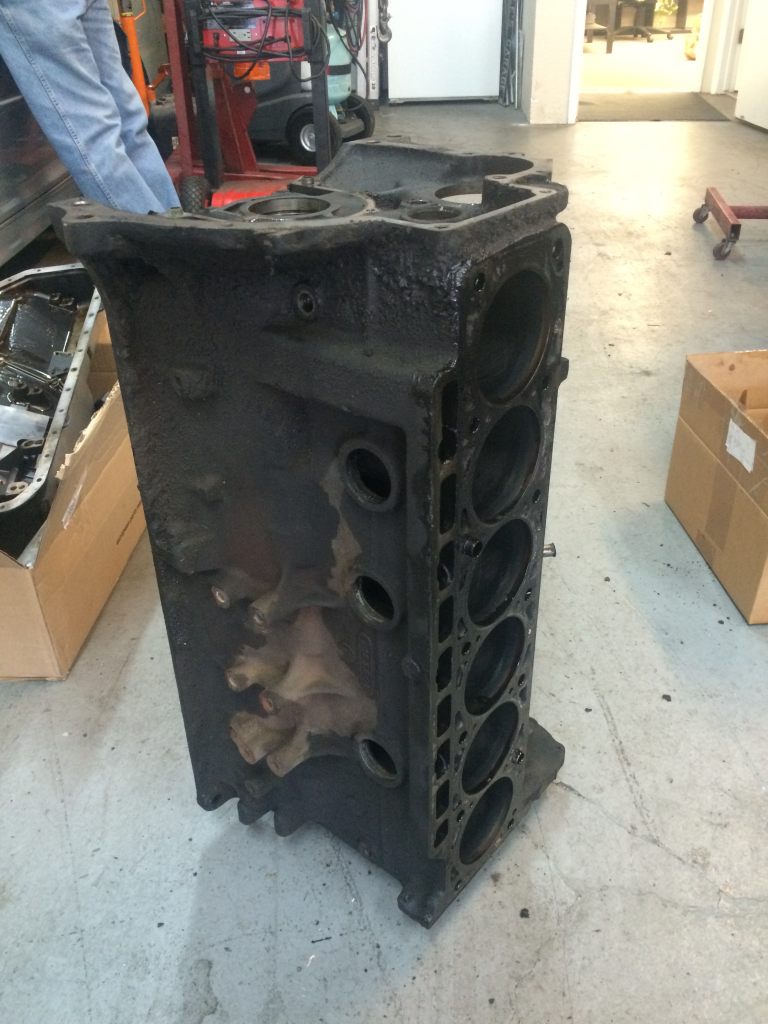
Here's the block ready to go to the machinist. It will be magnafluxed and the bores measured, etc. The cross-hatching is still evident on all of the cylinders so we will see what it needs. Once we know that, I'll decide on the route I want to go with the rings.
Those are TSMacNeil's legs there. He happened to swing by as we were getting started and pretty much spent the whole day with us.
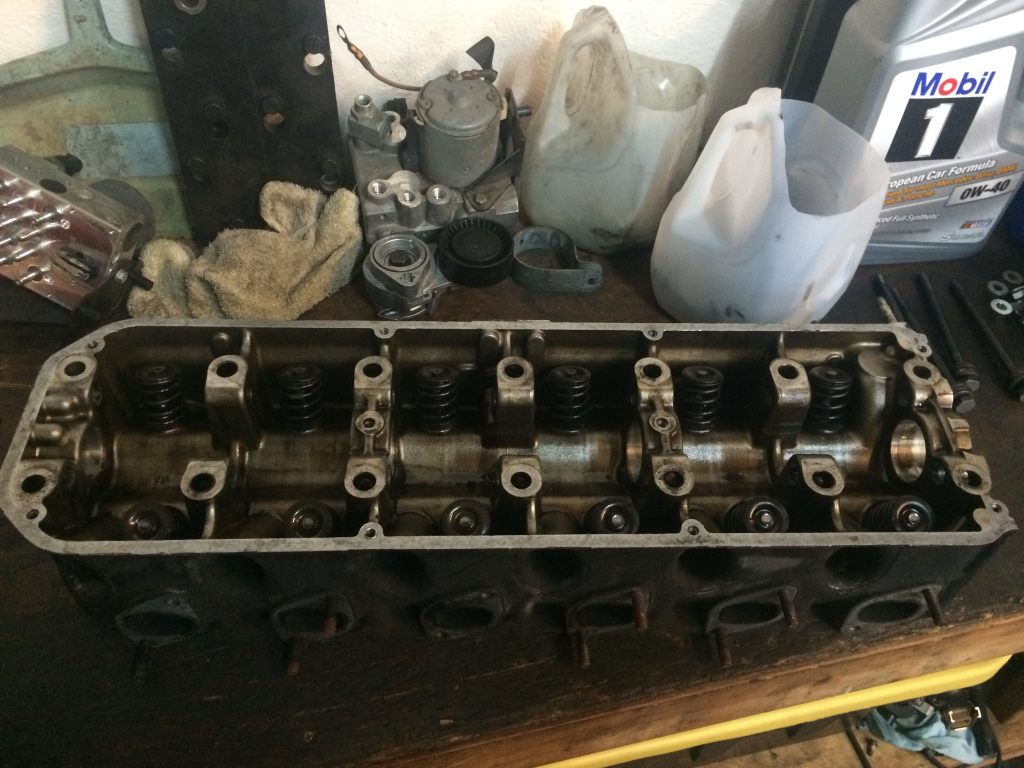
The head came apart easily. No trouble with the rocker shafts and putting a straight edge on it, it isn't warped, so that's a good sign. Once it's back, the head will get all new rockers, shafts, eccentrics, etc. The cam is in great shape. Here's the bare head:
I don't have any photos of the process because my hands were covered in oil and then I had to run and pick up a couple of parts for a car they had on the lift. By the time I got back, the cam was out.
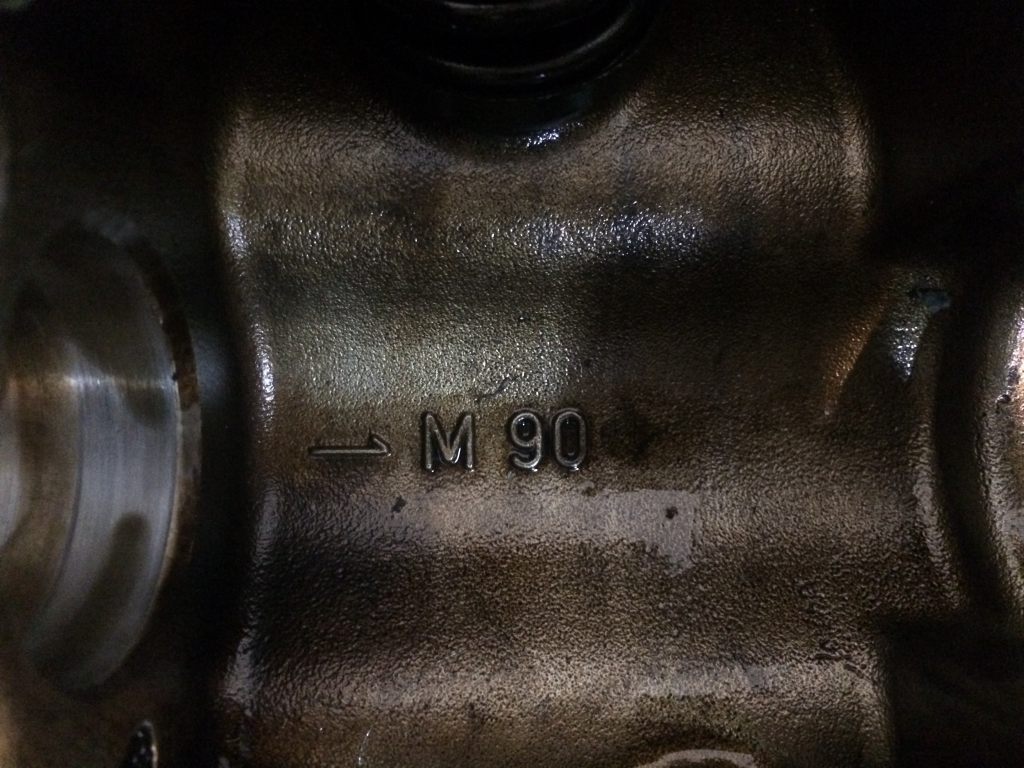
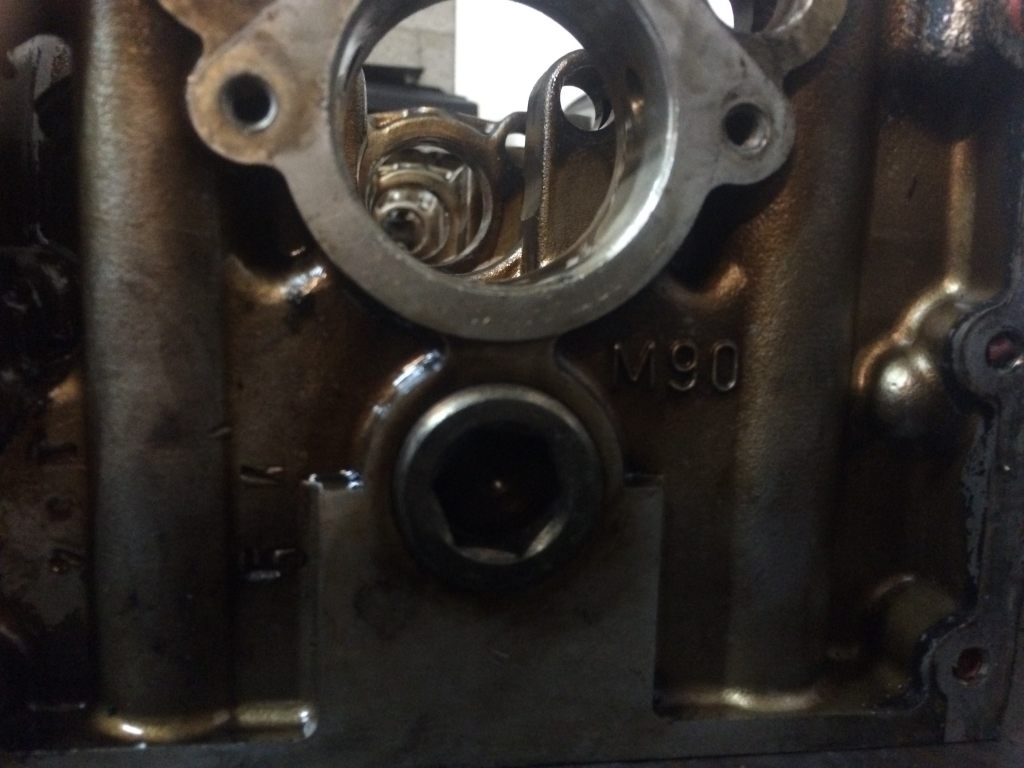
This had been discussed before on here but I don't think anyone ever posted photos. The "M90" heads have "M90" in two places on the head. First, under the cam by #6:
and lastly at the front of the head behind the timing cover:
I was a bit surprised about #5, but I was prepared for it not knowing what I was going to be in for with the motor. I'm glad that the issues are minor. It's going to get a lot of new parts so I'm wondering what I'll be in for on this, but in seeing what was going on, I'm obviously glad we took it apart - not to say I was going to leave it alone, since I was sure it needed valve guide seals at a minimum.
In other news...
I have spent pretty much the last three weeks trying to get a hold of the guy who put the headliner in my B7 Turbo. He apparently has developed a phone allergy and it's very frustrating. I've gone by his shop three separate times and cannot get a hold of him. He is affiliated with a restoration shop, so I called them. Besides being told "to read between the lines" and "all I can tell you is that he's really busy," I've made no progress. He does excellent work from what I've seen and unfortunately, I cannot get him to even talk to me to even have a look at my project.
I ordered headliner fabric from BMW. A member on firstfives ordered some for his car and apparently had enough to redo his entire headliner. I ordered qty 2 of the same part number he did figuring I would have this car and the Golf E12 someday needing a headliner and found that I only had enough to cover the main section of it. The dealer ordered 1 more and it was about half was much material. Turns out it is sold by the meter, so I don't know how he got a headliner out of it. Either way, having three meters, it turns out is just enough. I can use the 2m section for the main headliner section and then make the c-pillars out of the other. Unfortunately, it also means I paid about 3x more than I should have for the material.
I picked up another Marineblau-grau carpet from jodystevens and I'm going to use that to make the carpet pieces for the front kick panels and the rear deck carpeting. It is apparently the only way to get new Marineblau carpeting.
I also have to redo my seats again. In July, 2010, I had my seats recovered by Jim's Auto Upholstery using the cloth I sourced through a German enthusiast. Unfortunately, the vinyl that was used to recover the seats was totally wrong. It's closer in color to my recycling bin than what belongs on the seats. Another case of "how much extra do I have to pay to get what I've already paid for?" I was assured by the shop that they could just replace the vinyl with the correct stuff, which I purchased from Global Upholstery. It's an exact match and for all I know, it's the same stuff. I've had a roll of it in my closet since July, 2010. I decided to start looking for other shops who could help me with the seats. I was unhappy with some aspects of the work too. I went by a shop that I've seen some pretty interesting cars at. I brought one of the Recaros and my headliner. They gave me a pretty reasonable price to sew up the headliner using my old one as a pattern. Unfortunately, their installation price was quite steep, though they would come to my house to do it on a weekend, so it might be worth considering. I showed them the seat and that's when I was informed that they did such a shitty job sewing and matching up the corduroy pattern that the cloth could not be reused. He figured there were a few places they could cheat it where it wouldn't be seen but they'd need the little bit I had left to replace a couple of panels entirely. I had never really looked closely at the seats because the vinyl made me sick and I knew they were to be redone. Studying some of the stitch-work on the seats really showed just how poor of a job it was.
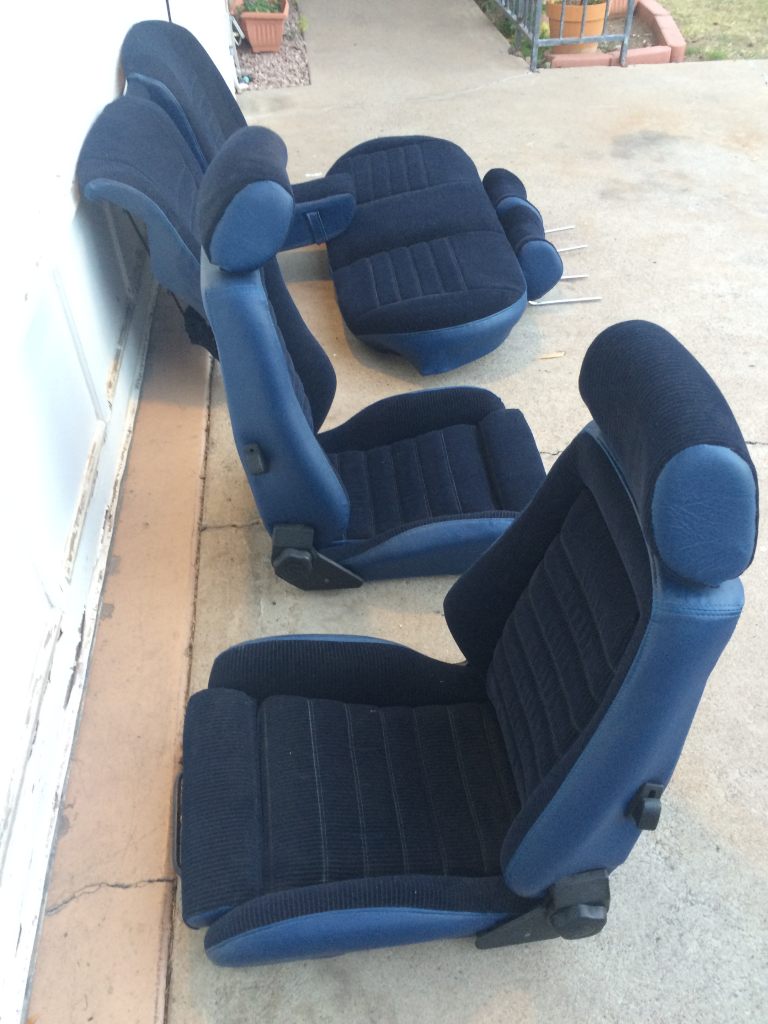
I felt like I had been punched in the stomach. I had been budgeting what was needed to finish the car and I thought I had a pretty good handle on things. This is now getting more expensive than I had anticipated. I checked to see what was available on the cloth front. I had ordered 5m last time and it was just enough to do the seats. I got with Ivo and found that the price of the cloth more than doubled since I last purchased it. I don't know why I expected any differently since everything else has doubled, too. Anyway, I was able to order what looks to be the last of it available, so hopefully that will go as planned. I went by a couple more shops in Phoenix based upon what I had seen over the years and also some reviews I've found and I got a couple of quotes of over $3k to redo the seats and $800 to do the headliner (with installation, but they need the car in their shop). That's all just labor. I'm providing the materials. The biggest issue is that with the seats having basically been ruined by idiots, there are no patterns to go off of. I do have a seat back and headrest from the original driver seat that can be used as a pattern and I think I can come up with a rear seat from a yard which would help since the rear seat is not even close to what I gave them. It looks like it belongs in a Corsica.
With the dash restoration, wood restoration, headliner, cloth, vinyl and carpet costs on top of the seats, I'm looking at about $10k just in interior for the car and it will be blue when it's finished. It will also be an E12, too. At this point, I'm still trying to figure out how big of a bullet I want to bite. There's someone that I'm reasonably certain could do a perfect job on the seats, but he has quoted more money than the other quotes I have received. It would be basically a sure thing while I don't have any direct experience with the other shops I've talked to. Upholstery really is as bad as paint and I think you obviously get what you pay for as well. It's depressing.
Oh, and I still have to figure out what I'm going to do for the transmission.
Just a refresher:
He picked it up from me and took it over to the shop a couple weeks ago. I made sure that before I pulled the balancer and other parts, I set the motor at TDC.
Everything went pretty smoothly removing the head:
A keen eye will see this on #5:
I put maybe 300 miles on this car before it was hit. I don't know how long the head has been like that.
It is a pretty common crack and can easily be repaired, I understand. It's the original head to the car so I'd like to keep it. We will see what the machinist says. He's fixed much worse with great success.
Everything looked pretty okay with the bottom end:
Until I looked at #5:
I have a feeling that whatever happened to that piston is probably related to the crack. Supposedly the PO did a head gasket on the car shortly after he got it according to sleuthing I have done on the M535i Yahoo! group but given how thorough he was with everything else replacing it one at a time, I'm not sure what exactly that entailed. It does not look like the head was resurfaced judging by the dimples.
The good news is that I thought ahead a few years ago and picked up a full set of M90 pistons. The other good news is that they are all in good shape and they also take the same rings as these (1.5mm, 2.5mm, 4mm instead of the 1.5mm, 2.5mm, 3.5mm).
Here are the rod bearings:
#3 has a shiny spot but you cannot feel it. What it looks like is that the oil holes on the crank weren't chamfered well, so that will be done by the machinist.
The main bearings were all in great shape. I didn't get a photo of those because my hands were full of oil, but here's a shot of the crank:
The timing chain, oil pump chain and sprockets are all in nice shape, but will, of course be replaced. The plastic guide rail looks pretty good too for the age and mileage:
Here's the block ready to go to the machinist. It will be magnafluxed and the bores measured, etc. The cross-hatching is still evident on all of the cylinders so we will see what it needs. Once we know that, I'll decide on the route I want to go with the rings.
Those are TSMacNeil's legs there. He happened to swing by as we were getting started and pretty much spent the whole day with us.
The head came apart easily. No trouble with the rocker shafts and putting a straight edge on it, it isn't warped, so that's a good sign. Once it's back, the head will get all new rockers, shafts, eccentrics, etc. The cam is in great shape. Here's the bare head:
I don't have any photos of the process because my hands were covered in oil and then I had to run and pick up a couple of parts for a car they had on the lift. By the time I got back, the cam was out.
This had been discussed before on here but I don't think anyone ever posted photos. The "M90" heads have "M90" in two places on the head. First, under the cam by #6:
and lastly at the front of the head behind the timing cover:
I was a bit surprised about #5, but I was prepared for it not knowing what I was going to be in for with the motor. I'm glad that the issues are minor. It's going to get a lot of new parts so I'm wondering what I'll be in for on this, but in seeing what was going on, I'm obviously glad we took it apart - not to say I was going to leave it alone, since I was sure it needed valve guide seals at a minimum.
In other news...
I have spent pretty much the last three weeks trying to get a hold of the guy who put the headliner in my B7 Turbo. He apparently has developed a phone allergy and it's very frustrating. I've gone by his shop three separate times and cannot get a hold of him. He is affiliated with a restoration shop, so I called them. Besides being told "to read between the lines" and "all I can tell you is that he's really busy," I've made no progress. He does excellent work from what I've seen and unfortunately, I cannot get him to even talk to me to even have a look at my project.
I ordered headliner fabric from BMW. A member on firstfives ordered some for his car and apparently had enough to redo his entire headliner. I ordered qty 2 of the same part number he did figuring I would have this car and the Golf E12 someday needing a headliner and found that I only had enough to cover the main section of it. The dealer ordered 1 more and it was about half was much material. Turns out it is sold by the meter, so I don't know how he got a headliner out of it. Either way, having three meters, it turns out is just enough. I can use the 2m section for the main headliner section and then make the c-pillars out of the other. Unfortunately, it also means I paid about 3x more than I should have for the material.
I picked up another Marineblau-grau carpet from jodystevens and I'm going to use that to make the carpet pieces for the front kick panels and the rear deck carpeting. It is apparently the only way to get new Marineblau carpeting.
I also have to redo my seats again. In July, 2010, I had my seats recovered by Jim's Auto Upholstery using the cloth I sourced through a German enthusiast. Unfortunately, the vinyl that was used to recover the seats was totally wrong. It's closer in color to my recycling bin than what belongs on the seats. Another case of "how much extra do I have to pay to get what I've already paid for?" I was assured by the shop that they could just replace the vinyl with the correct stuff, which I purchased from Global Upholstery. It's an exact match and for all I know, it's the same stuff. I've had a roll of it in my closet since July, 2010. I decided to start looking for other shops who could help me with the seats. I was unhappy with some aspects of the work too. I went by a shop that I've seen some pretty interesting cars at. I brought one of the Recaros and my headliner. They gave me a pretty reasonable price to sew up the headliner using my old one as a pattern. Unfortunately, their installation price was quite steep, though they would come to my house to do it on a weekend, so it might be worth considering. I showed them the seat and that's when I was informed that they did such a shitty job sewing and matching up the corduroy pattern that the cloth could not be reused. He figured there were a few places they could cheat it where it wouldn't be seen but they'd need the little bit I had left to replace a couple of panels entirely. I had never really looked closely at the seats because the vinyl made me sick and I knew they were to be redone. Studying some of the stitch-work on the seats really showed just how poor of a job it was.
I felt like I had been punched in the stomach. I had been budgeting what was needed to finish the car and I thought I had a pretty good handle on things. This is now getting more expensive than I had anticipated. I checked to see what was available on the cloth front. I had ordered 5m last time and it was just enough to do the seats. I got with Ivo and found that the price of the cloth more than doubled since I last purchased it. I don't know why I expected any differently since everything else has doubled, too. Anyway, I was able to order what looks to be the last of it available, so hopefully that will go as planned. I went by a couple more shops in Phoenix based upon what I had seen over the years and also some reviews I've found and I got a couple of quotes of over $3k to redo the seats and $800 to do the headliner (with installation, but they need the car in their shop). That's all just labor. I'm providing the materials. The biggest issue is that with the seats having basically been ruined by idiots, there are no patterns to go off of. I do have a seat back and headrest from the original driver seat that can be used as a pattern and I think I can come up with a rear seat from a yard which would help since the rear seat is not even close to what I gave them. It looks like it belongs in a Corsica.
With the dash restoration, wood restoration, headliner, cloth, vinyl and carpet costs on top of the seats, I'm looking at about $10k just in interior for the car and it will be blue when it's finished. It will also be an E12, too. At this point, I'm still trying to figure out how big of a bullet I want to bite. There's someone that I'm reasonably certain could do a perfect job on the seats, but he has quoted more money than the other quotes I have received. It would be basically a sure thing while I don't have any direct experience with the other shops I've talked to. Upholstery really is as bad as paint and I think you obviously get what you pay for as well. It's depressing.
Oh, and I still have to figure out what I'm going to do for the transmission.
-
Adam W in MN
- Posts: 5053
- Joined: Feb 12, 2006 12:00 PM
- Location: Don't waste my motherf***in' time!
- Contact:
Re: E12 M535i Project - 02-12-16 Update
Wow, adds up fast. I'm probably not helping, but seeing those pictures of the seats all together.... yes Chevy Corsica comes to mind (nice analogy, can't get that out of my head now). Unfortunate that it's so off and used up valuable raw materials for your build.
That's some nice forward thinking about the Mahle pistons for the M90 many years ago! I'm assuming you've perused my very old M90 engine build details, are you going to do similar bottom end "while we're in there" things like balancing, etc, with the clutch, flywheel, and reciprocating mass?
That's some nice forward thinking about the Mahle pistons for the M90 many years ago! I'm assuming you've perused my very old M90 engine build details, are you going to do similar bottom end "while we're in there" things like balancing, etc, with the clutch, flywheel, and reciprocating mass?
Re: E12 M535i Project - 02-12-16 Update
That's why the seats have been sitting in my office since 2010. I can't stand to look at them and I probably should have gotten on this sooner, but I was thinking, "sure, just replace the vinyl. No big deal." I never realized how they totally did the rear seat completely wrong. I brought up the point of the missing piping with them and they said they'd fix it when they replace the vinyl but the pattern is totally wrong, so what am I to do about that? The rear headrests are absolutely atrocious, too.
The machinist has the flywheel, crank, balancer, etc. That will all be balanced, flywheel resurfaced, etc. I had followed your engine build pretty closely but have decided to keep my motor as stock as possible, too, sticking with the stock pistons and what not. The oil pump will get all new internals, too.
I'd love to be doing the motor and the interior at the same time, but I don't know what this will all end up costing.
-
white chocolate
- Posts: 428
- Joined: Sep 21, 2011 9:44 PM
- Location: Canton, Ohio
Re: E12 M535i Project - 02-12-16 Update
Love reading these updates. That is a huge punch in the face with the interior, what a crappy situation. Here's to hoping it works out well, I'm sure it will look great when it is all said and done!
Re: E12 M535i Project - 02-12-16 Update
Visiting London maybe?wkohler wrote:I have spent pretty much the last three weeks trying to get a hold of the guy who put the headliner in my B7 Turbo. He apparently has developed a phone allergy and it's very frustrating. I've gone by his shop three separate times and cannot get a hold of him. He is affiliated with a restoration shop, so I called them. Besides being told "to read between the lines"
I've officially given up on Jim's Upholstery, they just don't seem to give a shit anymore.


