FAQ M30 Starter R&R
Posted: Jan 19, 2012 7:36 PM
<<<<<<<<<<<<<<<<<<<<<<<<<<<<<<<<<<<<<<<<<<<<<<<
>>>>>>>>>>>>>>>>>>>>>>>>>>>>>>>>>>>>>>>>>>>>>>>
Problem: You have tested and come to the conclusion that your starter motor, solenoid, or both have failed.
Cause: These things just happen.
How to fix: Remove and replace the starter.
-----------------------------------------------------------------
Foreword
Read this fire-side, feet up, relaxing in your favorite chair while sipping a good tea the night before you plan to replace your starter. That is my recommendation.
Time to complete obviously depends on the route you decide to take, but plan to spend 3 hours.
------------------------------------------------------------------------------
The write-up
------------------------------------------------------------------------------
First steps...
-Disconnect the battery completely. Disconnect the negative connection at the battery first, then disconnect the positive.
-Once you've found them, spray the starter bolts with a penetrating oil.
------------------------------------------------------------------------------
------------------------------------------------------------------------------
Locating and surveying the starter...
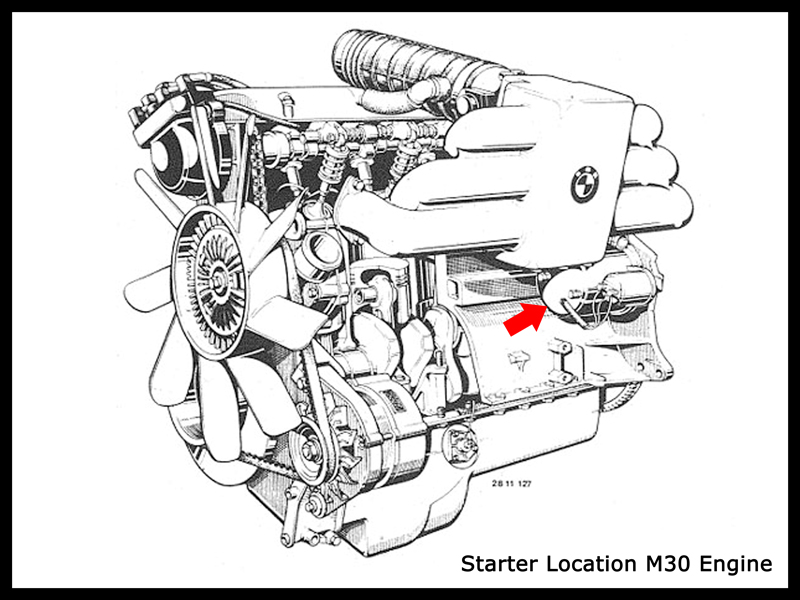
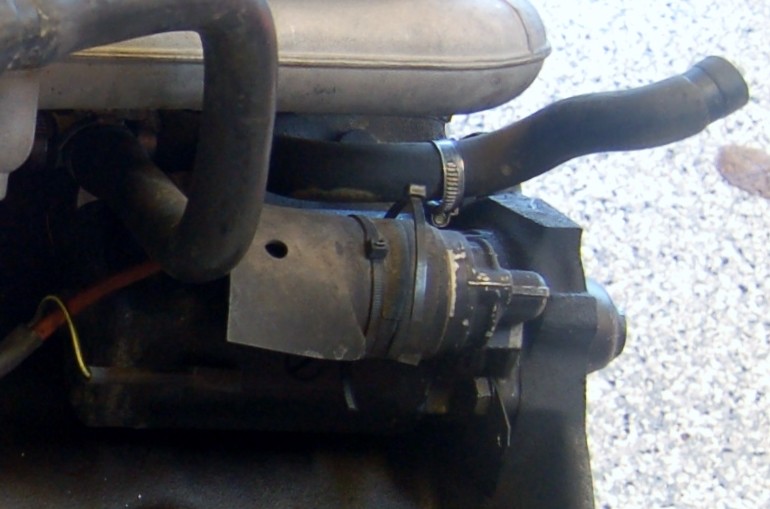
The starter is located at the back of the driver's side of the engine block, under
the intake manifold. It is held to the engine block by (2) 17 mm hexagonal-head
M10X25 bolts.
The starter is an electric Bosch non-gear reduction starter. The solenoid switch
can be removed and replaced separately.
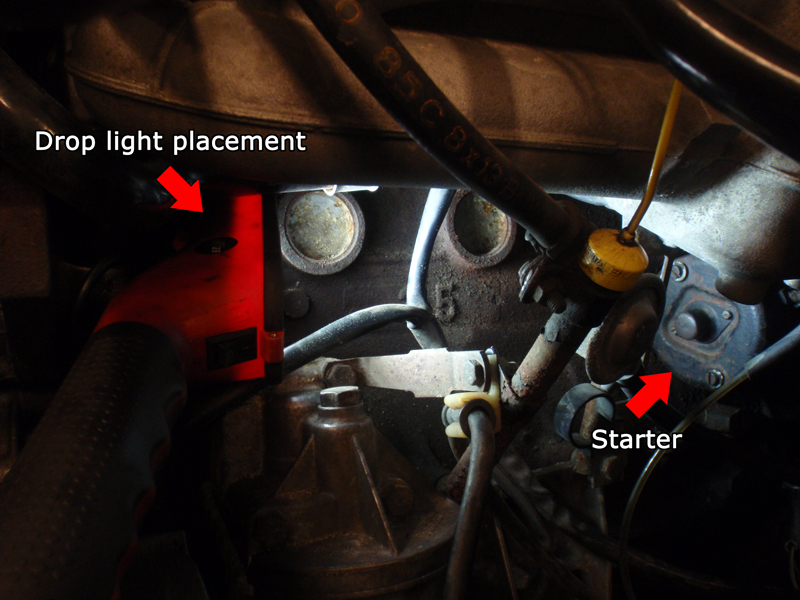
The best place to put a light is mate with the block, at the front of the engine, facing
the starter. This position illuminates both mounting bolts and the electrical
connections on the solenoid.
------------------------------------------------------------------------------
------------------------------------------------------------------------------
Disconnecting wiring...
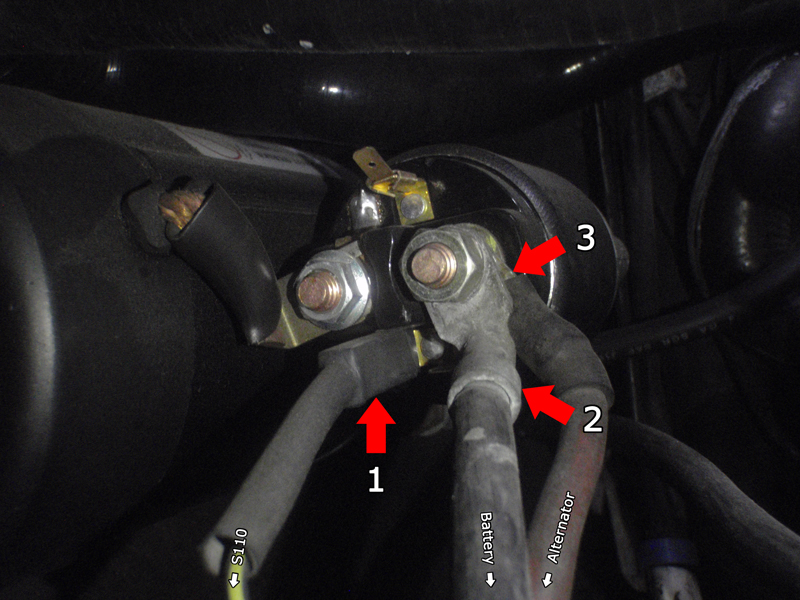
There are a total of 3 insulated electrical connections made to the starter. They all need to be disconnected. All of them are on the starter solenoid.
1. Start signal - a black and yellow wire leads to this connection. It is terminated with a slide connector. Just pull it off.
2. (+) Battery - a heavy black wire leads from the positive battery terminal to this connection. It is terminated with a ring terminal. A nut holds it to a post on the solenoid, it can be removed with a 13mm wrench or deep socket.
3. (+) Alternator - a red wire leads from the alternator output wire to this connection. It is terminated by a ring terminal to the same threaded post as the battery cable is. Both are removed by removing the same nut.
------------------------------------------------------------------------------
Removing the infamous top bolt...
Removing the top bolt is made out to be much worse than it actually is.
Here are the 6 methods we will be covering for removing the upper mounting bolt. Use whichever you feel most comfortable with.
********************************* Method #1 *********************************
Below are the pages from the BMW repair manual and Bentley service manual with the pertinent information.
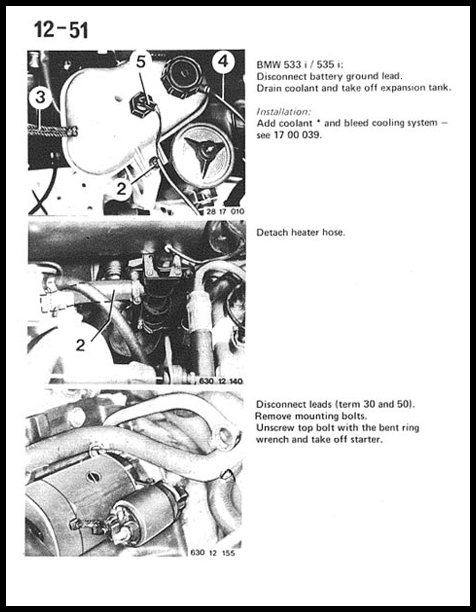
For the 528e / M20
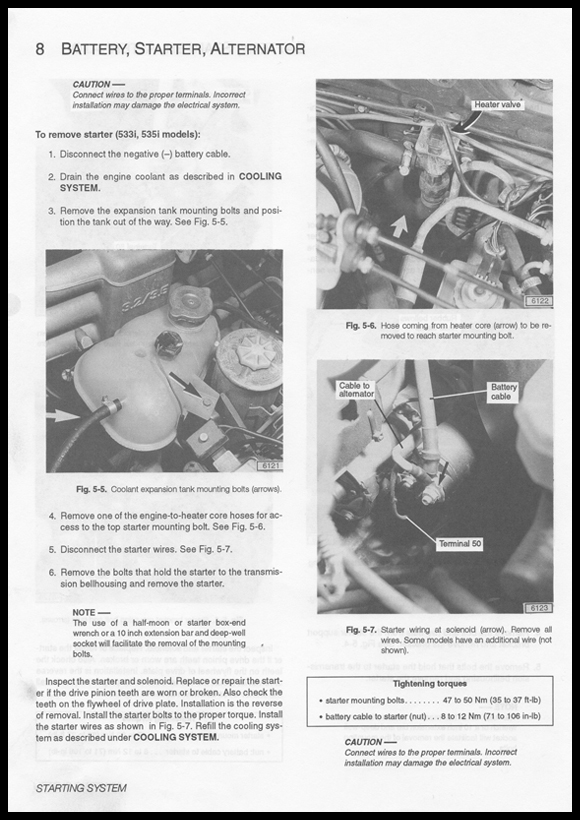
For the 528e / M20
********************************* Method #2 *********************************
This is a very popular way to remove the top bolt. It is very easy. The coolant does not have to be drained. No coolant hose has to be removed. Nothing has to be removed or even loosened.
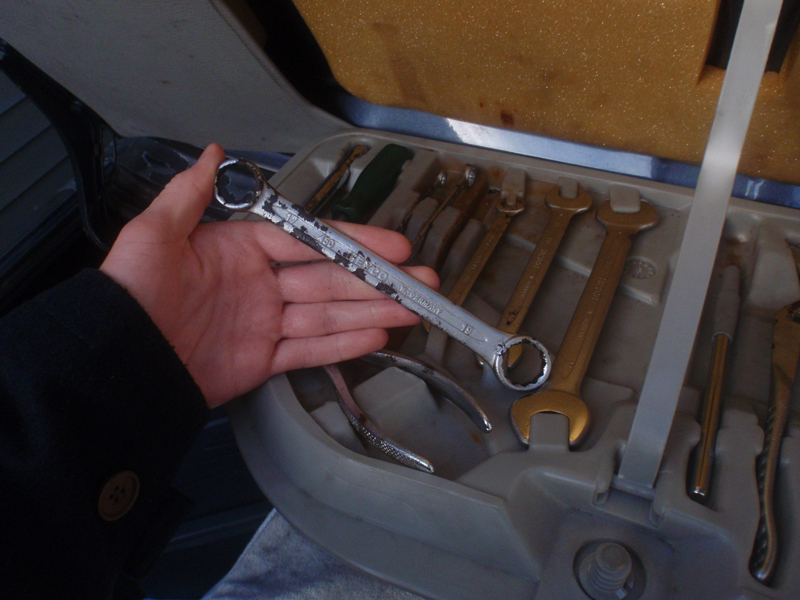
This is that wrench from the trunk tool kit.
The wrench in the trunk tool kit is used because its ends are not bent. I do not know the name of this bend. See the picture below.
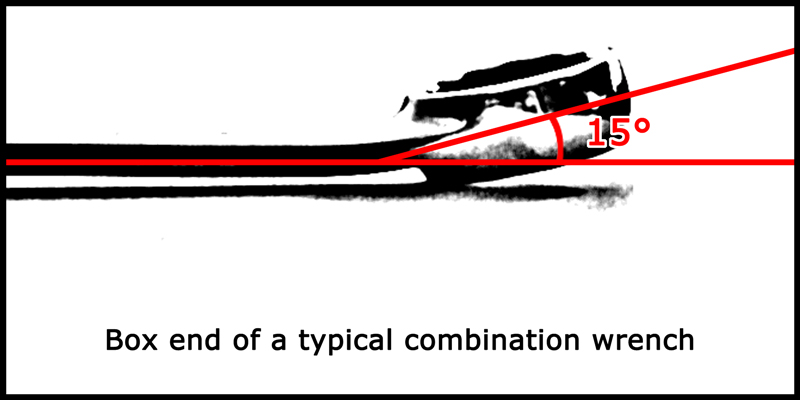
The bend wrenches often have.
The wrench in the trunk tool kit is not bent. The angle is 0. The lack of this bend will line the wrench up between the firewall and intake manifold once it is seated on the bolt.
This method is not perfect. The intake manifold will slightly obscure a portion of the rotation of the wrench when tightening or loosening the bolt. It won't be a problem. Just know it.
Again, nothing needs to be removed or unbolted to make room for the wrench.
I would describe how this method is done but whatever I write would pale in comparison to what "Lee in LA" already wrote on the topic. So here is what he wrote. His full write-up can be found here.
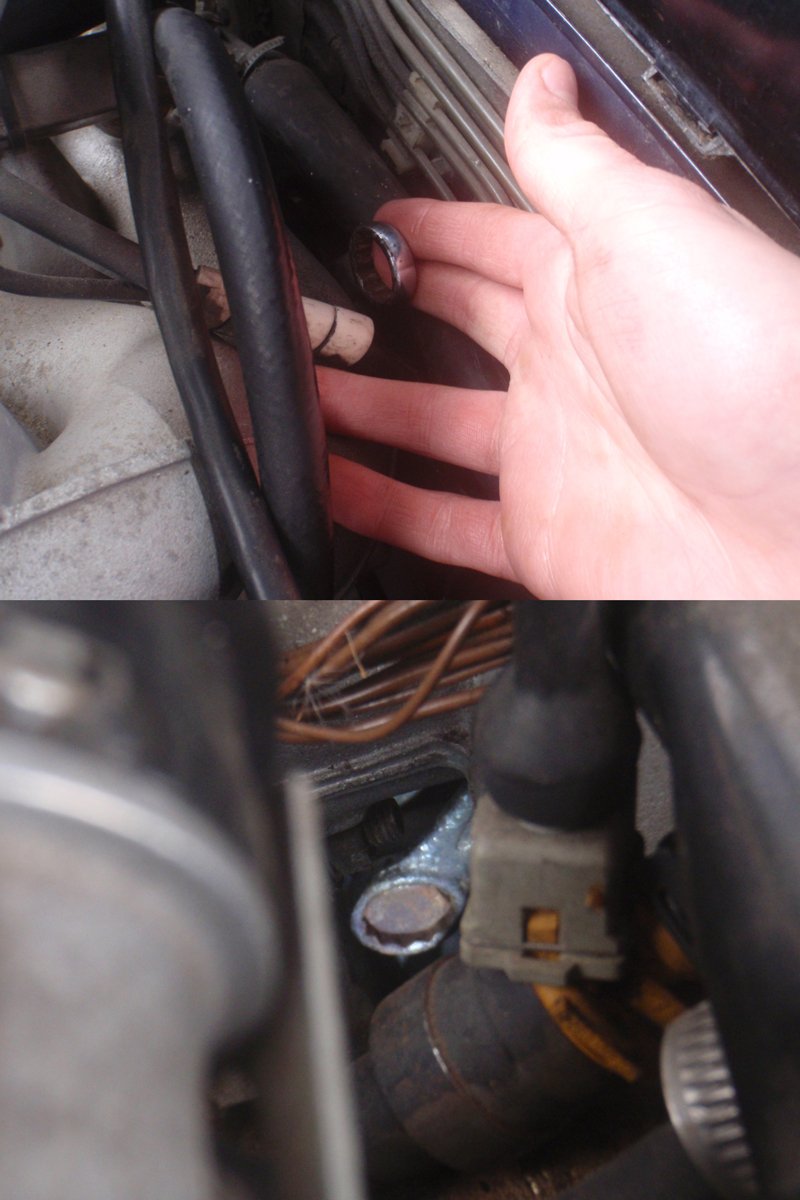
The placement of the wrench.
********************************* Method #3 *********************************
A regular 17 mm combination wrench with the 15 degree bend will also seat on the top bolt. But the end of the wrench that is not on the bolt will hit the firewall and it will be very annoying. I would not recommend using a regular wrench.
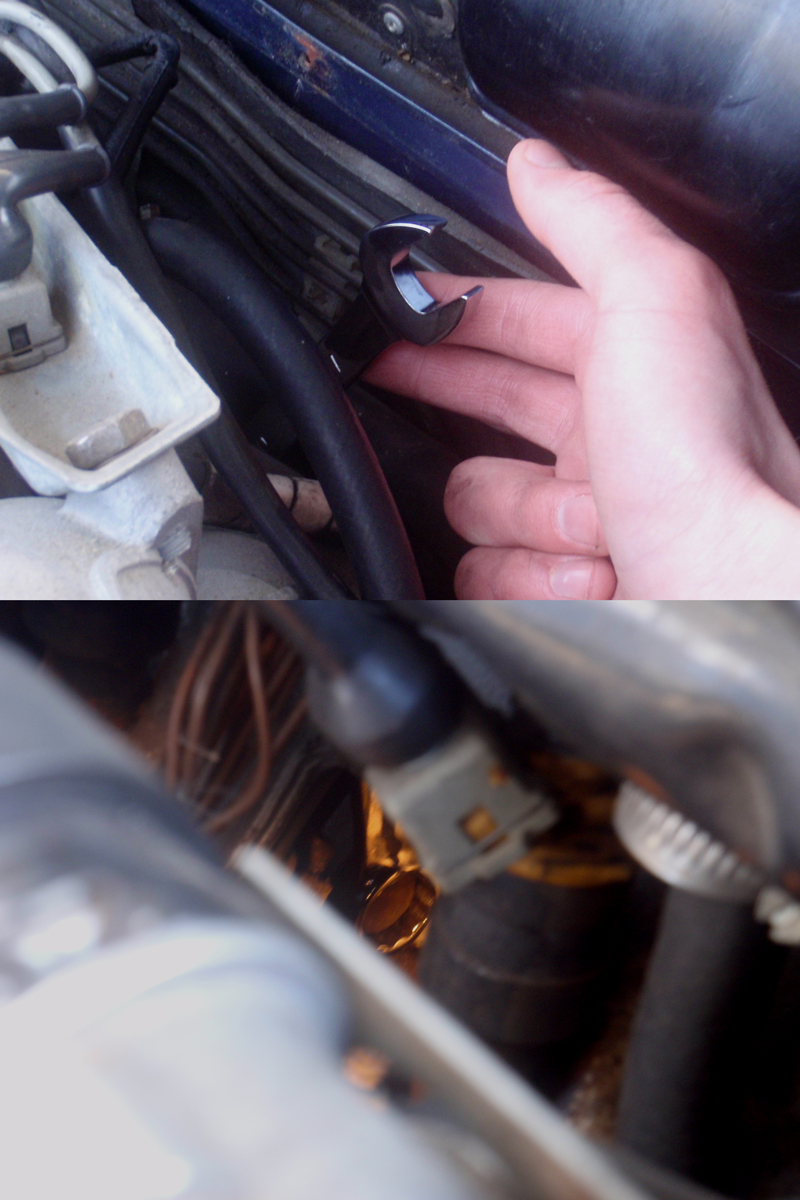
The placement of the wrench.
********************************* Method #4 *********************************
This is quoted from Michael (Skeen) as seen, already in the Tech FAQ, here.
********************************* Method #6 *********************************
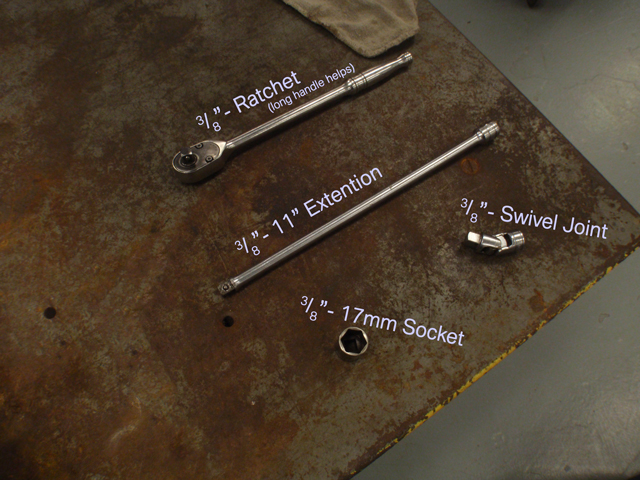
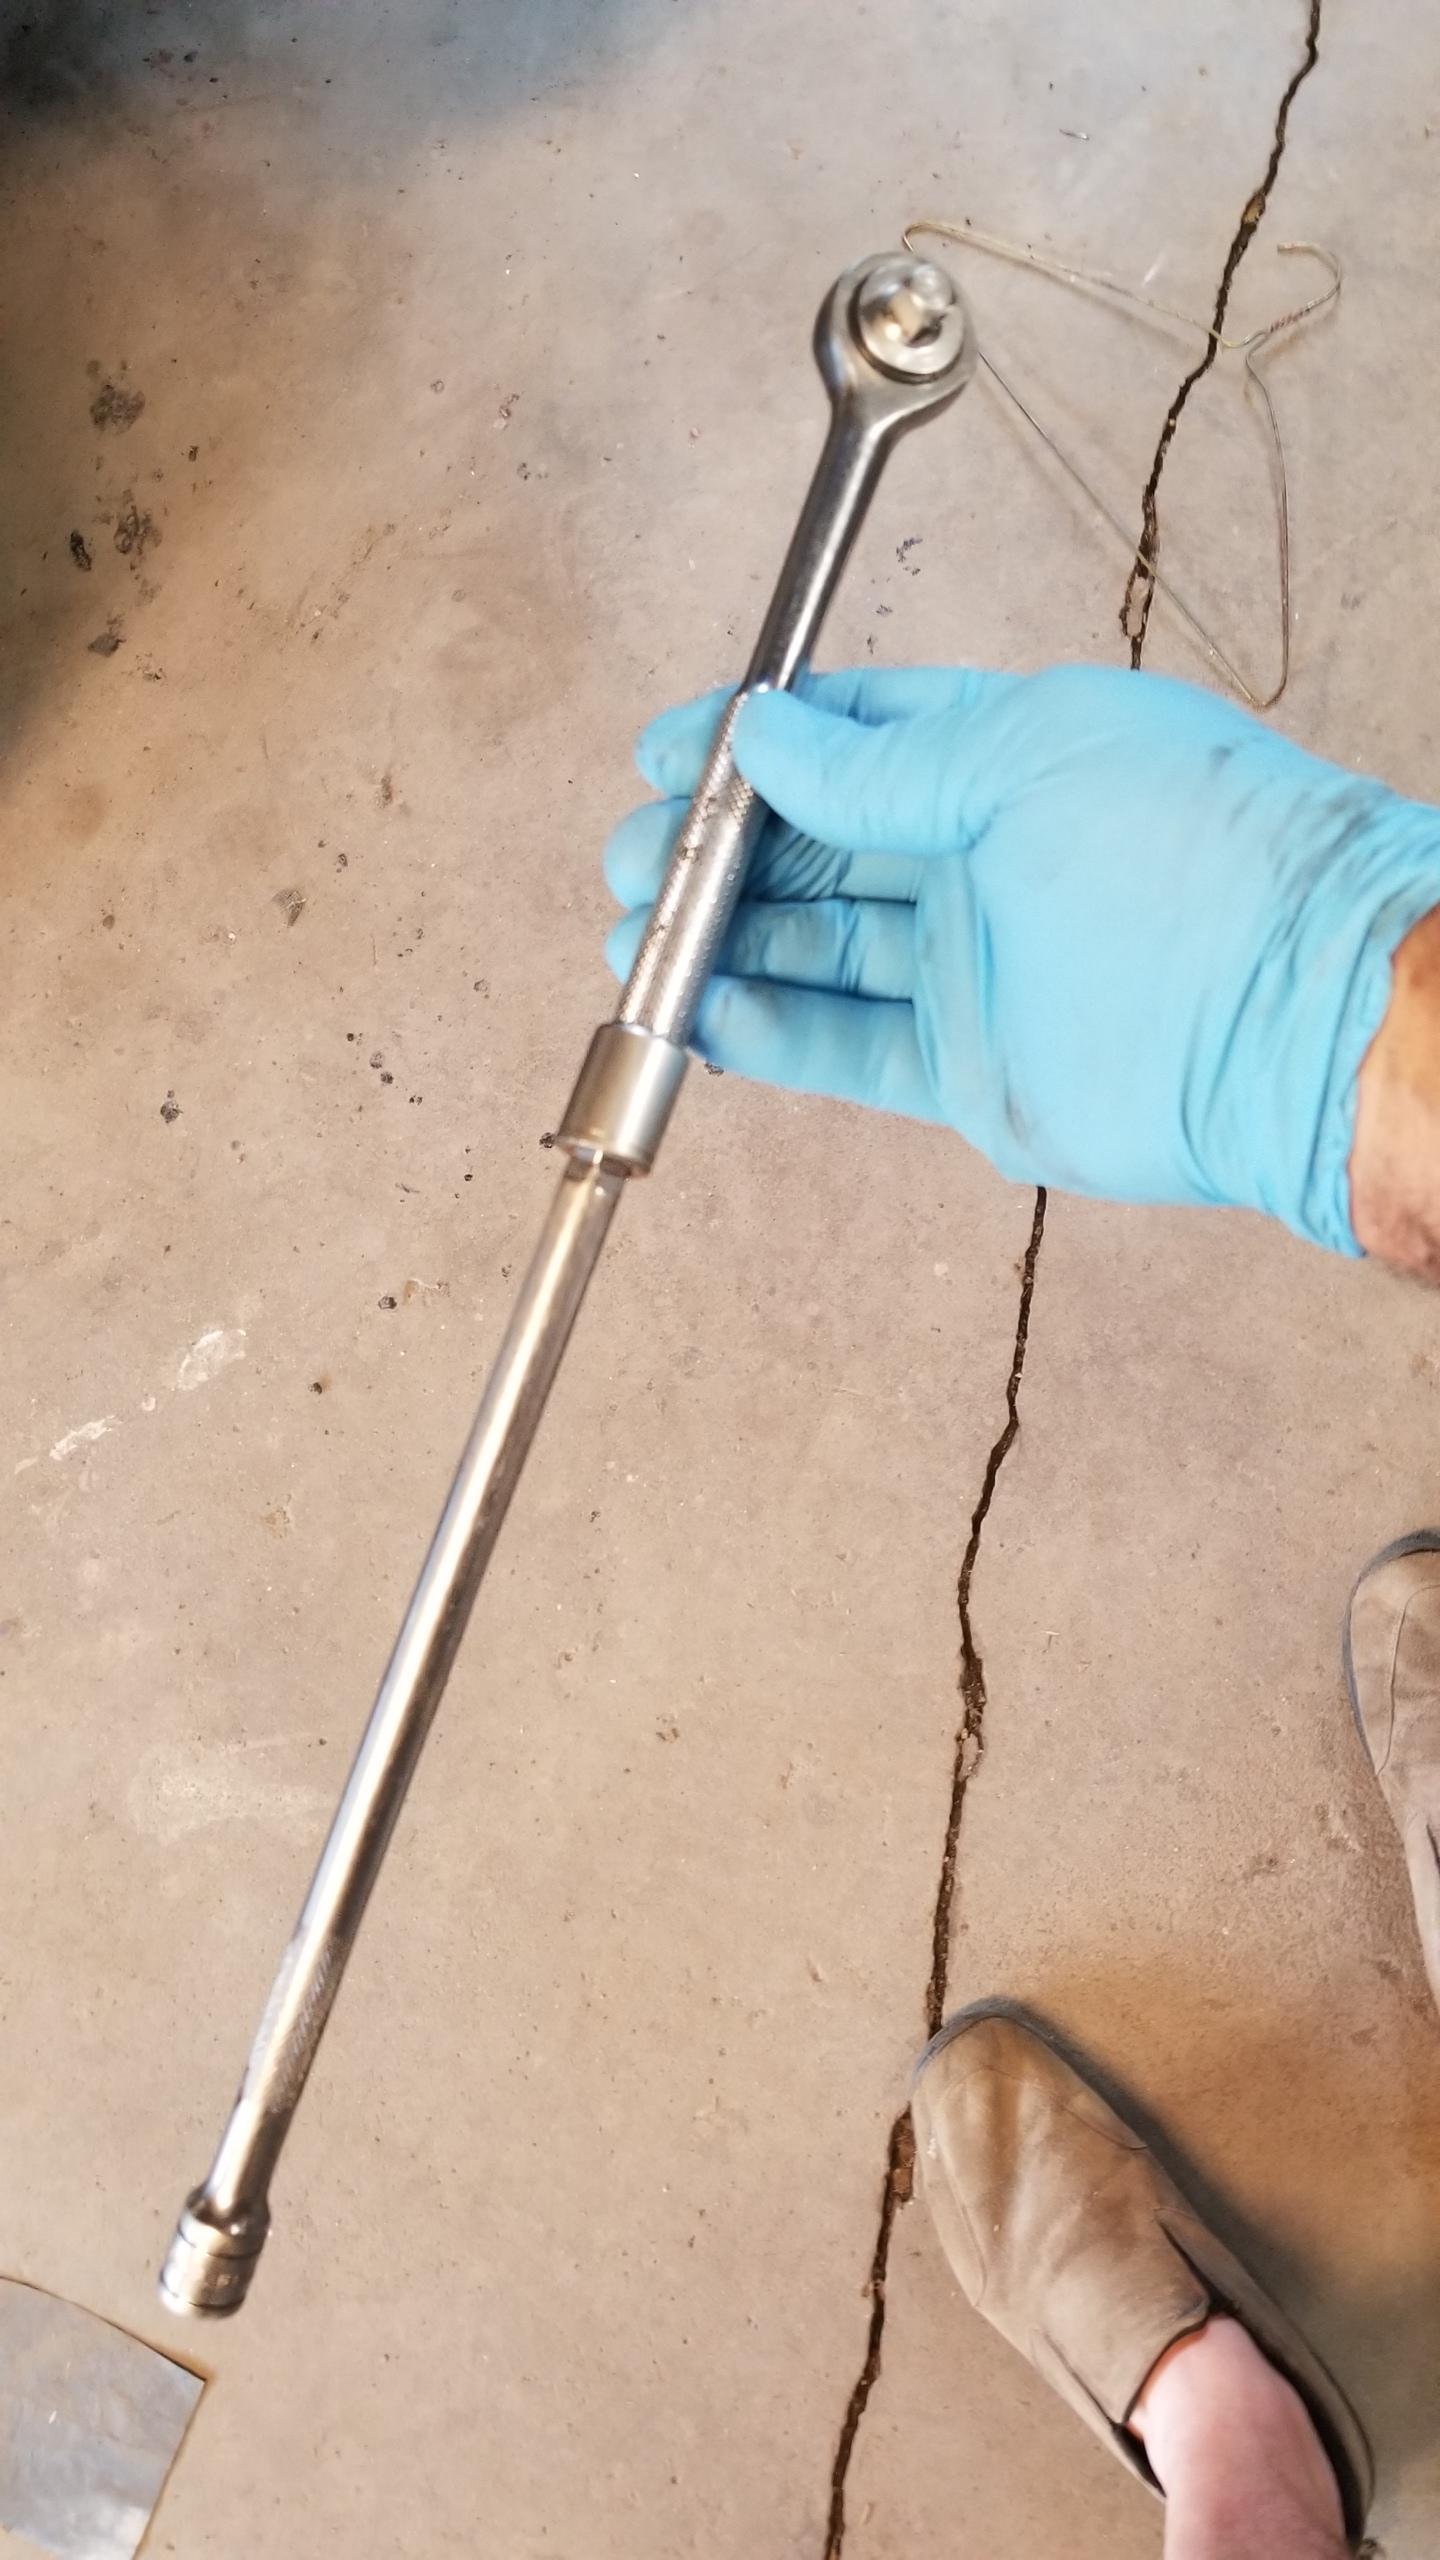
You'll need:
-3/8" ratchet (long handle is better)
-3/8" 11" extension
-Swivel joint (a.k.a. universal joint)
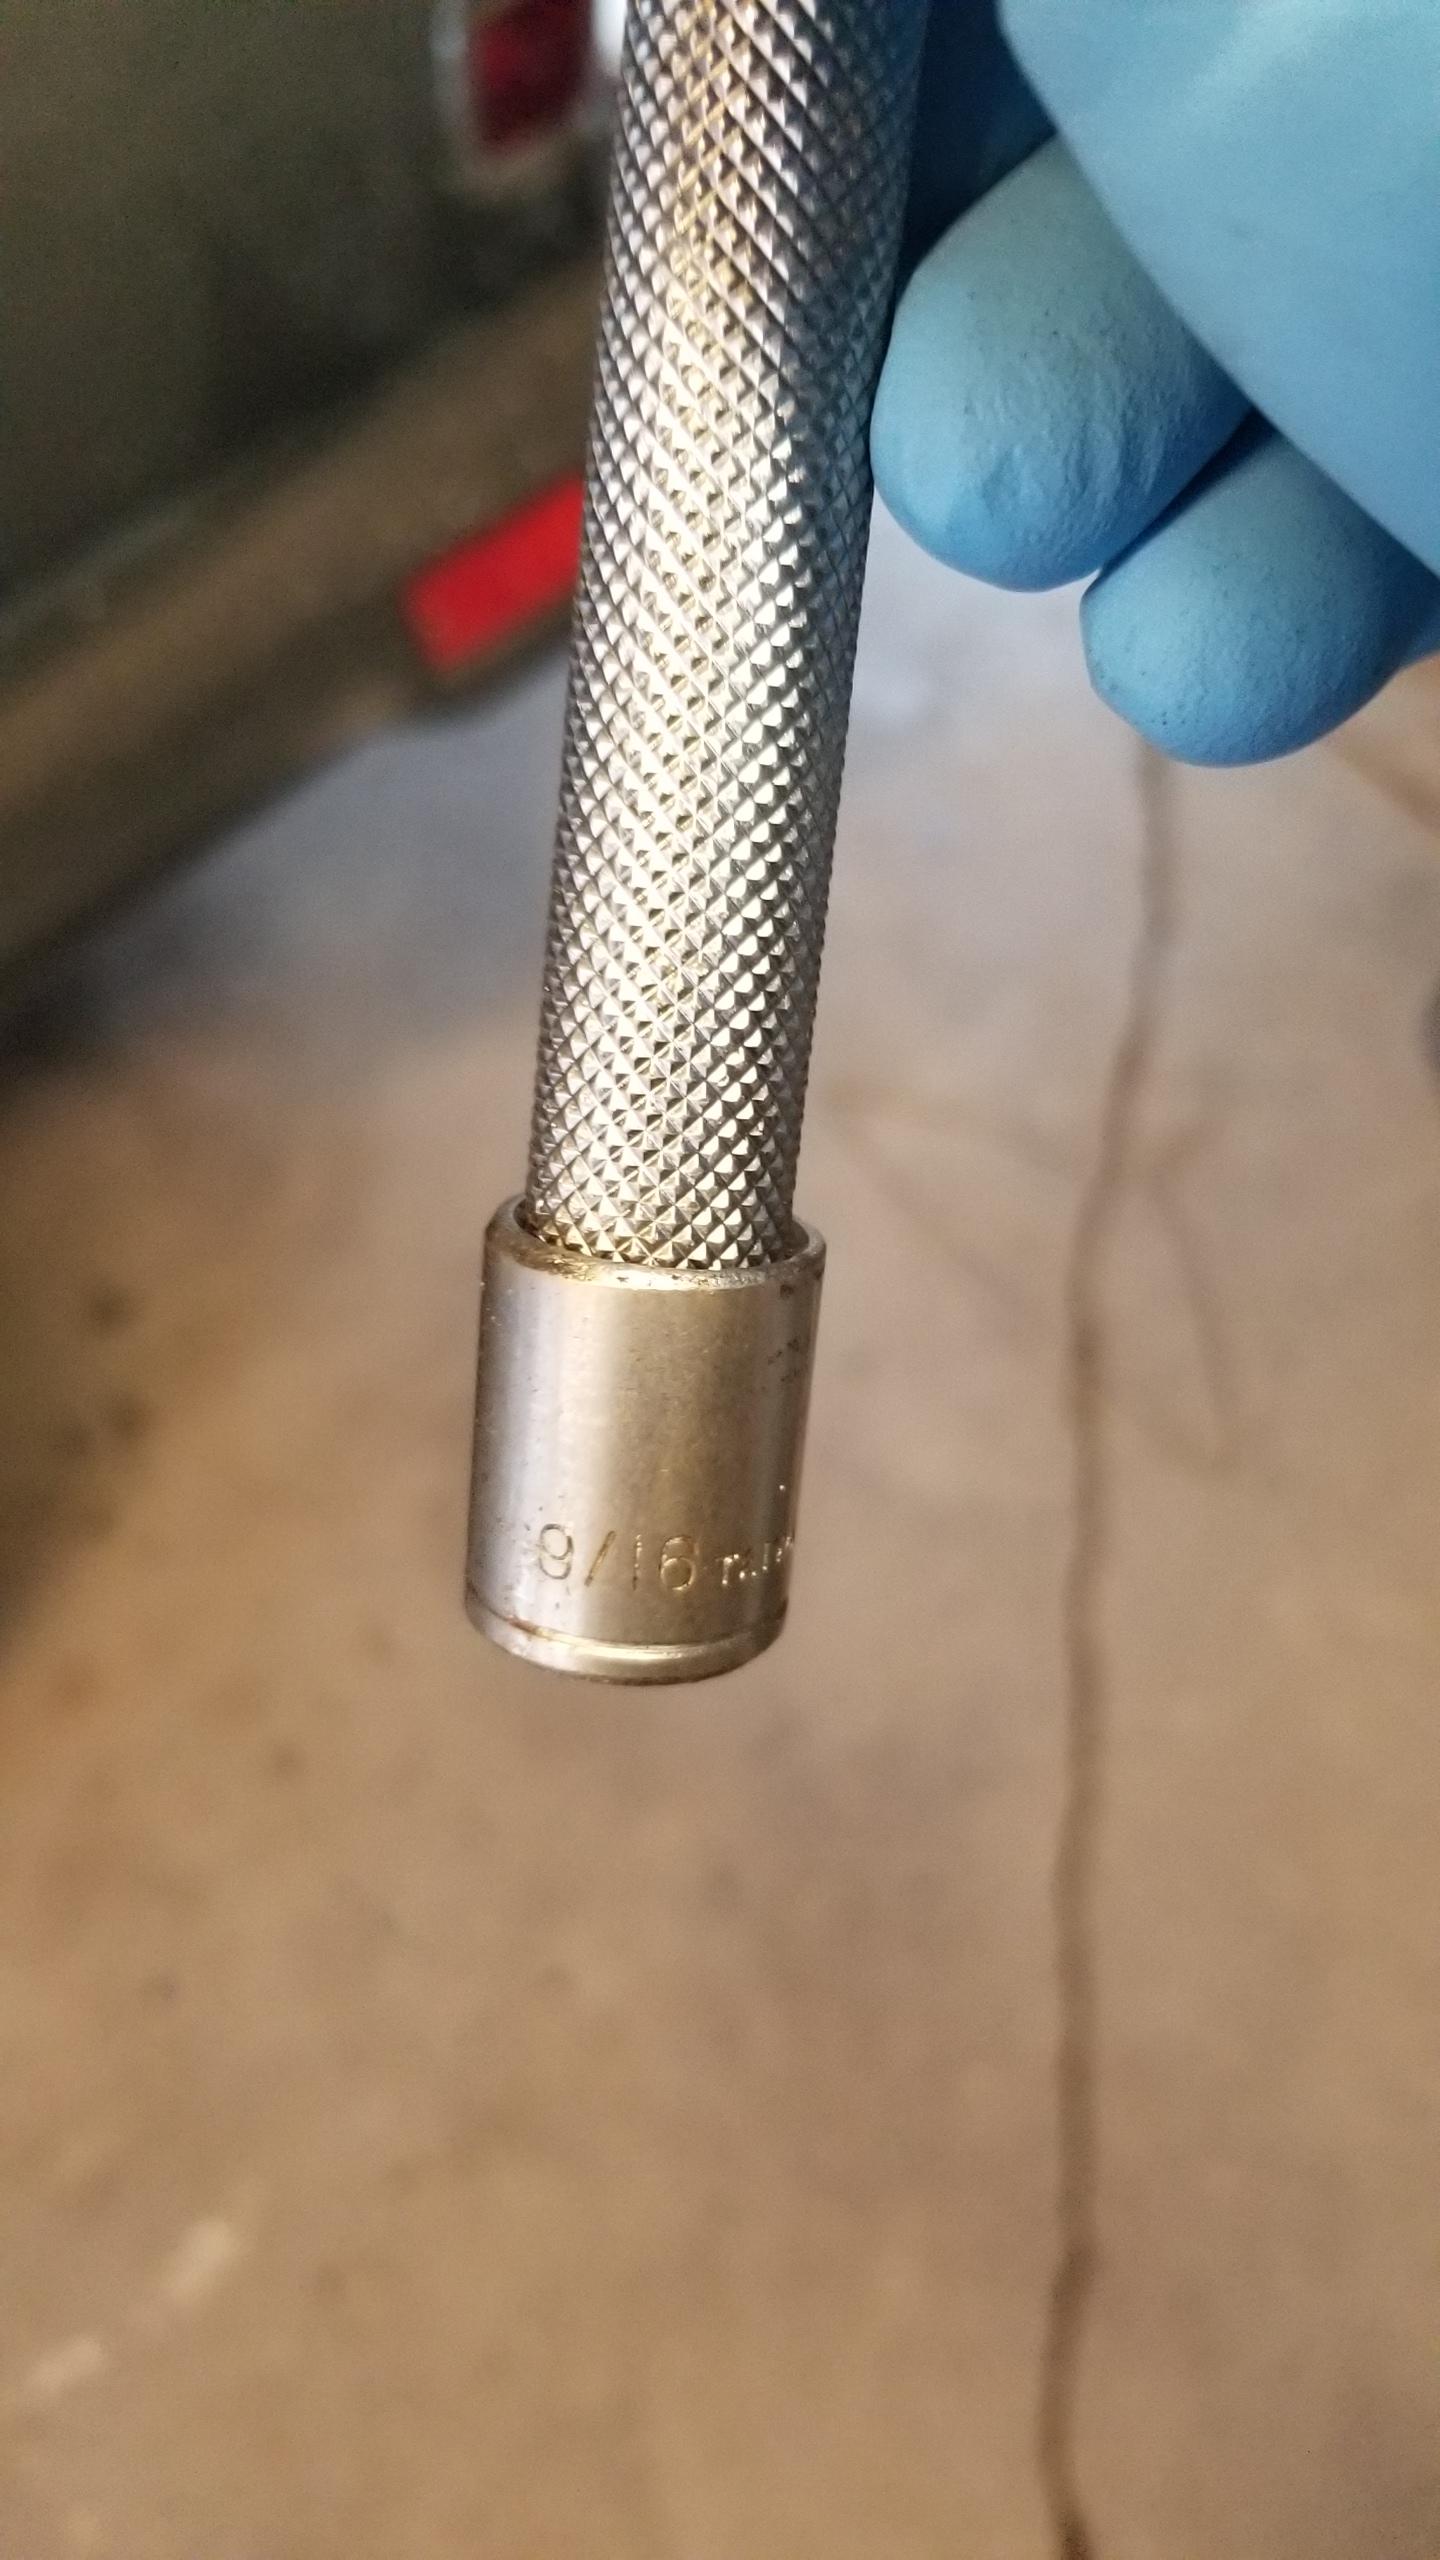
-Standard 3/8" 17mm socket
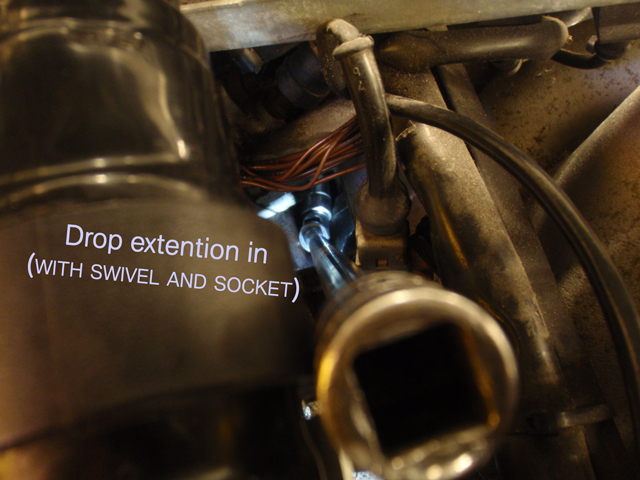
Connect your extension to your swivel joint to your socket and drop it through
the "hole" in the intake manifold that you can see the top bolt from. Get it as
close to the bolt as you can.
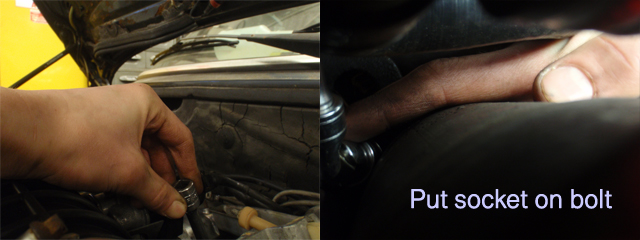
With your right hand, reach behind the starter and find the bolt (it'll feel like it's
way back there) and the socket you just lowered there, put it on the bolt. Twist
the whole getup with your left hand if you need to.
This is the dodgy part... remember the bit about the top bolt interfering with a
regular socket? You won't be able to put the socket on completely. Use your
judgment and make sure it's on good enough not to round the bolt. If you fear
you will round the bolt, STOP. Use a different method to remove the top bolt.
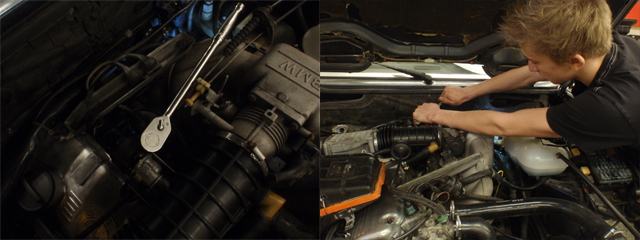
Textbooks will tell you to pull on a wrench when loosening a bolt... but textbooks
can bite it. Push to loosen the bolt. Use your left hand as a fulcrum on the head of
the ratchet and push. Bad words may ensue. Once you broke the bolt loose, spin
it the rest the way off. Whee!
------------------------------------------------------------------------------
------------------------------------------------------------------------------
Removing the bottom bolt...
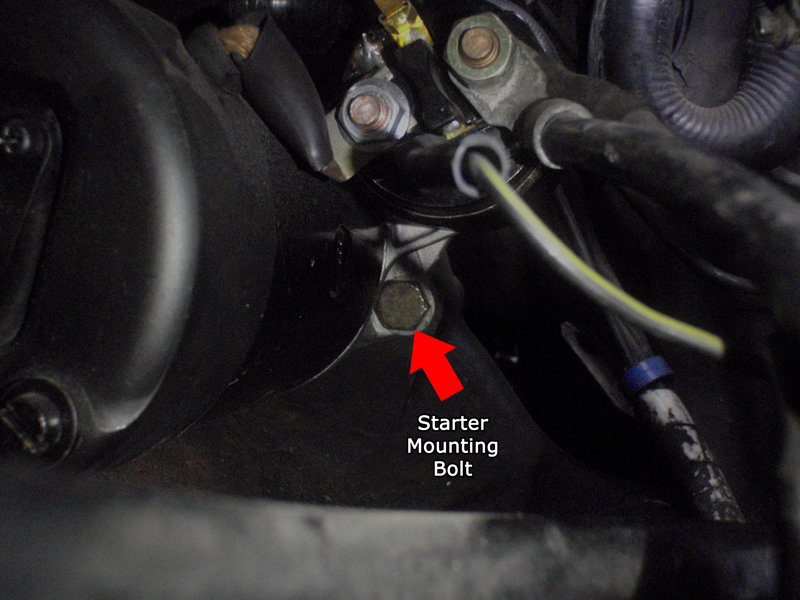
Removing the bottom bolt is as easy as pie. It is hard to see, though. Find it by
the feeling in your hand. Then put a wrench on it. I would recommend using
the trunk tool kit wrench. It is short. It fits well in the small space.
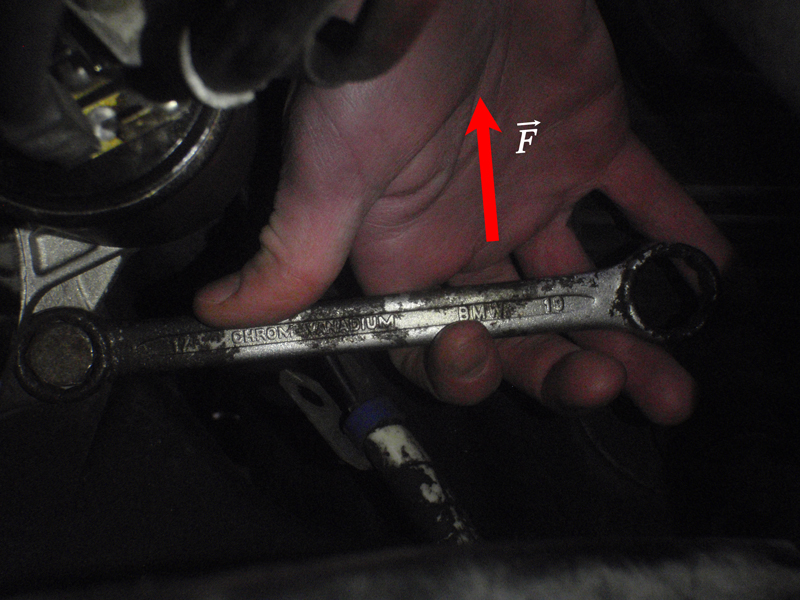
Once it's on, you should find the wrench by the firewall, under the master cylinder.
Pull up and break the bolt loose, then take it the rest of the way off.
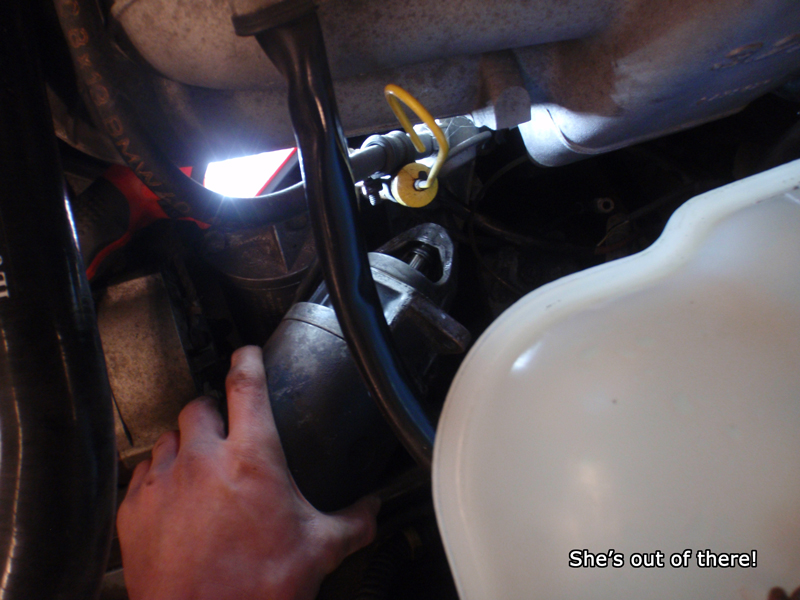
Eureka! You did it, now feel good about yourself.
------------------------------------------------------------------------------
------------------------------------------------------------------------------
Replacing the starter...
Install is reverse of removal.
You may want a friend to help hold the starter when starting the mounting bolts. It can be done alone, though.
It is best to put the bottom bolt in first, as you have more access. Thread both bolts in a few revolutions before tightening them to the specification.
Speaking of the specification, here are the torque specifications courtesy of Bentley Publishers.

------------------------------------------------------------------------------
Here are 4 notable choices for your replacement starter:
*A remanufactured Bosch starter is your best option. It seems some have been known to not function properly right out of the box. Always test a starter before installing it. I have yet to hear bad news about a working remanufactured Bosch starter.
------------------------------------------------------------------------------
The B35 starter upgrade...
The starter used in M30B35 engines is a direct bolt-on upgrade for the M30B34 and S38B35. No modification is needed to fit it to either engine.
In the E28 community, it is know as the "B35 starter". But using the Bosch part number is more specific, as more than one BMW engine has the designation "B35".
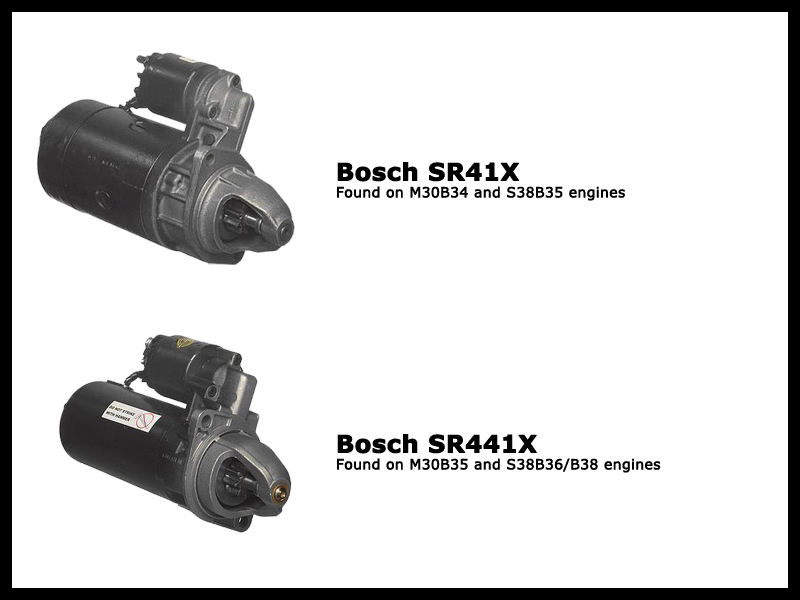
Notice how small the SR441X's casing is compared to the SR41X's
Why is the B35 starter better?
In addition, the B35 starter is lighter. It weighs ~10lbs whereas the B34 starter weights ~16lbs. And, allegedly, the B35 starter has more torque. I cannot prove it, but everyone says it does. Especially your boy "Jays535is".
********************************* Where to get a B35 starter *********************************
You can try get a "known good" used one by posting a wanted ad here, finding one at a junkyard, taking one off a parts car, etc.
For the M20 engine:
The SR43X is the OE starter
The SR443X is the equivalent 'upgrade'
------------------------------------------------------------------------------
------------------------------------------------------------------------------
------------------------------------------------------------------------------
------------------------------------------------------------------------------
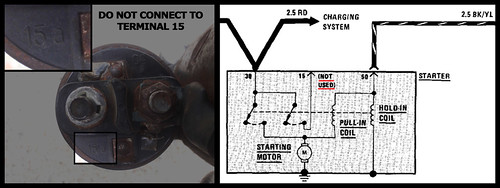
When reconnecting wires to the starter, connect the slide connector
(black&yellow wire) to terminal 50.
There are two male contacts on the starter, the connector will fit both,
you want to connect to terminal 50.
If you put everything back together, turn the ignition to 'START' position and nothing happens,
you may have put the connector on the wrong terminal (thanks for the tip, Jeremy).
Nothing "bad" will happen, but your engine will not crank.
------------------------------------------------------------------------------
------------------------------------------------------------------------------
------------------------------------------------------------------------------
Thank you to Hoffman Estates High School and David Ligman for allowing me to use their facilities.
additional resources:
This is where I found how to see the top bolt in the first place (thank you @Coldswede)
http://www.m535i.org/officers/ra/article.html#motor
Lee's full write-up using the wrench in the trunk tool kit
http://www.mye28.com/viewtopic.php?t=49600
Starter removal tip from FAQ
http://www.mye28.com/viewtopic.php?t=27427
"Rick's No Start Shark Page", this is also already in the FAQ.
Make sure your starter is indeed the problem before you remove it.
http://pwp.att.net/p/s/community.dll?ep ... 160912&ck=
Printer-friendly version of this write-up in .pdf format
[working on it, will post here when done]
If you haven't already, BUY A BENTLEY MANUAL! Do it!
- Currently being revised;
functionality is retained.
>>>>>>>>>>>>>>>>>>>>>>>>>>>>>>>>>>>>>>>>>>>>>>>
Problem: You have tested and come to the conclusion that your starter motor, solenoid, or both have failed.
Cause: These things just happen.
How to fix: Remove and replace the starter.
-----------------------------------------------------------------
Foreword
Read this fire-side, feet up, relaxing in your favorite chair while sipping a good tea the night before you plan to replace your starter. That is my recommendation.
Time to complete obviously depends on the route you decide to take, but plan to spend 3 hours.
------------------------------------------------------------------------------
The write-up
------------------------------------------------------------------------------
First steps...
-Disconnect the battery completely. Disconnect the negative connection at the battery first, then disconnect the positive.
-Once you've found them, spray the starter bolts with a penetrating oil.
------------------------------------------------------------------------------
------------------------------------------------------------------------------
Locating and surveying the starter...

The starter is located at the back of the driver's side of the engine block, under
the intake manifold. It is held to the engine block by (2) 17 mm hexagonal-head
M10X25 bolts.
The starter is an electric Bosch non-gear reduction starter. The solenoid switch
can be removed and replaced separately.

The best place to put a light is mate with the block, at the front of the engine, facing
the starter. This position illuminates both mounting bolts and the electrical
connections on the solenoid.
------------------------------------------------------------------------------
------------------------------------------------------------------------------
Disconnecting wiring...
There are a total of 3 insulated electrical connections made to the starter. They all need to be disconnected. All of them are on the starter solenoid.
1. Start signal - a black and yellow wire leads to this connection. It is terminated with a slide connector. Just pull it off.
2. (+) Battery - a heavy black wire leads from the positive battery terminal to this connection. It is terminated with a ring terminal. A nut holds it to a post on the solenoid, it can be removed with a 13mm wrench or deep socket.
3. (+) Alternator - a red wire leads from the alternator output wire to this connection. It is terminated by a ring terminal to the same threaded post as the battery cable is. Both are removed by removing the same nut.

- Note-
If you wish to download the electrical troubleshooting manual for your model and year BMW, go here.
------------------------------------------------------------------------------
Removing the infamous top bolt...
Removing the top bolt is made out to be much worse than it actually is.
- Note-
You can remove whichever bolt you want first.
The top bolt is harder to take off, so it is best to start there.
Why the top bolt is so infamous...
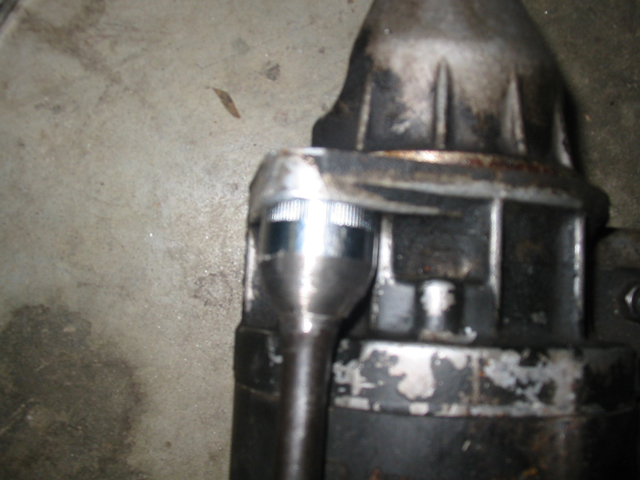
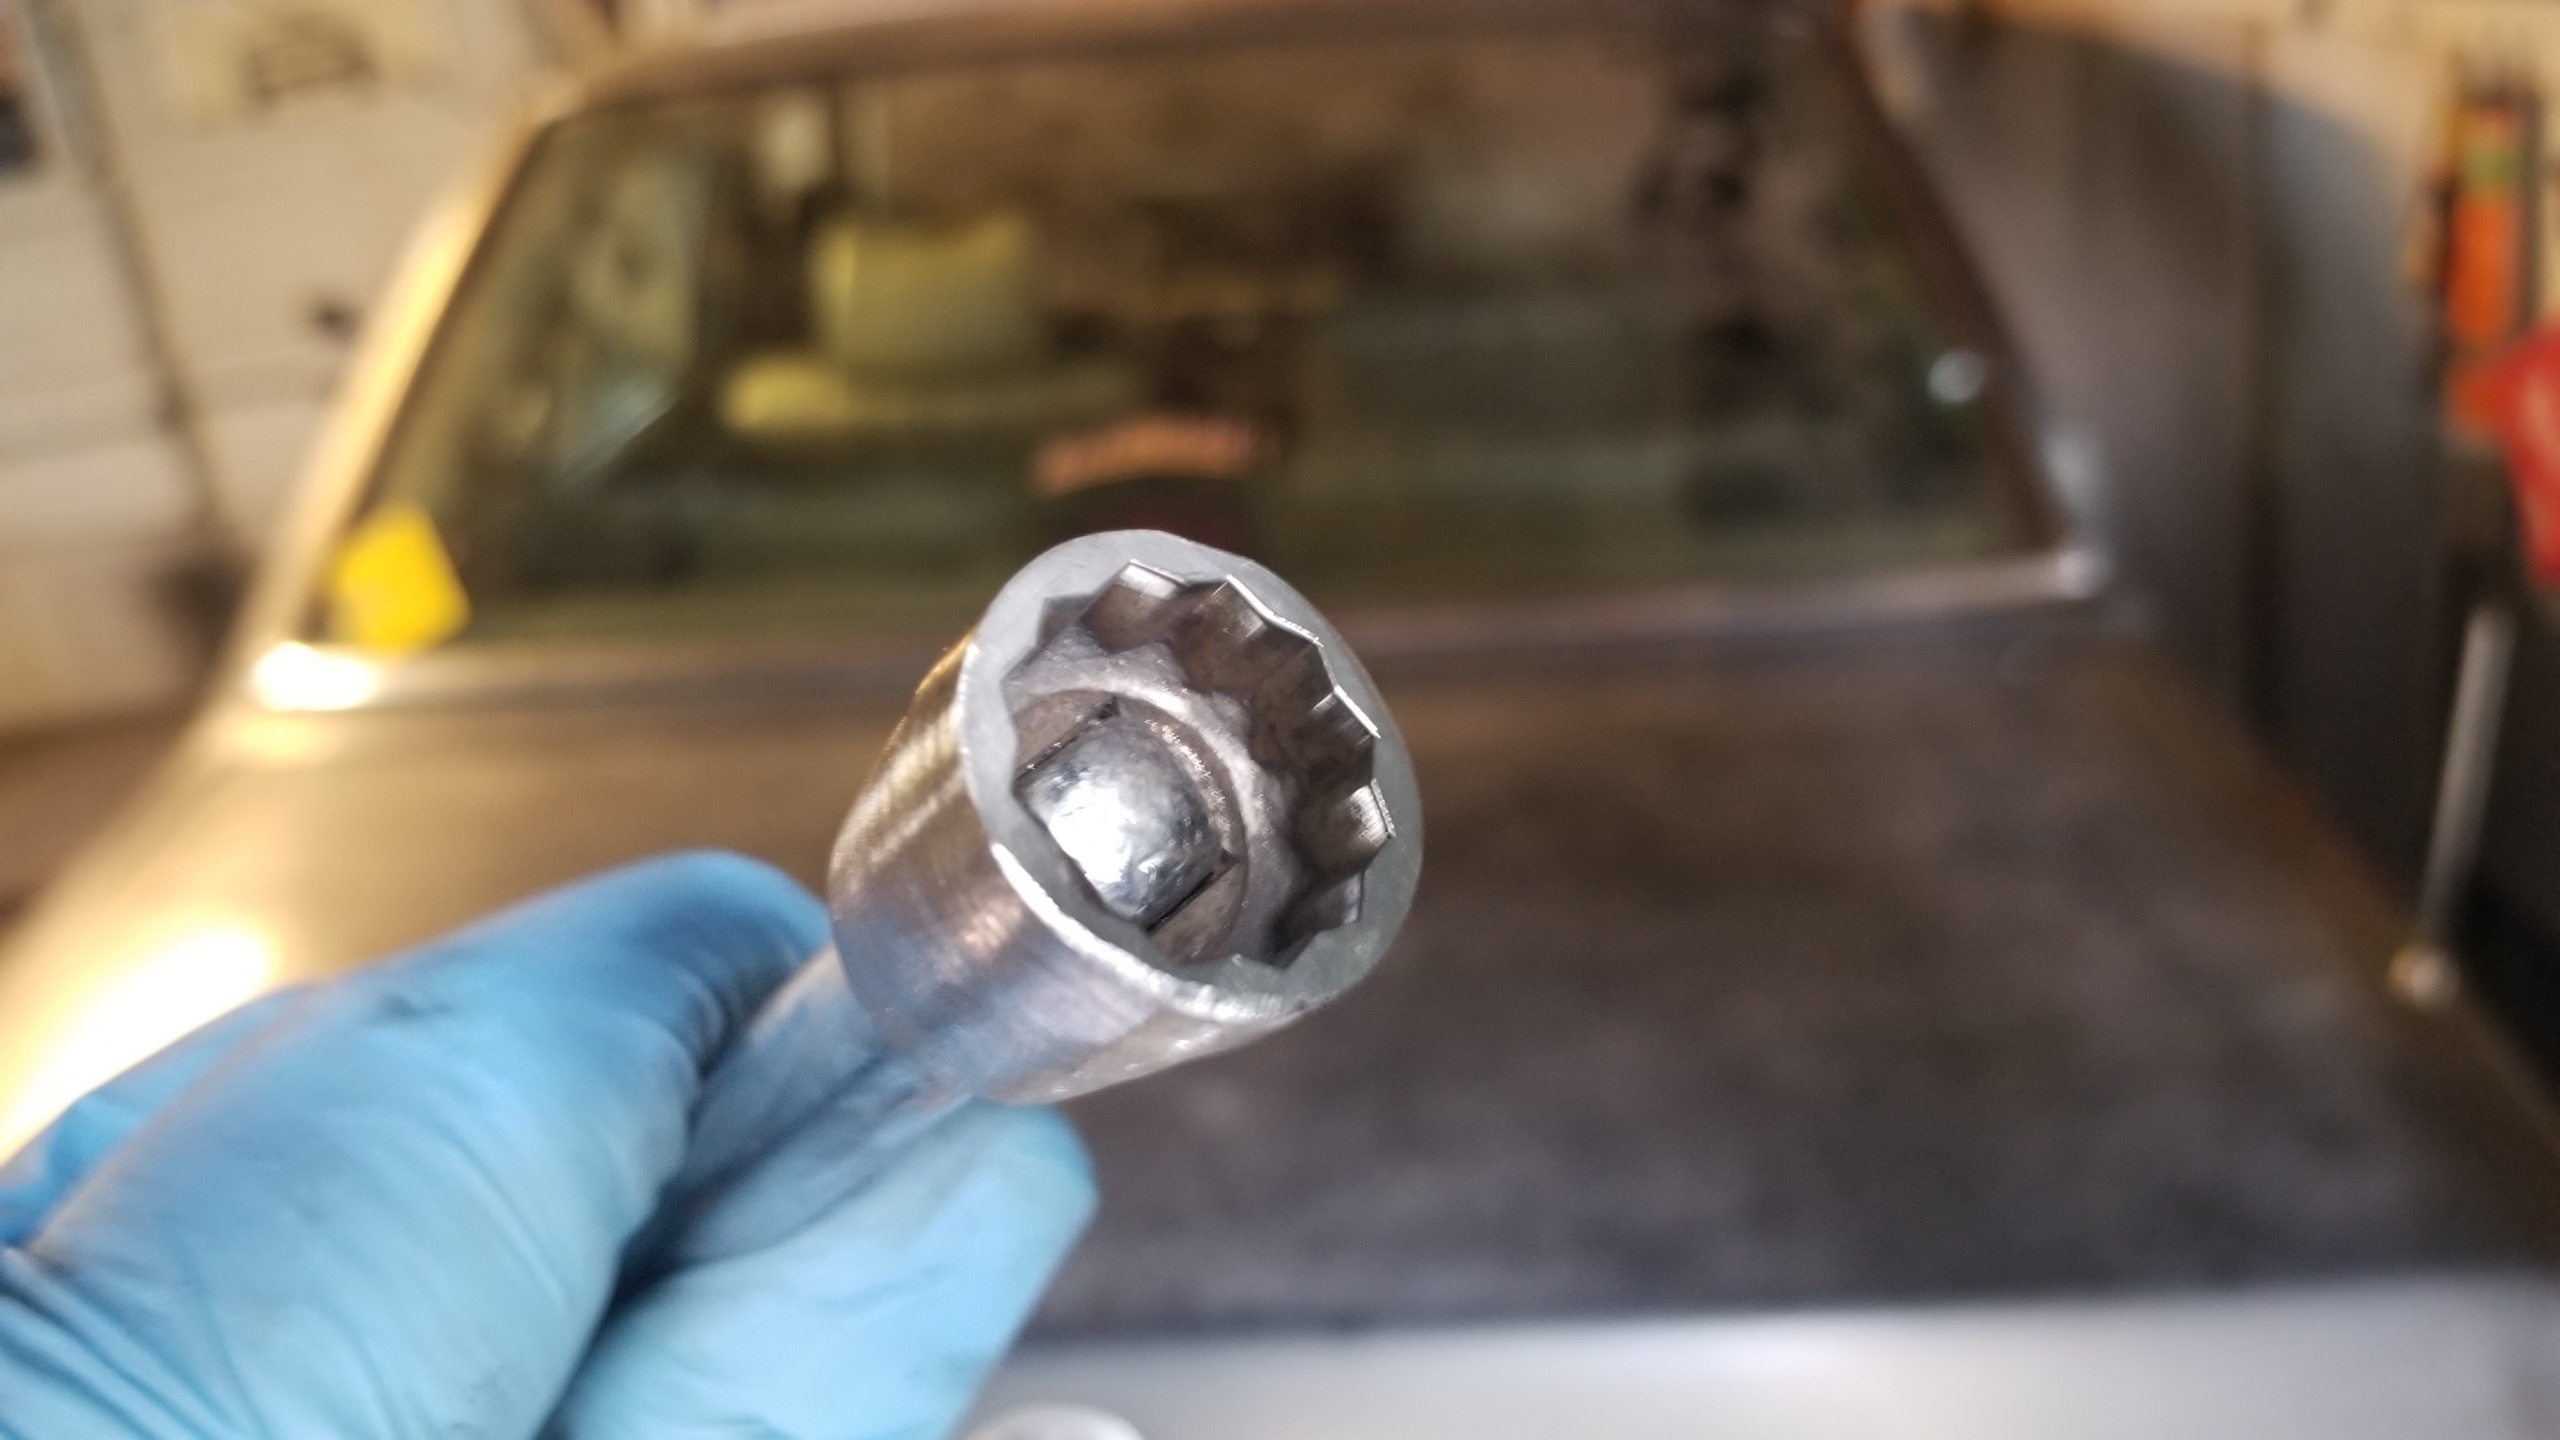
It is because the housing of the Bosch SR41X starter will interfere with a
standard socket attempting to mate with the mounting bolt known as the
"top bolt". See the picture below.
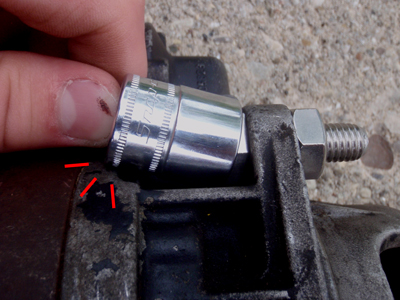
As you see, the housing does not allow the socket to seat completely on
the head of the bolt.
This bolt is intended to be removed using a half-moon wrench
(sometimes "obstruction" or "bent" wrench). But there are other means.
We cover 6 methods here.
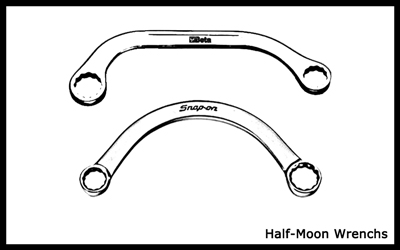
These are examples of what half-moon wrenches look like.
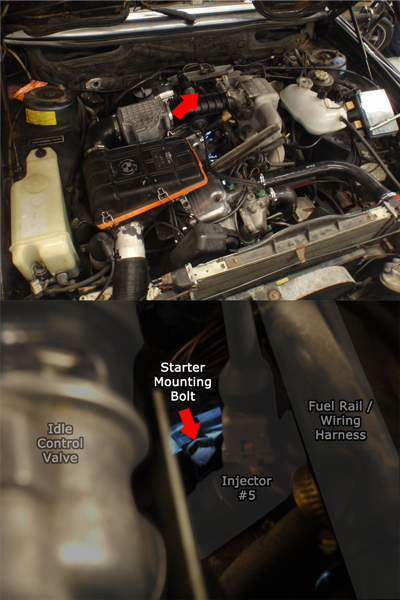
Seeing the top mounting bolt
To see the bolt, position your head above the rubber intake boot that joins
the air flow meter and throttle. Look through the gap in the intake manifold
between intake port 5 and 6. You should see it.
Here are the 6 methods we will be covering for removing the upper mounting bolt. Use whichever you feel most comfortable with.
********************************* Method #1 *********************************
- The manuals' way
Below are the pages from the BMW repair manual and Bentley service manual with the pertinent information.
- BMW Factory Repair Manual

For the 528e / M20
- Bentley Service Manual

For the 528e / M20
********************************* Method #2 *********************************
- Using the wrench in the trunk tool kit
This is a very popular way to remove the top bolt. It is very easy. The coolant does not have to be drained. No coolant hose has to be removed. Nothing has to be removed or even loosened.

This is that wrench from the trunk tool kit.
The wrench in the trunk tool kit is used because its ends are not bent. I do not know the name of this bend. See the picture below.

The bend wrenches often have.
The wrench in the trunk tool kit is not bent. The angle is 0. The lack of this bend will line the wrench up between the firewall and intake manifold once it is seated on the bolt.
This method is not perfect. The intake manifold will slightly obscure a portion of the rotation of the wrench when tightening or loosening the bolt. It won't be a problem. Just know it.
Again, nothing needs to be removed or unbolted to make room for the wrench.
I would describe how this method is done but whatever I write would pale in comparison to what "Lee in LA" already wrote on the topic. So here is what he wrote. His full write-up can be found here.
- " The upper mounting bolt is difficult to reach. I first located
it by reaching down and back from the opening in front of
the coolant reservoir. I got my hand on the starter motor,
and was able to locate the bolt by feel. You have to slide
your left hand back between the starter and the coolant
hose that runs on top of it and then feel around until you
locate the bolt head. Once you locate it you can use the
17/19mm box end wrench from the trunk tool kit, and feed
it down from directly above with your right hand. Here's
where you need an extra set of hands again. I had my father
reach over from the passenger side and put a little tension
on the wrench. While he was holding it in place, I got our
trusty cheater bar ( a 20 inch piece of 1 1/4 inch galvanized
pipe) and a hammer. I placed the end of the cheater bar
against the 19mm end of the wrench at a 90 degree angle
(wrench is vertical and pipe is horizontal) so that I could get
a good blow in the correct direction on the end of the pipe
with the hammer. Once we broke the upper bolt loose it
was just a matter of slowly backing the bolt out using the
wrench. You can only turn it about 1/8th of a turn each
time, until you can get it out by hand. "
- " The upper mounting bolt is difficult to reach. I first located

The placement of the wrench.
********************************* Method #3 *********************************
- Using a regular wrench
A regular 17 mm combination wrench with the 15 degree bend will also seat on the top bolt. But the end of the wrench that is not on the bolt will hit the firewall and it will be very annoying. I would not recommend using a regular wrench.

The placement of the wrench.
********************************* Method #4 *********************************
- Making your own tool
This is quoted from Michael (Skeen) as seen, already in the Tech FAQ, here.
********************************* Method #5 *********************************Skeen wrote:Problem: Starter went bad! How do I get the freakin' thing off?!
Cause: That stinkin' top bolt!
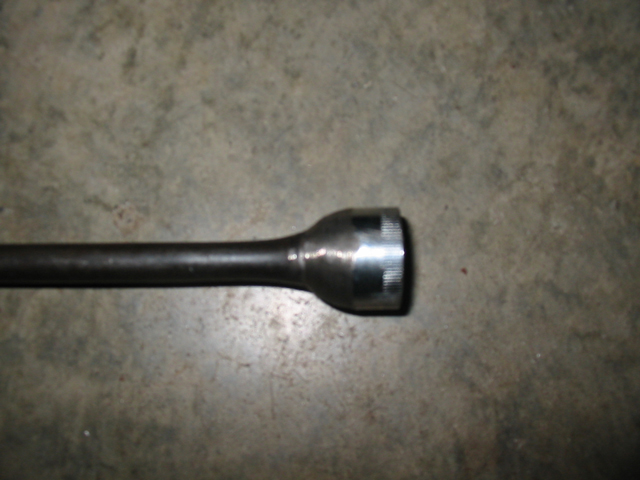
How to fix: Take a 3/8" drive 17mm shallow socket and streamline it. Shorten up the hex side of it to just the depth of the bolt head (~.25") and then grind off some of the shoulder on the ratchet side. Use a small diameter extension that's at least as long as the starter (if it's too fat, you'll have some clearance problems).
Your tool should look something like this:
When you're using this tool to take a starter off, you'll want to take the bottom bolt out first because when the top one starts coming out it will trap your tool between the bolt and the starter body if you can't pull the starter out of the block.
Installation: I suggest using a bit of Anti-Seize goop on the threads of the bolts you put on so it'll be easier if you have to take the starter off in the future.
-Michael
- Removing the intake manifold
********************************* Method #6 *********************************
- A very bad method
This method is stupid. You do not need to resort to this. But for giggles, here's how it's done.

You have been warned.

You'll need:
-3/8" ratchet (long handle is better)
-3/8" 11" extension
-Swivel joint (a.k.a. universal joint)
-Standard 3/8" 17mm socket

Connect your extension to your swivel joint to your socket and drop it through
the "hole" in the intake manifold that you can see the top bolt from. Get it as
close to the bolt as you can.

With your right hand, reach behind the starter and find the bolt (it'll feel like it's
way back there) and the socket you just lowered there, put it on the bolt. Twist
the whole getup with your left hand if you need to.
This is the dodgy part... remember the bit about the top bolt interfering with a
regular socket? You won't be able to put the socket on completely. Use your
judgment and make sure it's on good enough not to round the bolt. If you fear
you will round the bolt, STOP. Use a different method to remove the top bolt.

Textbooks will tell you to pull on a wrench when loosening a bolt... but textbooks
can bite it. Push to loosen the bolt. Use your left hand as a fulcrum on the head of
the ratchet and push. Bad words may ensue. Once you broke the bolt loose, spin
it the rest the way off. Whee!
------------------------------------------------------------------------------
------------------------------------------------------------------------------
Removing the bottom bolt...

Removing the bottom bolt is as easy as pie. It is hard to see, though. Find it by
the feeling in your hand. Then put a wrench on it. I would recommend using
the trunk tool kit wrench. It is short. It fits well in the small space.

Once it's on, you should find the wrench by the firewall, under the master cylinder.
Pull up and break the bolt loose, then take it the rest of the way off.
- Note-
There is nothing holding the starter in place; its weight sits on the one bolt
that is still in. Hold the starter up with one hand to relieve stress on the bolt.

Eureka! You did it, now feel good about yourself.
------------------------------------------------------------------------------
------------------------------------------------------------------------------
Replacing the starter...
- Note-
Before installing a replacement starter, test the old one to verify it is bad.
If the old starter tests good... that indicates it was and/or is not the issue.
Install is reverse of removal.
You may want a friend to help hold the starter when starting the mounting bolts. It can be done alone, though.
It is best to put the bottom bolt in first, as you have more access. Thread both bolts in a few revolutions before tightening them to the specification.
Speaking of the specification, here are the torque specifications courtesy of Bentley Publishers.

------------------------------------------------------------------------------
Here are 4 notable choices for your replacement starter:
- Find a known-good used one.
- I would not recommend this.
- Here is a respected member's take on rebuilds.
Buy a remanufactured onea wrote:a rebuild is always a crap shoot.- Bosch has discontinued this model starter. But they do still refurbish them
and sell the remanufactured units. Please only buy a starter remanufactured
by Bosch. Any other and you are better off using a goat for starting your car.
- Read the next section about this upgrade.
*A remanufactured Bosch starter is your best option. It seems some have been known to not function properly right out of the box. Always test a starter before installing it. I have yet to hear bad news about a working remanufactured Bosch starter.
------------------------------------------------------------------------------
The B35 starter upgrade...
The starter used in M30B35 engines is a direct bolt-on upgrade for the M30B34 and S38B35. No modification is needed to fit it to either engine.
In the E28 community, it is know as the "B35 starter". But using the Bosch part number is more specific, as more than one BMW engine has the designation "B35".

Notice how small the SR441X's casing is compared to the SR41X's
Why is the B35 starter better?
As ahab mentioned, a huge upside to installing the B35 starter is its casing's smaller diameter. It allows you to install/remove the upper mounting bolt using a 17 mm socket, extension, and ratchet.ahab wrote:It is well worth the added effort to source and install a B35 starter whenever you have your B34 out. There are a few reasons it's superior, smaller size resulting in ease of installation/removal being the relevant one here.
In addition, the B35 starter is lighter. It weighs ~10lbs whereas the B34 starter weights ~16lbs. And, allegedly, the B35 starter has more torque. I cannot prove it, but everyone says it does. Especially your boy "Jays535is".
Jays535is wrote:I would go with a B35 starter if you can, more torque, lighter...
Jays535is wrote:...easier to install & remove, & supposedly have more torque.
Jays535is wrote:...B35 unit. It's smaller, lighter and supposedly has more torque.
Jays535is wrote:...Newer B35 starter, more torque and lighter ...
********************************* Where to get a B35 starter *********************************
You can try get a "known good" used one by posting a wanted ad here, finding one at a junkyard, taking one off a parts car, etc.
- The B35 starter was found originally installed on these BMWs:
- E24 635CSi
E32 735i
E32 735iL
E34 535i
E34 M5 3.6
- E24 635CSi
- The Bosch part number for this starter is SR441X
The BMW part number for this starter is 12411720664.
For the M20 engine:
The SR43X is the OE starter
The SR443X is the equivalent 'upgrade'
------------------------------------------------------------------------------
------------------------------------------------------------------------------ahab wrote:If you must reinstall the B34 starter, you can use a "collar screw" (p/n 31121125714) from the support bar that mounts behind the subframe on many BMW models and stiffens the frame rails. It's the right size bolt and has a 15mm hex head which allows you to use a smaller socket in the confined space.
------------------------------------------------------------------------------
2nd.Skeen wrote:I suggest using a bit of Anti-Seize goop on the threads of the bolts you put on so it'll be easier if you have to take the starter off in the future.
------------------------------------------------------------------------------
------------------------------------------------------------------------------
When reconnecting wires to the starter, connect the slide connector
(black&yellow wire) to terminal 50.
There are two male contacts on the starter, the connector will fit both,
you want to connect to terminal 50.
If you put everything back together, turn the ignition to 'START' position and nothing happens,
you may have put the connector on the wrong terminal (thanks for the tip, Jeremy).
Nothing "bad" will happen, but your engine will not crank.

------------------------------------------------------------------------------
------------------------------------------------------------------------------
------------------------------------------------------------------------------
Thank you to Hoffman Estates High School and David Ligman for allowing me to use their facilities.
additional resources:
This is where I found how to see the top bolt in the first place (thank you @Coldswede)
http://www.m535i.org/officers/ra/article.html#motor
Lee's full write-up using the wrench in the trunk tool kit
http://www.mye28.com/viewtopic.php?t=49600
Starter removal tip from FAQ
http://www.mye28.com/viewtopic.php?t=27427
"Rick's No Start Shark Page", this is also already in the FAQ.
Make sure your starter is indeed the problem before you remove it.
http://pwp.att.net/p/s/community.dll?ep ... 160912&ck=
Printer-friendly version of this write-up in .pdf format
[working on it, will post here when done]
If you haven't already, BUY A BENTLEY MANUAL! Do it!
